Technical documentation for ePRINTit SaaS
This documentation is for developer to understand the flow behind how the ePRINTit SaaS works in ScanEZ.
Get started
To run the ePRINTit SaaS in ScanEZ, you need to activate station from https://{domain}.eprintitsaas.{topdomain}. There are two types of activation available in ScanEZ: ePRINTit public license & ePRINTit SaaS.
For ePRINTit Public license, there is only one screen available: Release code. This release code is generated by portal: https://eprintit.eprintit.com/portal/#/ppl/upload/{id}
The first action ScanEZ performs after activating the license is configuring the application.Once the activation process is success for the ePTINTit license, then the application will initialize and MQTT thread for kiosk token.
Here is how it is initialized:
_ = PPLService.Instance.InitializeAndStartConnectionAsync();
Separating IoT Thread for Efficient Application Restart
Problem:
The original IoT thread was integrated into the MainWindow.xaml.cs file, which could potentially impact the application's startup process and cause delays or unexpected behavior during restarts.
Solution:
To address this issue, we've decoupled the IoT thread from the main window and implemented a reusable thread process. This ensures that the MQTT thread for the kiosk token's IoT operates independently, regardless of the application's lifecycle.
Benefits of this approach:
Improved Startup Performance: By separating the IoT thread, the application can start up more quickly without being hindered by the initialization of the MQTT connection.
Enhanced Reliability: Isolating the IoT thread reduces the risk of potential conflicts or errors that could impact the main application's functionality.
Increased Flexibility: The reusable thread process can be easily adapted to other parts of the application promoting code reusability and efficiency.
Configuration loading from API
Function: LoadPPLSettings
Purpose: This function loads configuration settings essential for connecting to the IoT device and retrieving the kiosk token.
Description:
Loads configuration data from an XML file (
GlobleVariableClass.gStrPPL_Xml).Parses the XML document to extract specific settings:
BaseURL: Base URL for the PPL API.ThingTagId: Unique identifier for the IoT device.ThingId: Another identifier for the IoT device.Tier: Service tier information.DomainName: Domain name associated with the application.CustomerId: Customer ID for the application.PPL_API_KEY: Decrypts the API key stored in the XML file usingEncryptionHelper.DecryptString.
Configures the
PPLApiclass with theThingTagId.Asynchronously retrieves the kiosk token using
PPLApi.GetKioskTokenAsync(true)and stores it inPPLAPIConstants.KioskToken.Clears any existing user data from
localStorage.
Error Handling:
Catches any exceptions during the process and logs them using
Global_ClassLibrary.CommonMethod.WriteSystemLog.
Context and Usage:
This function is typically called when the application loads the home page to ensure the latest configurations are applied.
Additionally, settings are reloaded when the "Job Done" page is loaded to verify license status.
Additional Information:
The configuration settings are crucial for establishing a connection to the IoT device and retrieving the kiosk token, which is necessary for querying the GraphQL API.
Reloading settings during specific page loads ensures the application functions with the most recent configurations.
ePRINTit_Login_Selection Page
Purpose
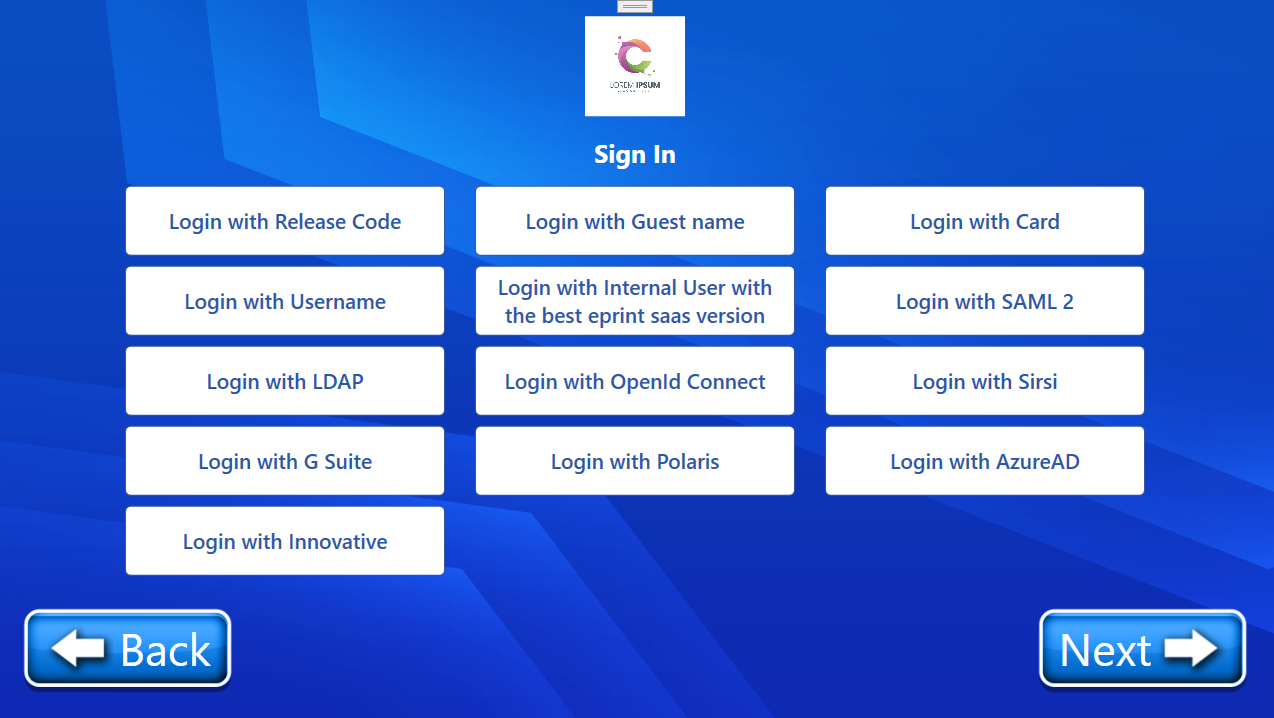
The ePRINTit_Login_Selection page serves as a central hub for users to authenticate and access print release functionality. It dynamically presents various login options based on the configuration settings loaded from the ePRINTit Portal.
Functionality
Configuration-Driven Login Options:
The page displays a list of available login options, determined by the configuration settings loaded from the ePRINTit Portal via the
LoadPPLSettings()method.This ensures that only relevant login options are presented to the user.
This page is also ensures no previous user’s data is currently held in the localstorage dictionary. for more details, check
ClearAndDisposeCollectionmethod in code.
User Authentication:
When a user selects a login option, they are redirected to the appropriate authentication flow.
This may involve:
Entering a release code
Providing internal user credentials
Using a card number (and/or pin)
Authenticating via external identity providers (e.g., LDAP, SAML, OAuth)
Login Options
The following login options may be available, depending on the configuration:
Login with Release Code: Allows users to authenticate using a unique release code.
Login with Internal User: Enables users to log in with their internal user credentials.
Login with Username: Provides a basic username-based authentication method.
Login with Guest Name: Allows users to print as a guest, potentially with limited privileges.
Login with Card Number: Facilitates authentication using a physical card.
Login with Sirsi, Polaris, Innovative: Integrates with specific library systems for authentication.
Login with LDAP, SAML, GSuite, AzureAD, OAuth: Leverages external identity providers for seamless authentication.
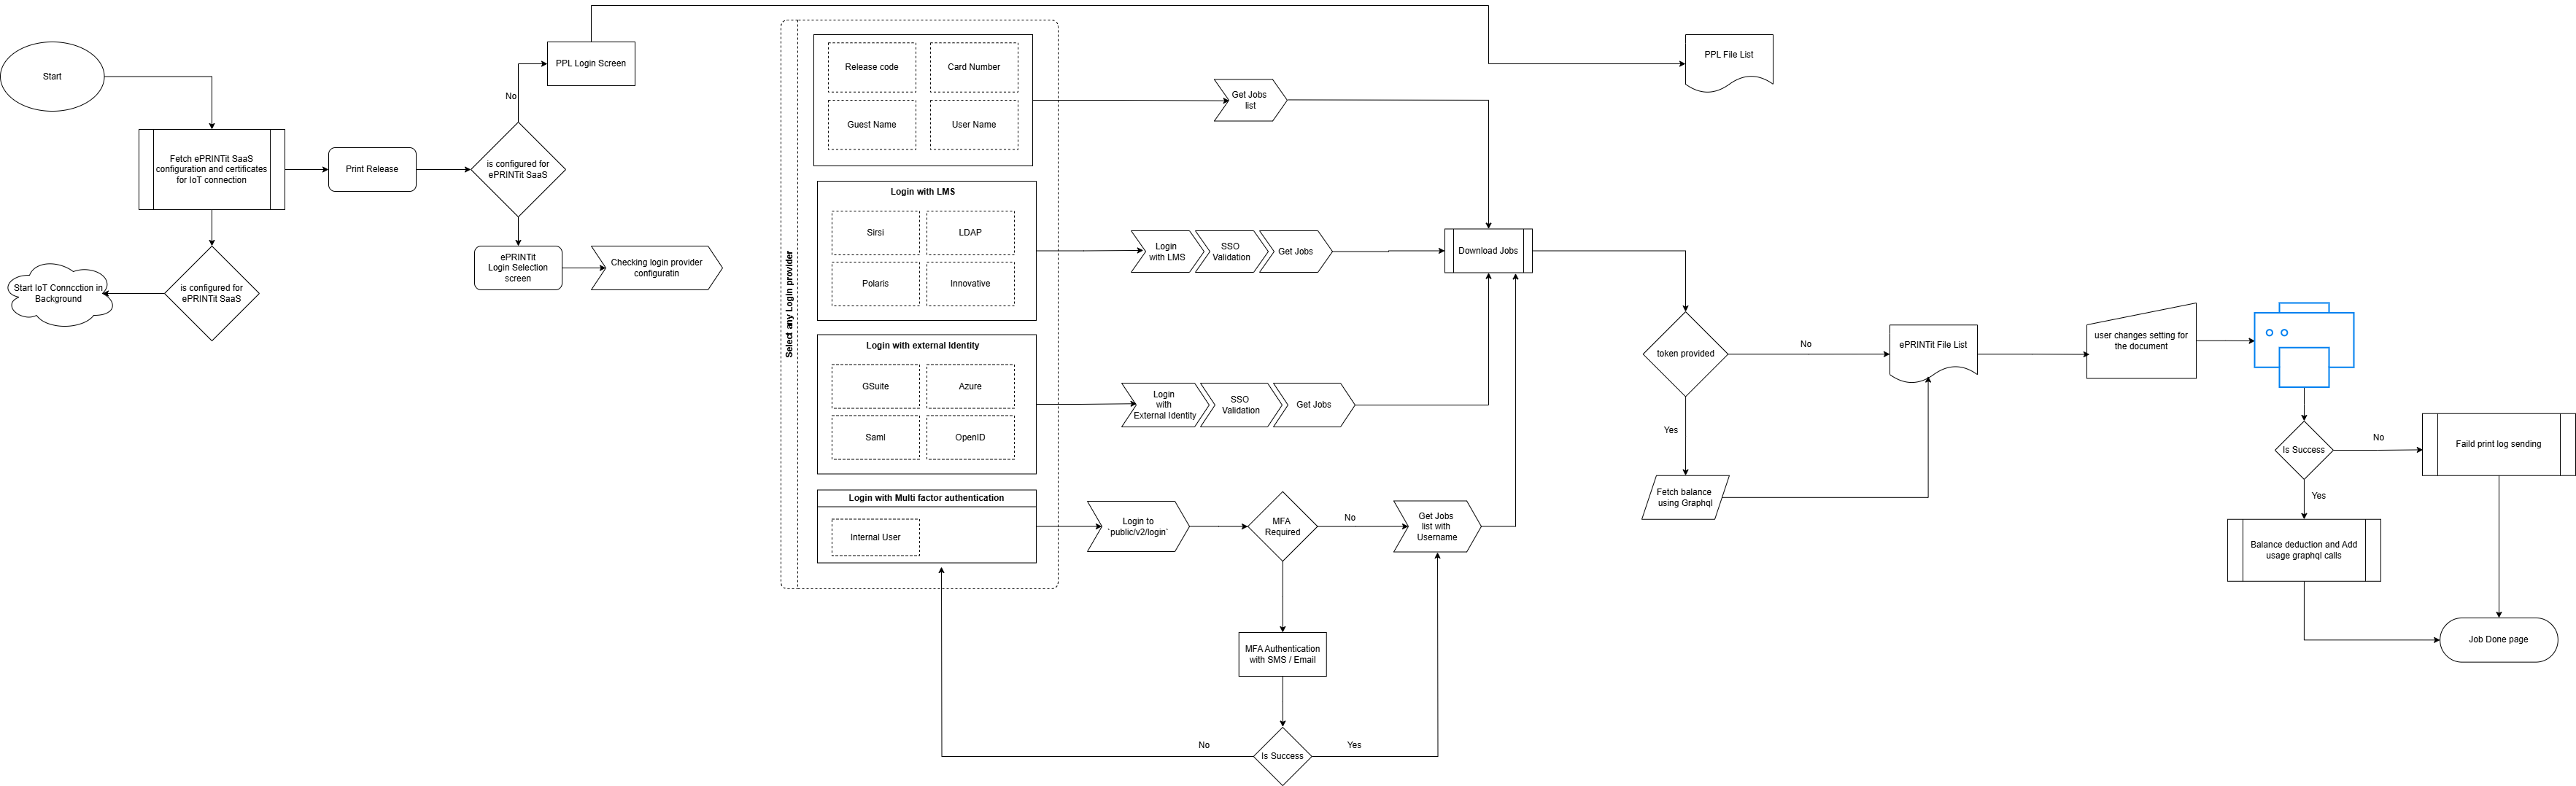
User can select any of login provider. here is the screen breakdown where user will be navigated to:
Auth Provider | Screen |
Guest Login | PPL_GuestNameLogin |
GSuite, Azure, OAuth & SAML Login | PPL_OAuthLoginPage |
Card Login | PPL_CardLoginPage |
Sirsi, Polaris, LDAP, Innovative | PPL_BarcodeLogin |
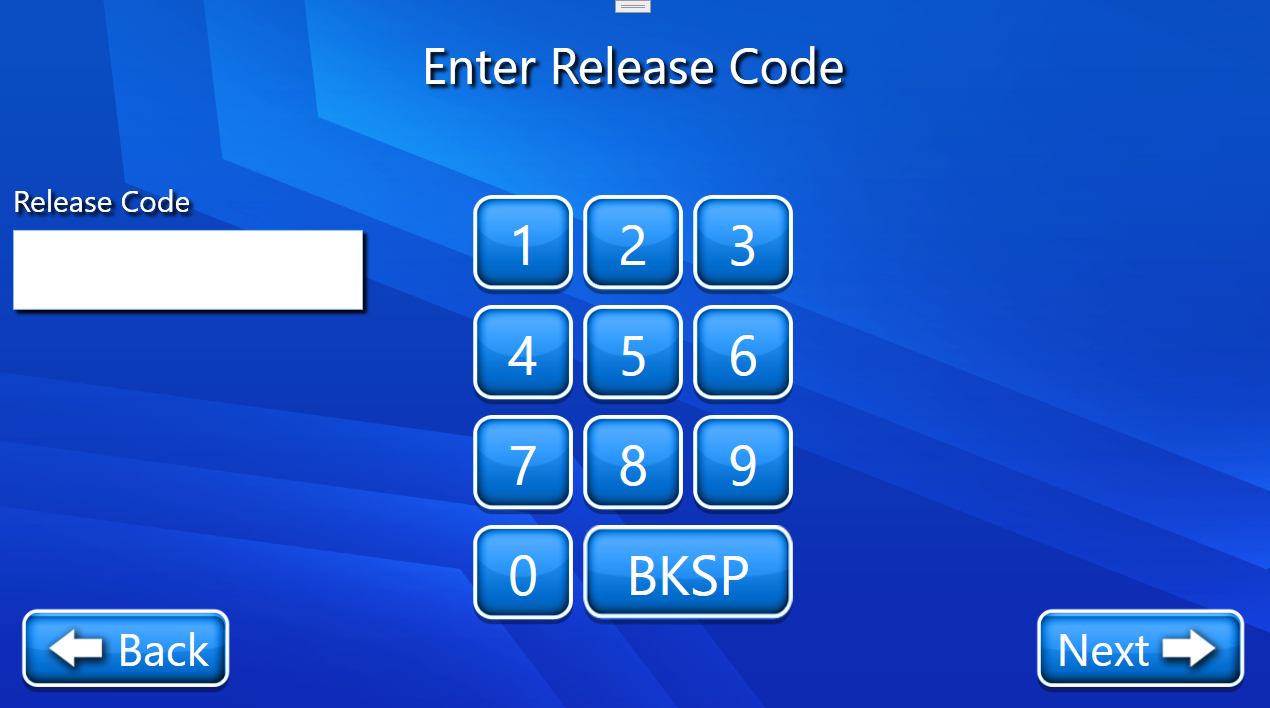
Release Code | PPL_Login_Page |
Internal User | PPL_InternalLogin |
UserName Login | PPL_UsernameLoginPage |
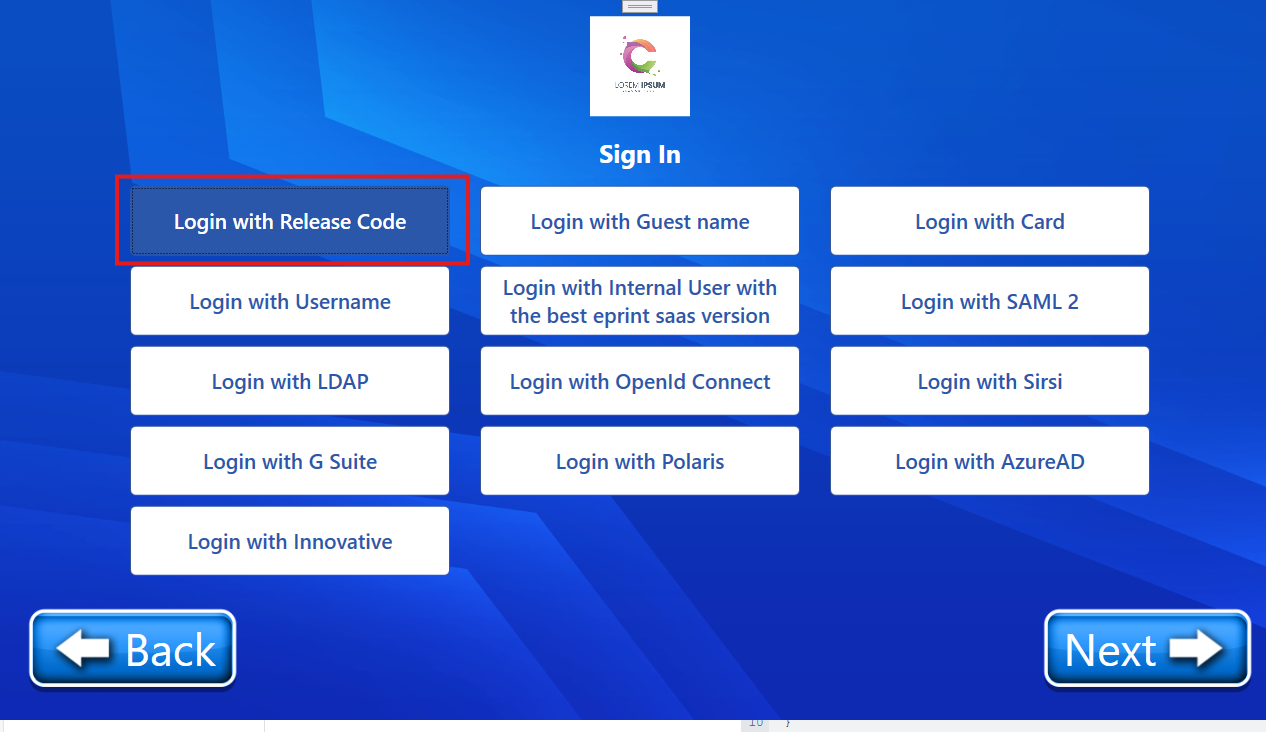
Process for login:
Clicking a Login Button:
The click event handler for a login button (e.g.,
BtnGuestCode_Click) is triggered.The handler sets
selectedLoginOptionto the correspondingLoginOptionenum value.The
SpeakSelectedfunction is called to announce the selected login option.
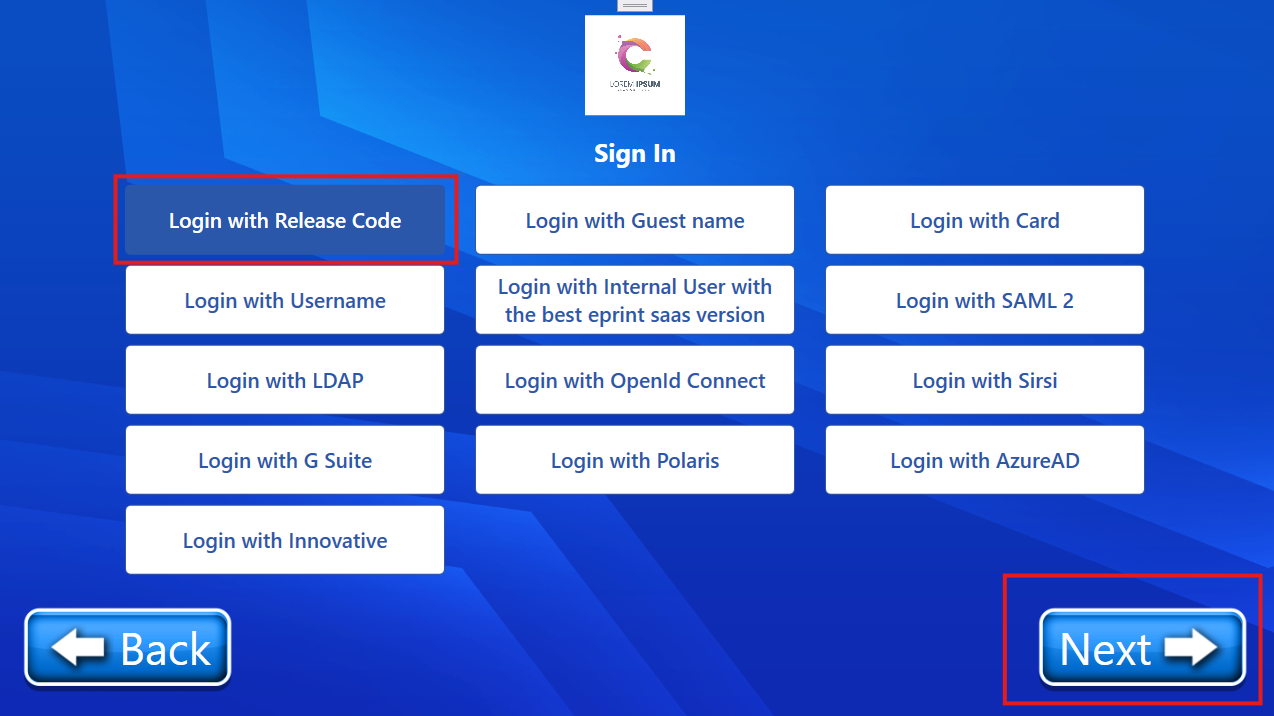
Clicking "Next" Button:
The
BtnNext_Clickfunction is triggered.It checks if
selectedLoginOptionis notGlobleVariableClass.LoginOption.none(meaning no option is selected).If no option is selected, an alert message is displayed using a
MessageWindow.
If a login option is selected:
The
routeMappingsdictionary is used to retrieve the corresponding route information (page URI andLoginOptionvalue) for the selected option.GlobleVariableClass.gStrPplCurrentJobis set to the retrievedLoginOptionvalue.Navigation occurs using
NavigationService.Navigateto the login page URI obtained fromrouteMappings.
User Authentication and Job Retrieval
Functionality:
This section describes the process of retrieving print jobs for specific login types (CardNumber, GuestName, ReleaseCode, and UserName).
Components:
GetPPLJobsFunction: Performs user authentication (for specific login types) and fetches print jobs from the Print Portal Library (PPL) API.PPLLoginTypeEnum: Defines the supported login types.PPLAPIConstantsClass : Contains configuration constants for the PPL API, such as base URL and API key.RestClient: Class used for making HTTP requests (likely from a third-party library).RestRequest: Class used to configure HTTP requests (likely from a third-party library).localStorage: Mechanism for storing user credentials locally (implementation depends on the chosen framework).PPLPrintJobResponseClass: Class representing the response structure of the PPL API for print jobs.PPLPrintJobDocClass : Class representing an individual print job document returned by the API.PPL_SettingsClass : Class containing collections for storing retrieved print jobs (likely part of your application model).
Process:
Function Call: The
GetPPLJobsfunction is called with the user-provided input and their login type.API Request Construction:
The function builds a GET request to the PPL API's
/public/printJobsendpoint.Common headers, including the API key, are added.
Depending on the
loginType, a corresponding query parameter (cardNumber,guestName,releaseCode, oruserName) is added with the user input.
User Credential Storage:
The user input is stored locally using
localStorageunder the key of the correspondingloginType(for potential future use within your application).
API Request Execution:
The
RestClientexecutes the constructed API request.
Response Handling:
If the response status code is
OK(200):The JSON response is deserialized into a
PPLPrintJobResponseobject.
If the
Statusproperty in the response is 1 and there's data, job processing occurs:Each job in the
Datalist is converted to aPPLPrintJobDocobject.Properties of the job document are populated with data from the API response.
A selected flag (
IsSelected) is explicitly set tofalse.
The job document is added to the appropriate collection in
Models.PPL_Settingsbased on theIsPrintedandIsDeletedflags:If printed and not deleted, it goes to
List_RePrint_Doc.Otherwise, it goes to
List_Ppl_Doc.
If any errors occur during request execution or response processing, an error message is logged.
Return Value:
The function returns
trueif jobs were successfully retrieved,falseotherwise.
Authentication Logic:
Simplified Approach:
This implementation doesn't perform actual user authentication for
CardNumber,GuestName,ReleaseCode, andUserNamelogin types.It directly retrieves print jobs based on the provided input.
Internal User Authentication (With and Without MFA)
Functionality:
This section describes the process of authenticating a user with the "Internal User" login type. This involves sending a login request to the PPL API and handling potential Multi-Factor Authentication (MFA) scenarios.
Components:
InternalUserLoginFunction: Attempts user login with username and password, handles MFA.MFAClass : Class for managing MFA logic (likely part of your application logic).PPLLoginClass : Class representing the login object sent in the API request.RestResponseClass : Class representing the response from the HTTP client library.PPLAPIConstantsClass : Contains configuration constants for the PPL API.RestClient: Class used for making HTTP requests (likely from a third-party library).RestRequest: Class used to configure HTTP requests (likely from a third-party library).MFALoginResponseClass : Class representing the PPL API response structure for login with MFA required.
Process:
Function Call: The
InternalUserLoginfunction is called with the user's username and password.Initial Setup:
MFA.Requiredis set tofalse(assuming MFA is not initially required).The API request URL is constructed using
PPLAPIConstants.BaseURL.A
PPLLoginobject is created with the provided username and password.Common request headers are added, including API key, tier, and subdomain.
API Request Construction:
A
RestClientinstance is created.A POST request is configured to the
/public/v2/loginendpoint.Headers and the login object (
loginObj) as JSON body are added to the request.
API Request Execution:
The request is executed using
RestClient.Execute.
Response Handling:
A
JsonDocumentobject is created from the response content.The JSON structure is parsed to extract the
mfaRequiredproperty.MFA Required:
If
mfaRequiredistrue:The response is deserialized into an
MFALoginResponseobject.The
MFAclass variables are populated with information extracted from the response:MFARequired: Set totrue.MfaToken: MFA token from the response.Text: Textual information related to the MFA option (e.g., instructions).Email: User's email for potential MFA delivery.UserID: User ID from the response.UserName: User name provided for login.
The function returns the original response (containing MFA information).
No MFA Required:
If
mfaRequiredisfalse, the function directly returns the response from the API (successful login).
MFA Handling for Internal user
Process:
Login API Call:
The
PPLApi.InternalUserLoginfunction is called with username and password.
Response Handling:
Successful Login (200 Status Code):
The response is deserialized into a
RestResponseobject.An inner
try...catchblock handles potential exceptions.If
MFA.Requiredistrue(MFA required):The UI thread is invoked using
Dispatcher.Invoke.A
PPL_MFAWindowinstance is created and displayed modally usingShowDialog.If the user cancels the MFA window (returns
false):Check if MFA was successfully completed (
MFA.isValidUser).If valid:
Call
PPLApi.GetPPLJobsto retrieve jobs.If jobs are retrieved successfully, call
PPLApi.Download_ePRINT_Fileto download files.
If
MFA.Requiredisfalse(no MFA required):The response content is deserialized into an
InternalUserResponseobject.User information (token, user data, account IDs, total balance) is extracted from the response and stored in
localStorage.A log message is written with the obtained token (debug level).
Call
PPLApi.GetPPLJobsto retrieve jobs.If jobs are retrieved successfully, call
PPLApi.Download_ePRINT_Fileto download files.
Login Error:
If the response status code is not 200:
The response content is deserialized into a
PPLErrorResponseobject (if possible).If an error message exists, a
MessageWindowdisplays it to the user.
Exception Handling:
If any exception occurs during the login process:
The UI thread is invoked using
Dispatcher.Invoke.The exception message and stack trace are logged using
CommonMethod.WriteSystemLog.User input fields (username and password) are cleared.
Username field receives focus.
Innovative, LDAP, Polaris, Sirsi Login Process
This section explains the barcode and PIN login process for login types like Innovative, LDAP, Polaris, and Sirsi. The code for this functionality resides in the PPL_BarcodeLogin.xaml.cs file.
Process:
User Input:
User enters their barcode and (optional) PIN in the corresponding UI fields.
BtnNext_ClickEvent:An
LMSLoginobject is created with the entered barcode, PIN, and the current login type (retrieved fromGlobleVariableClass.gStrPplCurrentJob).
Progress Window:
A progress window is displayed using
ProgressWindow.Execute.
Login with LMS:
The
PPLApi.LoginWithLMSfunction is called asynchronously, passing theLMSLoginobject and anauthId(likely obtained from configuration).
LMS Login Response:
Successful Login:
If the LMS login is successful (
lmsResponse.IsSuccessfulistrue):The response content is parsed into a
JObject.A
hashIdis extracted from the parsed JSON object.The
PPLApi.SSOLoginfunction is called with thehashIdandauthId.
Login Error:
If the LMS login fails, no further processing occurs. This might be handled differently depending on the implementation.
SSO Login Response:
Successful SSO Login:
If the SSO login is successful (
ssoResponse.IsSuccessfulistrue):The response content is parsed into a
JObject.Username and token are extracted from the parsed JSON.
The token is stored in
PPLAPIConstants.TokenandlocalStorage.The
PPLApi.GetPPLJobsfunction is called with the username andPPLLoginType.UserNameto retrieve print jobs.If jobs are retrieved successfully, the
PPLApi.Download_ePRINT_Filefunction is called to download files.
Job Download:
Download Successful:
If both job retrieval and download are successful, the user is navigated to the ePRINT file list page.
Download Error:
If there's an error during job retrieval or download, a message window is displayed using
MessageWindowwith the appropriate error message.
Error Handling:
Any exceptions are caught and logged using
CommonMethod.WriteSystemLog.
Additional Notes:
The
GetLDAPConfigfunction retrieves configuration details (likeauthIdandorgId) based on the selected login type.
Understanding PPLApi.cs Functions:
LoginWithCardOrPinFunction: This function is likely used for other login types that involve card numbers and PINs. It's not directly relevant to the current Innovative / LDAP / Polaris / Sirsi login process.ValidateCardNumberOrPinFunction: This function (used withinLoginWithCardOrPin) performs the actual validation of a card number or PIN against the provided customer ID using a GraphQL mutation request.
I hope this explanation clarifies how the code handles Innovative, LDAP, Polaris, and Sirsi login using barcode and PIN.
SSO Login Process
This section explains the SSOLogin function in PPLApi.cs and how it facilitates Single Sign-On (SSO) login for Innovative, LDAP, Polaris, and Sirsi login types.
Function Breakdown:
SSOLoginFunction:Takes two arguments:
hashId: Obtained from the successful LMS login response.authId: Retrieved from configuration usingGetLDAPConfig.
Constructs the SSO login request:
URL: Base URL from
PPLAPIConstants.Endpoint:
/public/SSO/Confirm(likely for confirming SSO login).Method: POST
Headers:
apikey: API key fromPPLAPIConstants.tier: Tier information fromPPLAPIConstants.subdomain: Subdomain name fromPPLAPIConstants.
Body (JSON format):
hashId: The providedhashId.authId: The retrievedauthId.
Sends the request using
RestClientand checks for successful response (response.IsSuccessful).Successful Response:
Parses the response content into a
JObjectfor data extraction.Extracts username and token from the parsed JSON data.
Stores the token in both
PPLAPIConstants.TokenandlocalStorage.Optional (Commented Out): Checks if
CardNumberexists inlocalStorage. If so, it seems to trigger an asynchronous functionUpdateUserAsync(implementation not provided).
SSO Login Flow:
After a successful login with the external LMS (Innovative, LDAP, Polaris, or Sirsi), a
hashIdis obtained.The
SSOLoginfunction is called with thehashIdandauthId.The function constructs and sends an SSO login request to the PPL API server.
If the request is successful, the server responds with a JSON containing username and token.
The username and token are used to authenticate the user within the PPL application.
The token is stored for future API calls using both a global variable (
PPLAPIConstants.Token) andlocalStorage.
Card Login Process in PPL_CardLoginPage.cs
This section explains the card login functionality in the PPL_CardLoginPage.cs file, focusing on how it interacts with the PPLApi.LoginWithCardOrPin method.
User Interface Checks:
The code checks if the
TextBox_CardNumberis empty.If empty, the focus is set to the textbox, and a message window displays a "Login Failed" message.
If a PIN is required (
isPinRequiredis true) and theTextBox_Pinpassword field is empty:
The focus is set to the PIN textbox.
A message window displays a "Login Failed" message.
Login Process:
If both card number and PIN (if required) are valid, a progress window is displayed using
ProgressWindow.Execute.Inside the progress window's callback function:
The card number (
cardNo) is retrieved fromTextBox_CardNumber.Text.The PIN (
PIN) is retrieved fromTextBox_Pin.Password.The
PPLApi.LoginWithCardOrPinfunction is called asynchronously with the card number, PIN requirement flag (isPinRequired), and the actual PIN (if provided).The returned
loginResponseobject is used to determine the login status based on the HTTP status code:Success (HttpStatusCode.OK):
A flag
bResLoginis set totrueindicating successful login.The
PPLApi.Download_ePRINT_Filefunction is called (presumably for downloading print jobs).
Failure:
The
loginResponse.ErrorMessageis used to display a message window with the specific error message.
Navigation:
If both login and download are successful (
bResLoginandbResDownloadare true), the application navigates to the ePRINT file list page usingNavigationService.Navigate.
Error Handling:
Any exceptions during the login process are caught and logged using
CommonMethod.WriteSystemLog.
Key Points:
This code snippet showcases how the UI interacts with the
PPLApi.LoginWithCardOrPinfunction for authentication.Progress window and message windows are used for user feedback during the login process.
Successful login potentially leads to downloading print jobs and navigating to the file list page.
Release Code Login Process
This section explains the release code login process implemented in the PPL_Login_Page.cs file.
User Input and Validation:
The user enters the release code in the
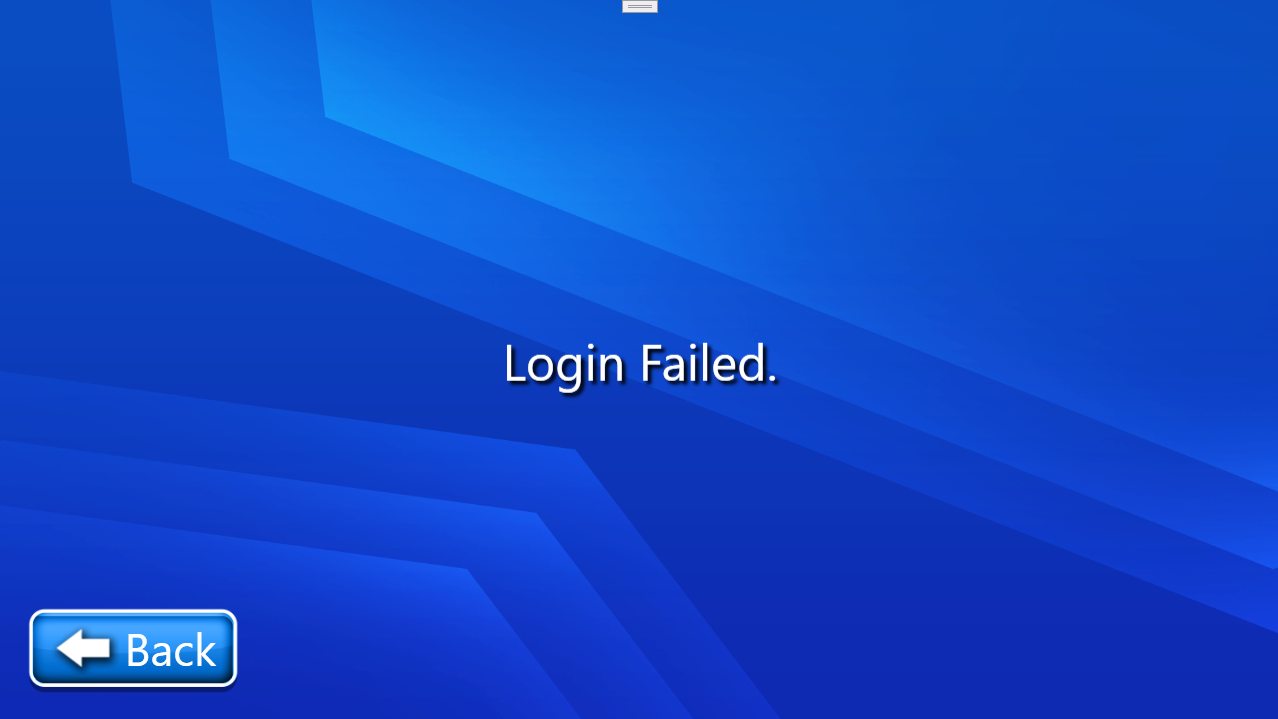
TextBox_ReleaseCode.The code checks if the release code is empty. If so, it displays a "Login Failed" message.
Login Process:
A progress window is displayed while the login process is in progress.
The
activeLicenseis retrieved from the configuration file.Based on the
activeLicense:ePRINTit SaaS:
The
PPLApi.GetPPLJobsfunction is called with the release code andPPLLoginType.ReleaseCodeto retrieve print jobs.If jobs are retrieved successfully (
bResLoginis true), thePPLApi.Download_ePRINT_Filefunction is called to download files.
Other License:
The
Loginfunction (implementation not provided) is called with the release code.If the login is successful (
bResLoginis true), theDownload_Thumbnailfunction is called (likely for downloading thumbnails).
Navigation and Error Handling:
If both login and download are successful (
bResLoginandbResDownloadare true):The application navigates to either
Ppl_File_ListorePRINT_File_Listbased on theCustomerIdvalue.
If only login is successful but download fails (
bResLoginis true,bResDownloadis false):A "Download Failed" message is displayed.
If login fails (
bResLoginis false):A "Login Failed" message is displayed.
Username and Guest Login Process
This section explains the guest login process implemented in the PPL_GuestNameLogin.xaml.cs file. similarly the user login process implemented in PPL_UsernameLoginPage.xaml.cs file.
User Input and Validation:
The user enters the username or guest name based on page.
The code checks if the username or guest name is empty. If so, it displays a "Login Failed" message.
Login Process:
A progress window is displayed while the login process is in progress.
the login process is similer as the release code login, it is checking the username or guest name against the joblist’s api and returns true or false.
Navigation and Error Handling:
If both login and download are successful (
bResLoginandbResDownloadare true):The application navigates to either
Ppl_File_ListorePRINT_File_Listbased on theCustomerIdvalue.
If only login is successful but download fails (
bResLoginis true,bResDownloadis false):A "Download Failed" message is displayed.
If login fails (
bResLoginis false):A "Login Failed" message is displayed.
ePRINTit_FileList_New Page: A Deep Dive
Page Initialization and Setup
InitializeComponent():
Initializes the UI components defined in the XAML file.
LoadPaperSizes():
Loads available paper sizes from a configuration source (likely a database or configuration file).
Populates a data structure (e.g., a list or collection) with the loaded paper sizes.
Initialize_ComboBox_PaperSizeALL() and Initialize_ColorDropdown_All():
Initializes the paper size and color dropdowns with default values or options.
radioButton_LandScape_All.IsChecked = true;
Sets the "Landscape" radio button to be checked by default.
radioButton_OneSide_All.IsChecked = true:
Sets the "One-Sided" radio button to be checked by default.
Loading Balance and Settings
LoadBalanceAndSettings():
Token Check:
Retrieves the user's token from local storage.
Checks if the current login type is "Internal User".
If yes, fetches the total balance from local storage.
If not, fetches user balance and group IDs from the PPL API using the token.
If a card number is present, fetches the Cbord balance.
UI Update:
Updates the
TotalBalanceUI element with the calculated total balance.If user balances are null, the total balance is displayed without any additional calculations.
Loading Paper Sizes and Color Options in ePRINTit_FileList_New
This code snippet demonstrates how the ePRINTit_FileList_New page retrieves and displays paper size and color options:
Paper Size Loading (LoadPaperSizes):
Error Handling: The code attempts to load paper sizes from an XML file (
GlobleVariableClass.gStrSimpleScanTextXml).If the file doesn't exist, a message box displays an error message.
Default Paper Sizes: A list containing commonly used paper sizes is defined (
paperSizes).Active Paper Sizes: The
CommonMethod.GetPaperSizeList()function retrieves a list of currently enabled paper sizes.XML Parsing: The code iterates through the
paperSizeslist:For each size, it attempts to find a corresponding element in the loaded XML document (
printSettingElement).Some sizes ("Ledger", "A3", etc.) might require accessing specific XML elements.
Enabled Check: It checks if the current paper size is enabled using the
activeList.Adding to DropDown: If the element exists and the size is enabled, a new
ePRINTDropdownobject withValueandNameproperties is created and added to thepaperSizeDropdownlist (presumably used for the paper size dropdown).
Color Options Loading (Initialize_ColorDropdown_All):
Resource Strings: It retrieves localized text for "Grayscale" and "Color" using
CommonMethod.GetButtonText().Color List: A list of
ePRINTDropdownobjects is created, with each object representing a color option (Color and Grayscale).Binding Source: The
ColorMode_Alldropdown'sItemsSourceproperty is set to the color list.Binding Properties:
SelectedValuePath: Specifies the property used for the selected value ("Value").DisplayMemberPath: Specifies the property used for display ("Name").
Default Selection: The color dropdown currently sets "Color" as the default selection.
Code Breakdown: Cost Calculation and Button Management
This code snippet deals with cost calculation and button visibility based on the selected jobs and user balance in the ePRINTit_FileList_New page.
CheckCost (Triggered on Configuration Changes):
Calls
UpdateCost_ePRINT,CalculateJobCost, andCheckCostAmountfunctions.
UpdateCost_ePRINT (Job Rate Calculation):
Iterates through both
PPL_Settings.List_Ppl_Doc(Print Jobs) andPPL_Settings.List_RePrint_Doc(Reprint Jobs).For each job:
Sets
colorModebased on the job'sColorproperty (grayscale or color).Calls
CommonMethod.Get_ePRINTPricePerPageto get the price per page based on paper size, color mode, and duplex printing.Sets the job's
Rateproperty with the retrieved price per page.
CalculateJobCost (Total Cost Calculation):
Initializes
totalCostto 0.Determines the current job list based on
_previousPrintflag (Print or Reprint).Iterates through each job in the current list:
Gets the job's rate, page count, and copies.
Calculates the current job cost (
rate * pages.Count * copies).Sets the job's
TotalCostproperty.If the job is selected, adds the current job cost to the
totalCost.
Sets the global
TotalCostproperty.Updates the
lblTotalCostlabel with the formatted total cost.
CheckCostAmount (Button Visibility Toggling):
Checks the job version using
CommonMethod.GetJobVersionandGlobleVariableClass.gEnumCurrentJob.If it's a free version, shows the
BtnNextbutton only.
Otherwise (paid version):
Checks if user's
totalBalanceis greater than or equal toTotalCost(or ifTotalCostis zero).If sufficient balance, shows the
BtnNextbutton and hides theBtn_PayNowbutton.If insufficient balance, hides the
BtnNextbutton and shows theBtn_PayNowbutton.
Overall Functionality:
This code ensures that the cost of selected jobs is calculated and displayed accurately. It also dynamically changes the visibility of the "Next" and "Pay Now" buttons based on the job version (free or paid) and user's balance compared to the total cost.
Handling Color Mode, Orientation, and Duplexity for All Jobs
These code snippets demonstrate how the ePRINTit_FileList_New page handles applying settings to all jobs simultaneously:
ColorMode_All_SelectionChanged (Color Change for All Jobs):
Gets the selected color mode from the
ComboBox.Determines the current job list based on
_previousPrint.Iterates through each job in the current list and sets its
Colorproperty to the selected value.Checks if the
ComboBoxis loaded (presumably to avoid unnecessary actions during initialization).Uses the
Speakfunction to announce the change (optional functionality).Calls
CheckCostto recalculate costs after the color change.
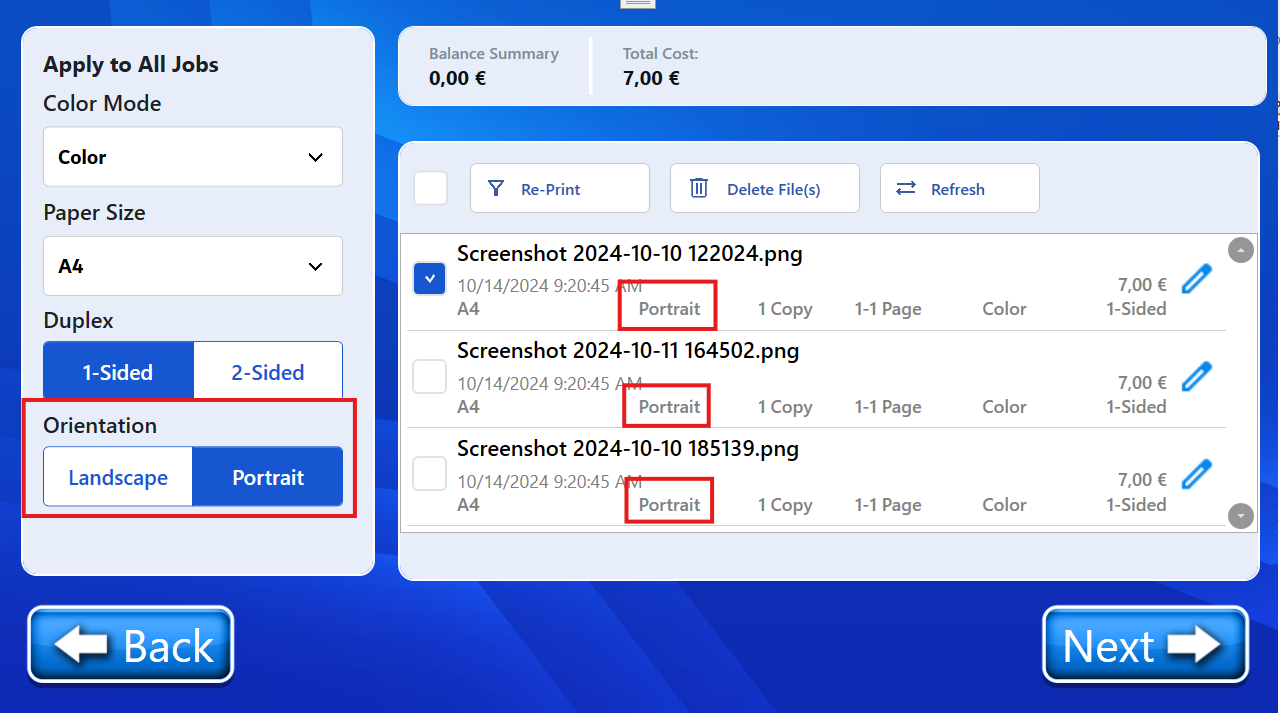
RB_OrientationChecked (Orientation Change for All Jobs):
Handles the checked event of radio buttons for landscape and portrait orientation.
Determines the current job list based on
_previousPrint.Sets a default value for
selectedValue("Landscape").Checks if the clicked radio button is "Landscape" and is checked.
If yes, iterates through each job and sets its
Orientationto "Landscape".
Otherwise, iterates through each job and sets its
Orientationto "Portrait" and updatesselectedValue.Checks if the
RadioButtonis loaded.Uses the
Speakfunction to announce the change.Includes error handling to log any exceptions using
CommonMethod.WriteSystemLog.
OnDuplexChange (Duplexity Change for All Jobs):
Similar to
RB_OrientationChecked, it handles the checked event of radio buttons for one-sided and two-sided printing ("Duplex").Determines the current job list based on
_previousPrint.Sets a default value for
selectedValue("One Sided").Checks if the clicked radio button is "One Side" and is checked.
If yes, sets the
Duplexproperty of each job tofalse(one-sided).
Otherwise, sets the
Duplexproperty of each job totrue(two-sided) and updatesselectedValue.Checks if the
RadioButtonis loaded.Uses the
Speakfunction to announce the change.Calls
CheckCostto recalculate costs after the duplexity change.
Overall Functionality:
These event handlers provide a way to apply color mode, orientation, and duplex settings to all jobs simultaneously. This simplifies user interaction and ensures consistency across selected jobs.
Refresh, Delete, and Previous Print Functionality
Refresh Button (BtnRefresh_Click)
Speak Confirmation: A message is spoken to confirm the refresh action.
Clear Existing Jobs: The
ClearAndDisposeCollectionmethod is called to clear both the print and reprint job lists and release resources.Progress Indicator: A progress indicator is displayed while the refresh operation is in progress.
Login Credential Retrieval:
The code iterates through a list of potential login keys (
GuestName,ReleaseCode,UserName,user,CardNumber) to determine the last used login method.
API Call:
PPLApi.GetPPLJobsis called with the retrieved login credential and type to fetch new jobs.If successful,
PPLApi.Download_ePRINT_Fileis called to download the files.
UI Update:
If no jobs are found, the user is navigated back to the home page.
Cost Calculation: The
CheckCostmethod is called to recalculate the total cost.
Delete Button (BtnDelete_Click)
Speak Confirmation: A message is spoken to confirm the deletion action.
Job Selection Check: Ensures at least one job is selected for deletion.
Progress Indicator: A progress indicator is displayed while the deletion process is in progress.
Deletion Loop:
Iterates through the selected jobs.
Calls
PPLApi.DeletionOfJobsto delete the job on the server.If deletion is successful, the job is removed from the local list.
UI Update: The job list is updated to reflect the deleted jobs.
Cost Calculation: The
CheckCostmethod is called to recalculate the total cost.
Previous Print Button (BtnPrevious_Click)
Toggle
_previousPrintFlag: This flag determines whether to display print or reprint jobs.Update Button Text: The button text is updated to reflect the current view (Print or Reprint).
Update Job List: The
change_sourcemethod (not shown) is called to update the displayed job list based on the_previousPrintflag.Speak Confirmation: A message is spoken to inform the user about the switch between print and reprint views.
Breakdown of the BtnNext_Click Functionality (ePRINTit_FileList_New)
This code snippet handles the "Next" button click in the ePRINTit_FileList_New page, which initiates the printing process.
Checking for Selected Jobs:
Verifies if any job is selected in the current list (print or reprint) using
currentList.Where(x => x.IsSelected).Any().If no selection is made, a message window prompts the user to select a document.
Optional Job Owner Information:
Checks the
PPL_Settings.JobInfoflag.If enabled, a
PrintJobInfoWindowdialog appears for the user to enter owner information (presumably for labeling purposes).If the user cancels the dialog, the process is aborted.
Looping Through Selected Jobs:
The
PrintConvertedImage_ePRINTfunction is called for each selected job in the current list.This function handles the conversion and printing of individual jobs.
PrintConvertedImage_ePRINTFunction:
Iterates through the selected jobs in the provided list.
For each job:
Constructs a
DocRequestobject with details like job ID, color mode, copies, paper size, duplex printing, printer name, orientation, page range, and output file path.
Opens a progress window.
Within the progress window:
Reads the job file content into a memory stream.
Calls
PrnConverter.ConvertToPrnto convert the job content to a printable format (likely PRN).Passes the
DocRequestobject, memory stream, and owner information (if applicable) for conversion.
Handles potential exceptions during conversion.
If conversion is successful (
"OK"result):Sets a flag indicating successful printing of all jobs.
If conversion fails:
Displays an error message window with the error details.
Logs the printing failure using
PPLApi.PrintFailLoggingAsync.
Payment :
Regardless of failure or success EasyBookingTransaction is sending usage logs.
Local Storage Cleanup and Navigation:
Clears local storage (potentially user-specific data).
Navigates to the "Job Done" page regardless of success or failure.
Breakdown of the EasyBookingTransaction Function (ePRINTit_FileList_New)
This function handles the payment processing for printing jobs in the ePRINTit_FileList_New page. It appears to be integrated with an EasyBooking service.
Group ID Retrieval:
Retrieves the
groupIDfrom local storage.If it exists, it's deserialized into a string array.
Otherwise, an empty string array is assigned.
Looping Through Jobs and EasyBooking Object Creation:
Iterates through the provided
JobList.For each job:
Calls
EasyBookingService.CreateEasybookingObjto create an EasyBooking object likely containing job details, total cost, user balance, and group IDs.Updates the user's total balance by subtracting the job cost if sufficient balance exists.
If the balance is insufficient, deducts the remaining cost from a potential CBord balance (assumed to be another payment source).
Processing EasyBooking Objects (if any):
If there are EasyBooking objects to process:
Creates tasks for each object using
ProcessElementAsync.Waits for all tasks to complete using
Task.WhenAll.
ProcessElementAsyncFunction:
Attempts to process an EasyBooking object (
element).Extracts group IDs (if any) from the
GroupIDarray.Calls
PPLApi.AddUsageAsyncto potentially record usage data for the job with the EasyBooking service.This function takes the EasyBooking object, job type (
print_release), transaction start and end times, group IDs (optional), and device name (optional).
If the user has a balance:
Fetches the updated user balance using
PPLApi.GetUserBalance.
If
keysexist in local storage:Fetches the CBord balance using
PPLApi.FetchCbordBalance.
Removes the "transactionId" from local storage.
Breakdown of AddUsageAsync
This function (AddUsageAsync) handles recording usage data for printing jobs in the EasyBooking service. Here's a breakdown of the steps involved:
Configuration and Token Retrieval:
Fetches a kiosk token using
GetKioskTokenAsync.Constructs headers and base path for API calls using the token.
Logs details about the transaction method.
Data Extraction and Processing (if job type is print or iot):
Extracts details like copies, paper size, payment type, and user type from the
jobDataobject.Calculates total cost based on color and grayscale costs.
Sets payment type based on account IDs or free printing.
Extracts user type (guest, internal) based on
ReleaseCodeorGuestName.Retrieves device data (location ID, device ID, device name) using
GetDeviceData.
Usage Object Construction:
Creates a new
EasyBookingBaseobject containing:Transaction details (date, start/end time, time zone)
Customer and location information
Printing details (copies, paper size, color type, etc.)
User and device information
Payment information (account, cash, credit card, CBORD)
Local Storage of Usage Data:
Inserts the extracted job data and usage object fields into a local database table using
_dbService.AddRecordUsage.
Sending Usage Data (if internet connection exists):
Checks internet connectivity using
InternetConnectionHelper.If connected, sends the usage object (
usageObj) to the EasyBooking service usingSendUsageAsync.On successful response: returns a success message.
On error response:
Logs the error details.
Requests a new token using
RequestToken.Inserts the usage data into a "retry" table using
_dbService.AddRetryUsage.
Handling No Internet Connection:
If no internet connection is available, directly saves the usage data to the "retry" table using
_dbService.AddRetryUsage.Returns a success message indicating data is saved locally.
Error Handling:
Catches any exceptions during processing and logs them with details.
Return Response:
If data saving fails due to printing errors, returns an internal server error message.
Breakdown of SendUsageAsync Function
This function is responsible for sending usage data to an external API (likely a GraphQL API) using a SendGraphQLAsync method. Here's a breakdown:
GraphQL Query and Variables:
GraphQL Query: The
queryvariable holds the GraphQL mutation to add usage data.Usage Object: An
EasyBookingDtoobject is created from theusageObjectand populates the necessary fields for the mutation.Variables: A dictionary is created to hold the
addUsageInputvariable, which contains theusageObobject.
API Call:
The
SendGraphQLAsyncmethod is called with thequeryandvariablesto execute the GraphQL mutation.The response from the API call is returned.
Key Points:
GraphQL Mutation: The GraphQL mutation is used to send the usage data to the server.
Error Handling: The code includes a
try-catchblock to handle potential exceptions during the API call.Logging: The
LoggerDetailsmethod is used to log information for debugging and troubleshooting.Data Serialization: The
usageObobject is serialized into JSON format before being sent in the GraphQL request.
By following these guidelines, you can improve the reliability and performance of the SendUsageAsync function.
User flow for Release Code login
Login Fail (if there is no Release code is blank or Release code session is Expired)
Or Else it redirects to Document selection Page

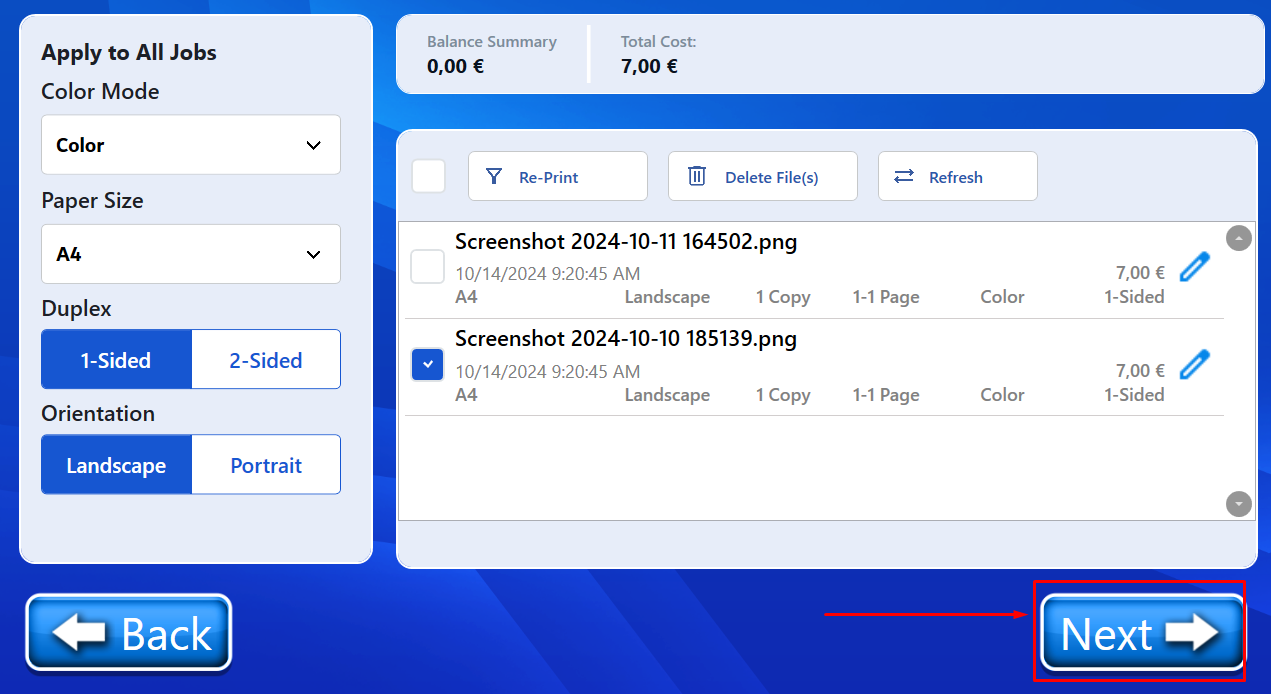
Document Selection Page
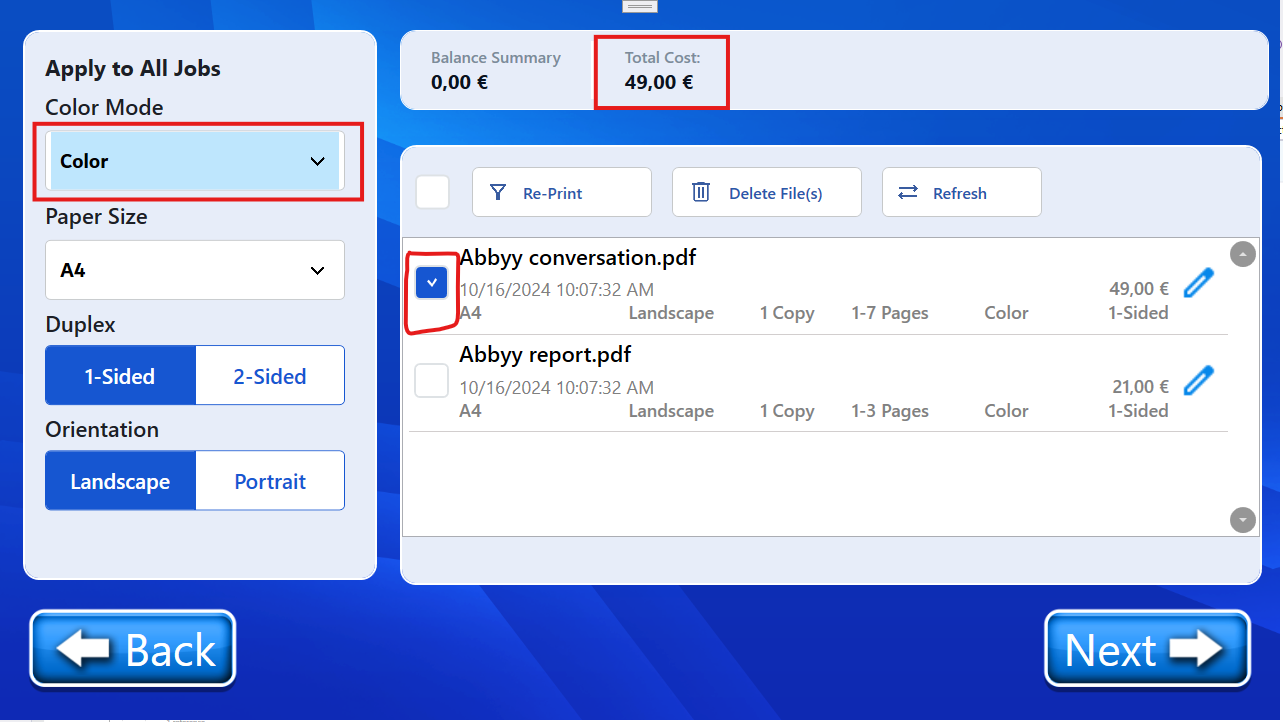
Color Selection (Explanation in ePRINTit_FileList_New.xaml.cs)
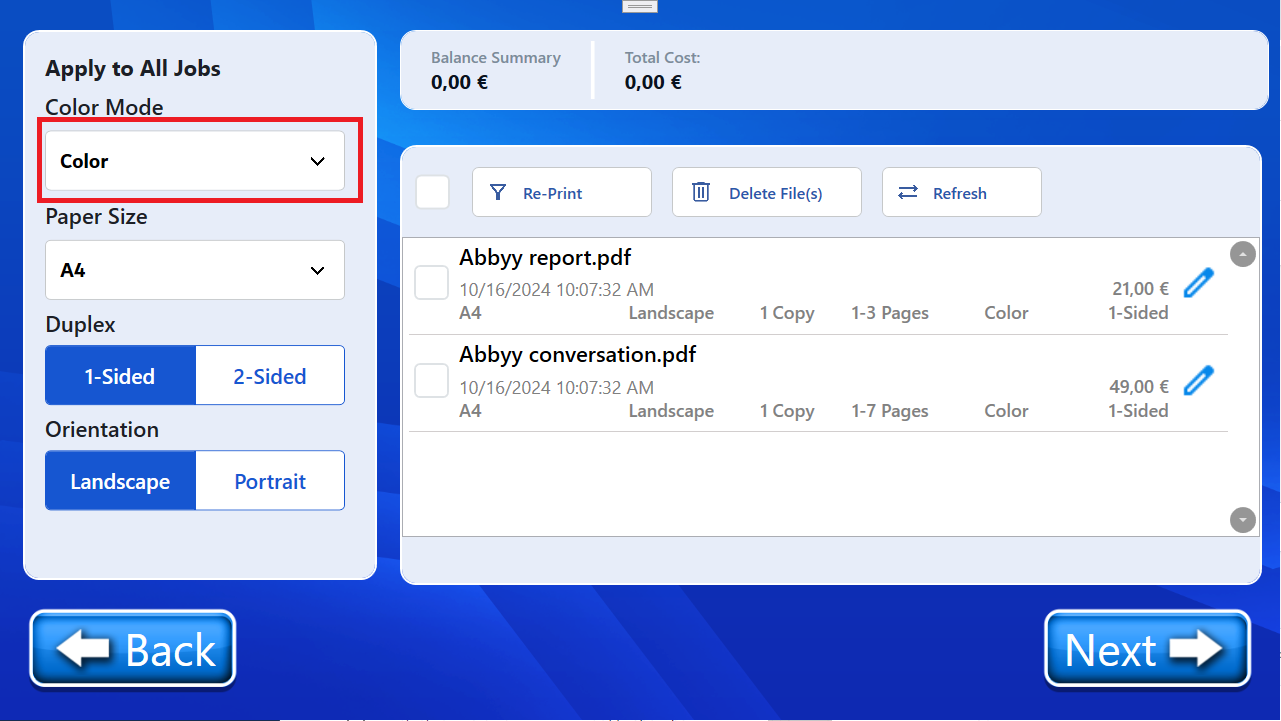
Color Change Effect on Total Cost ….
E.g. 1> On Default Selected Value (Color)
E.g. 2>On Changes Color to Grayscale

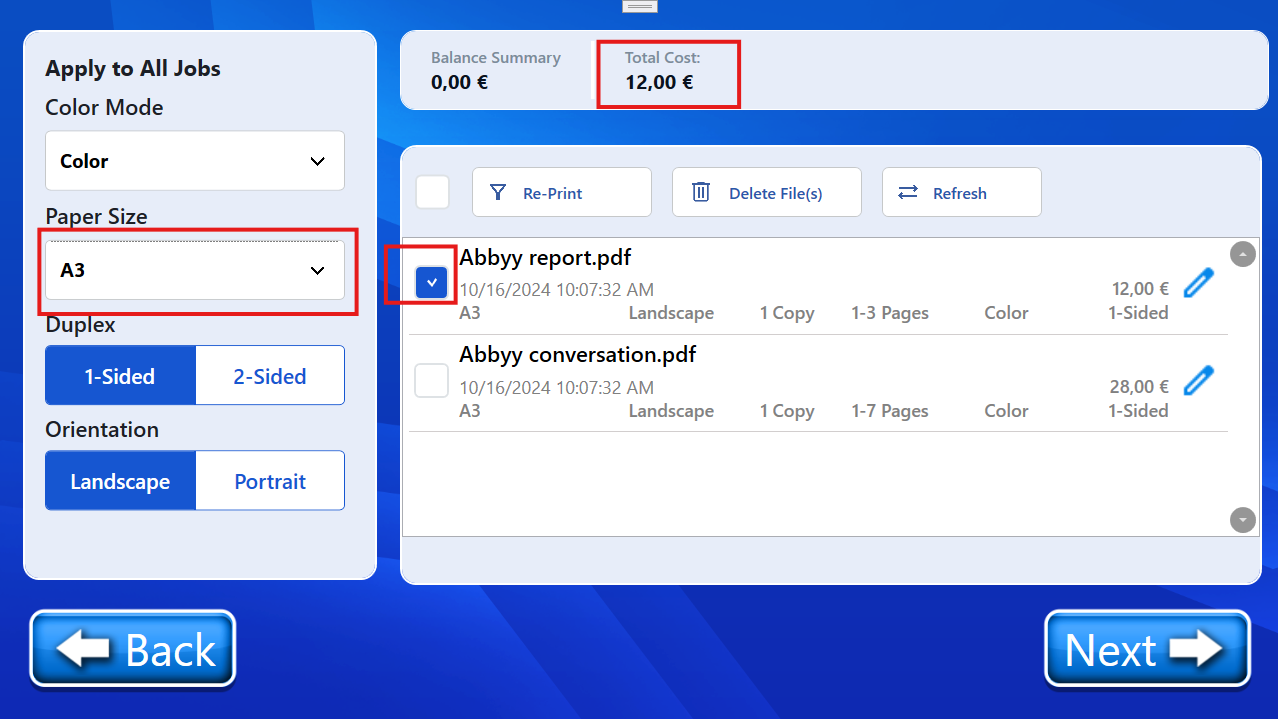
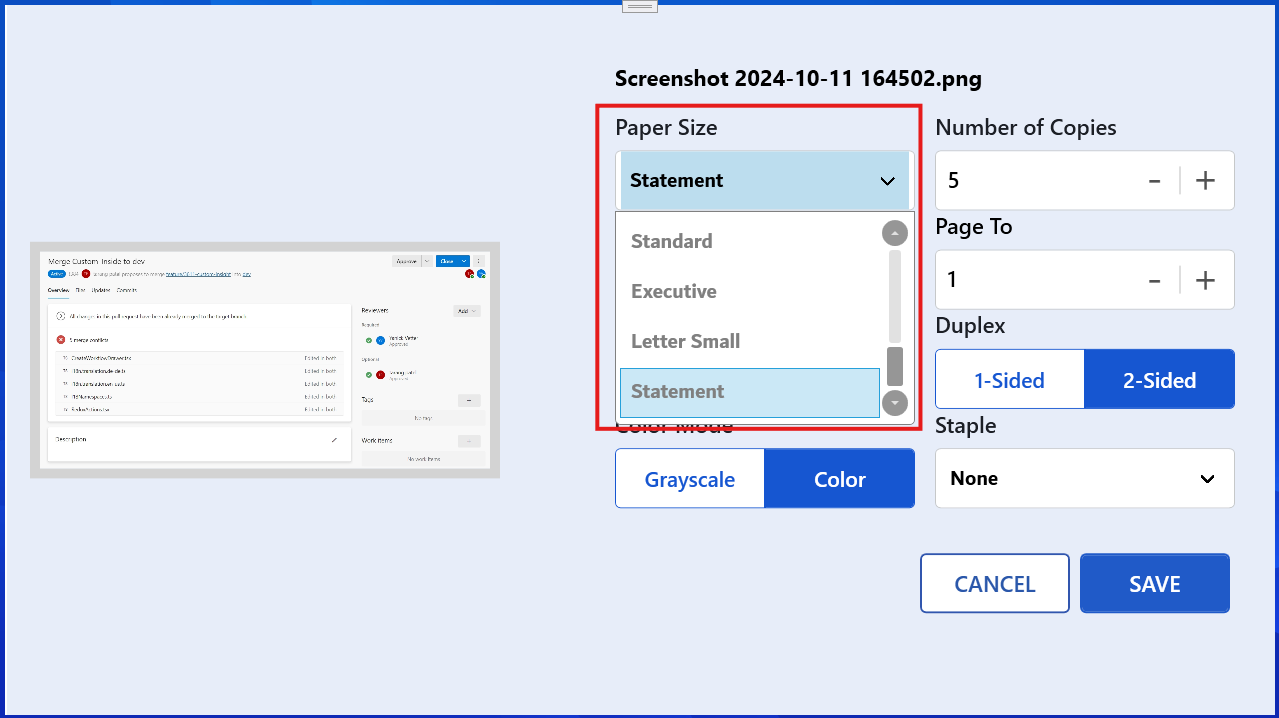
Paper Size Selection
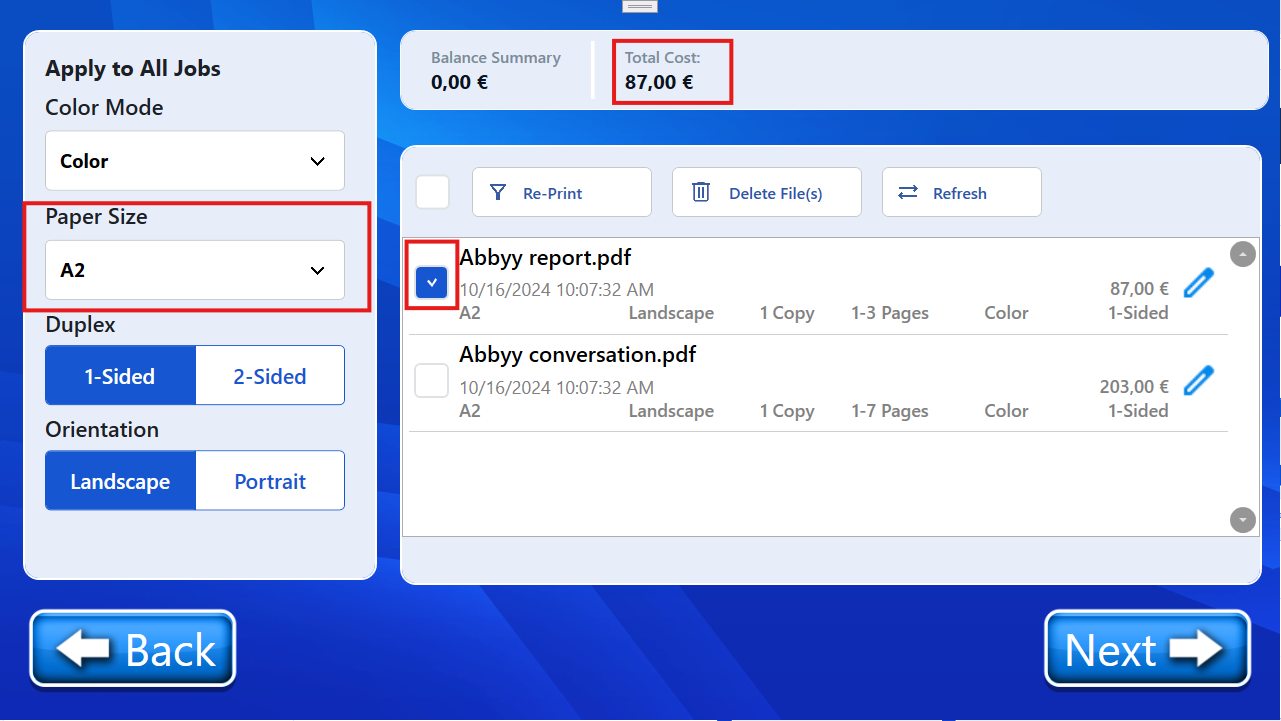
Paper Size Selection Change Effect on Total Cost ….
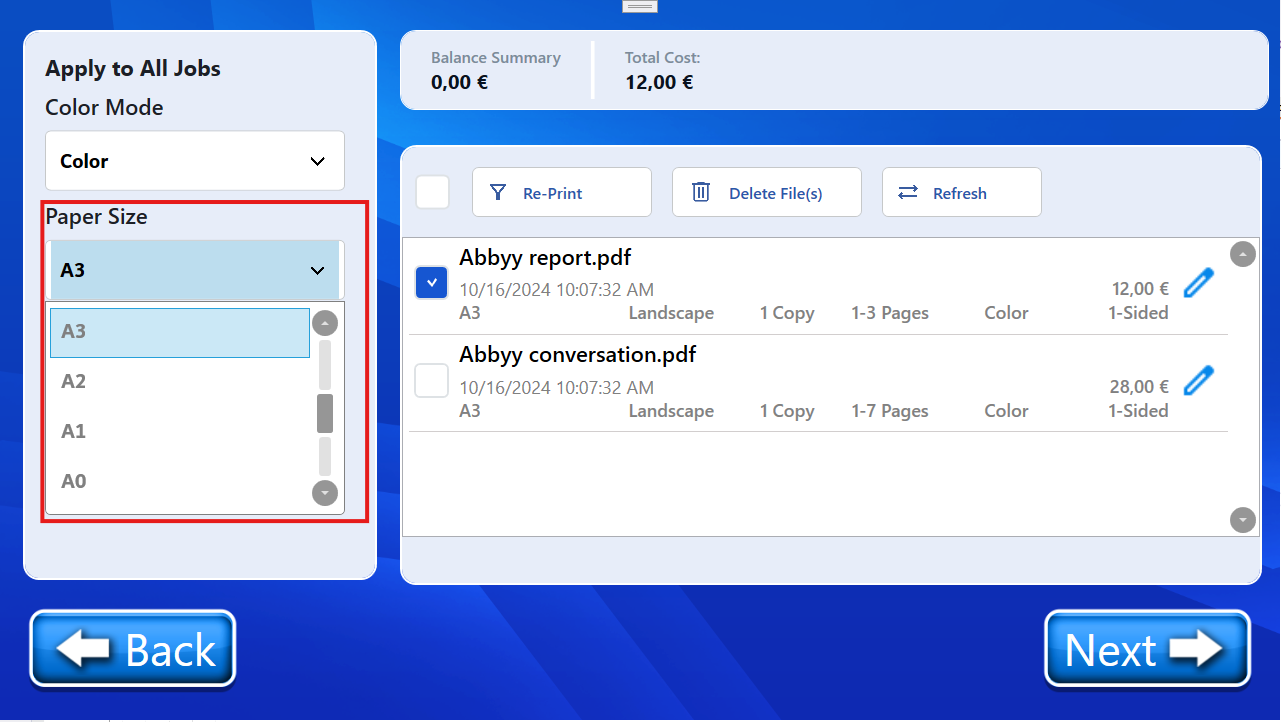
E.g. 1>
E.g. 2>
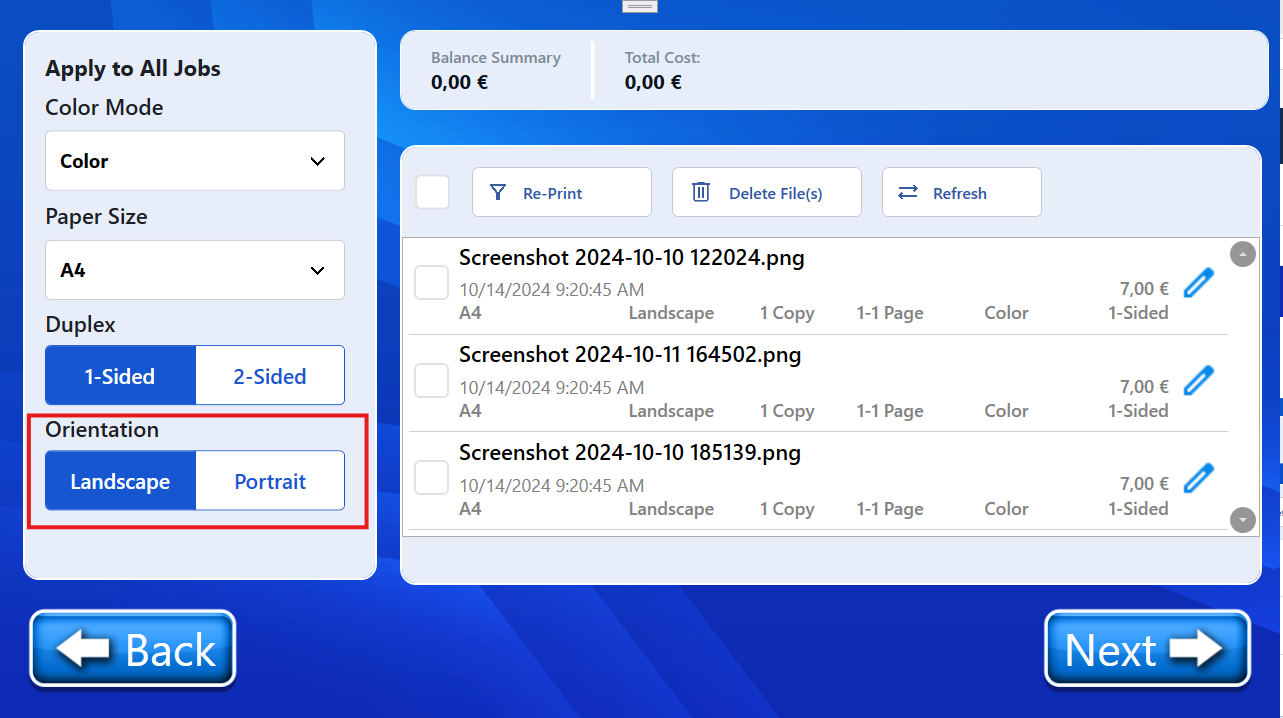
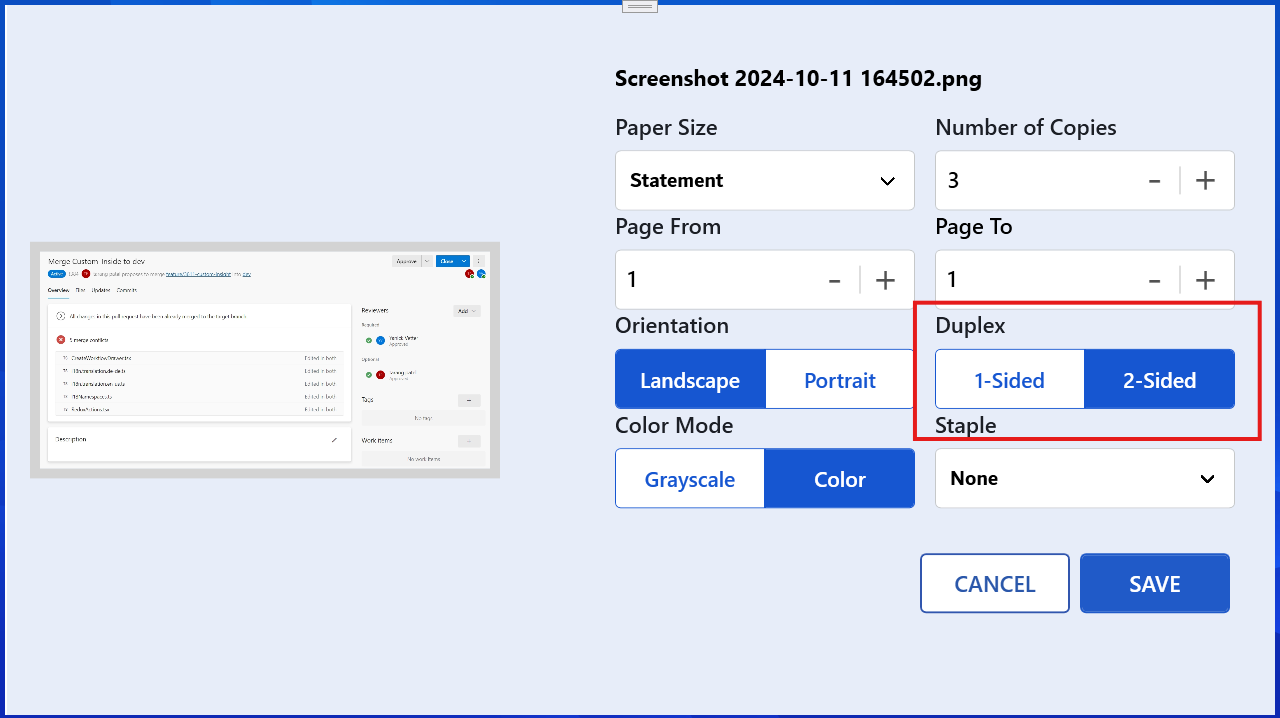
Duplex (2 option, 1> 1-Sided ,2> 2-Sided)
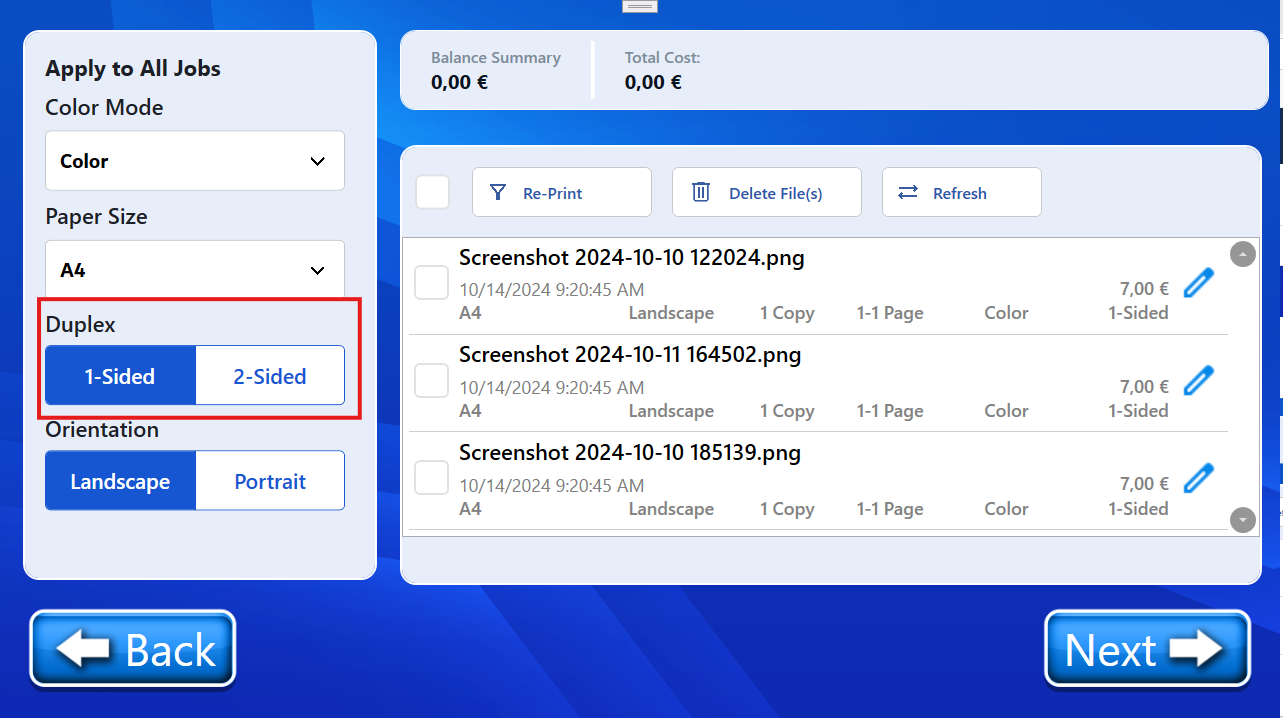
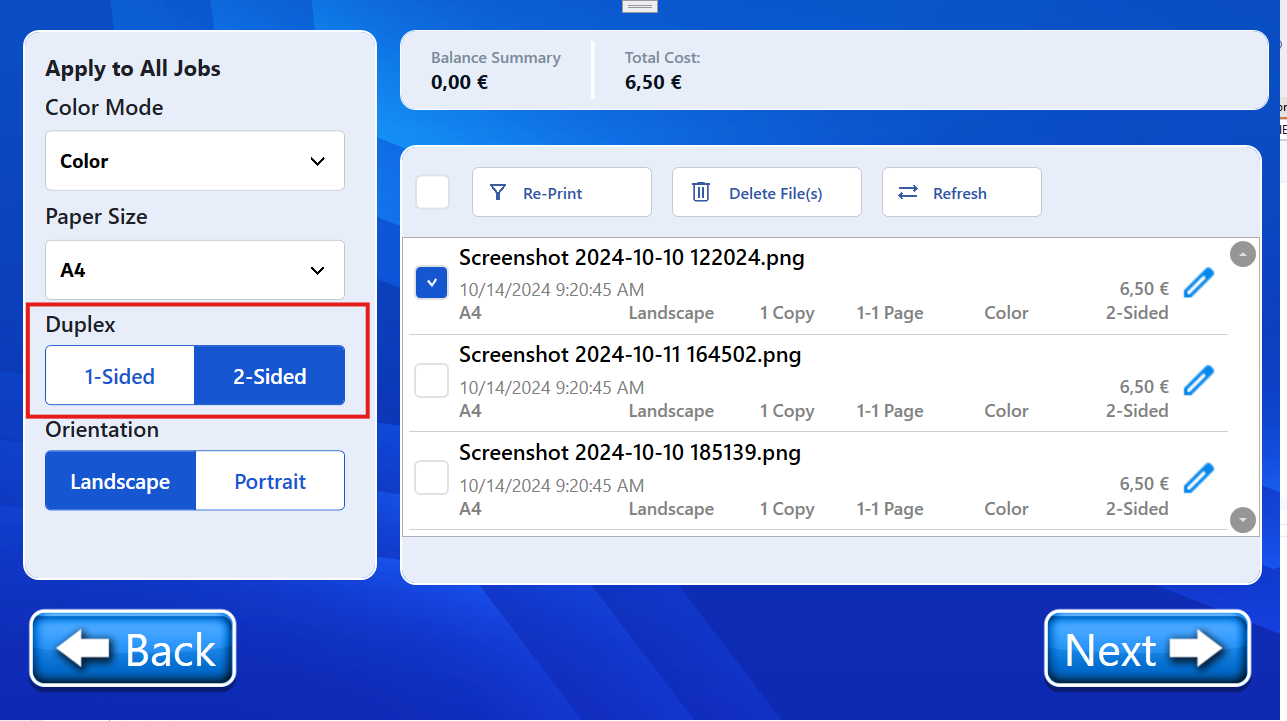
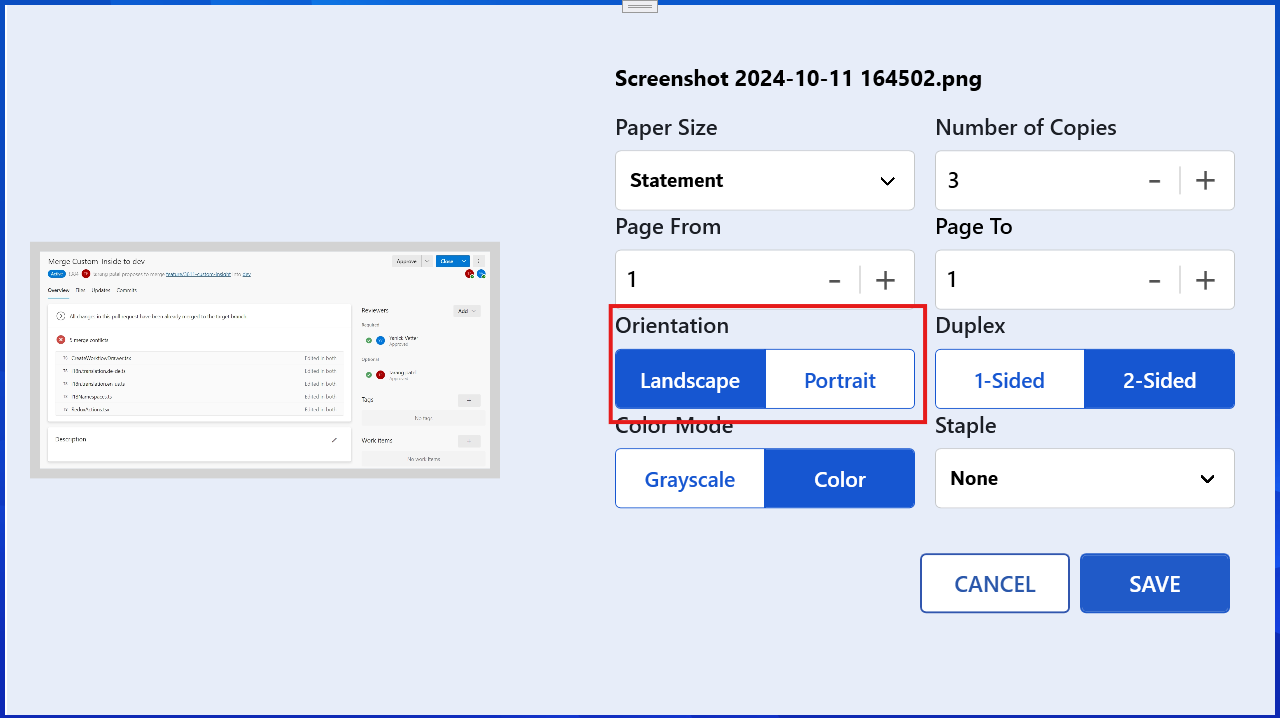
Page Orientation (2 option, 1> 1-Landscap ,2> 2-Portrait)
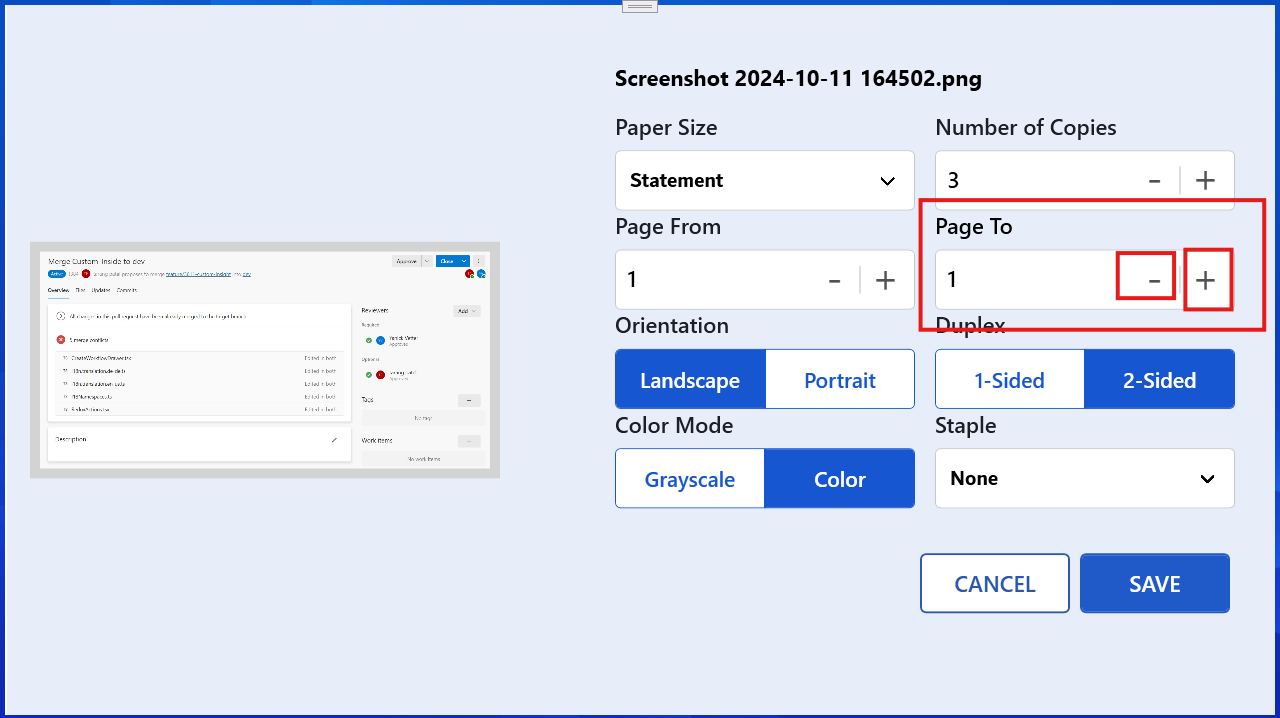
On Click Pencil Icon it will be Open in new Edit Window (btnEdit_Click)
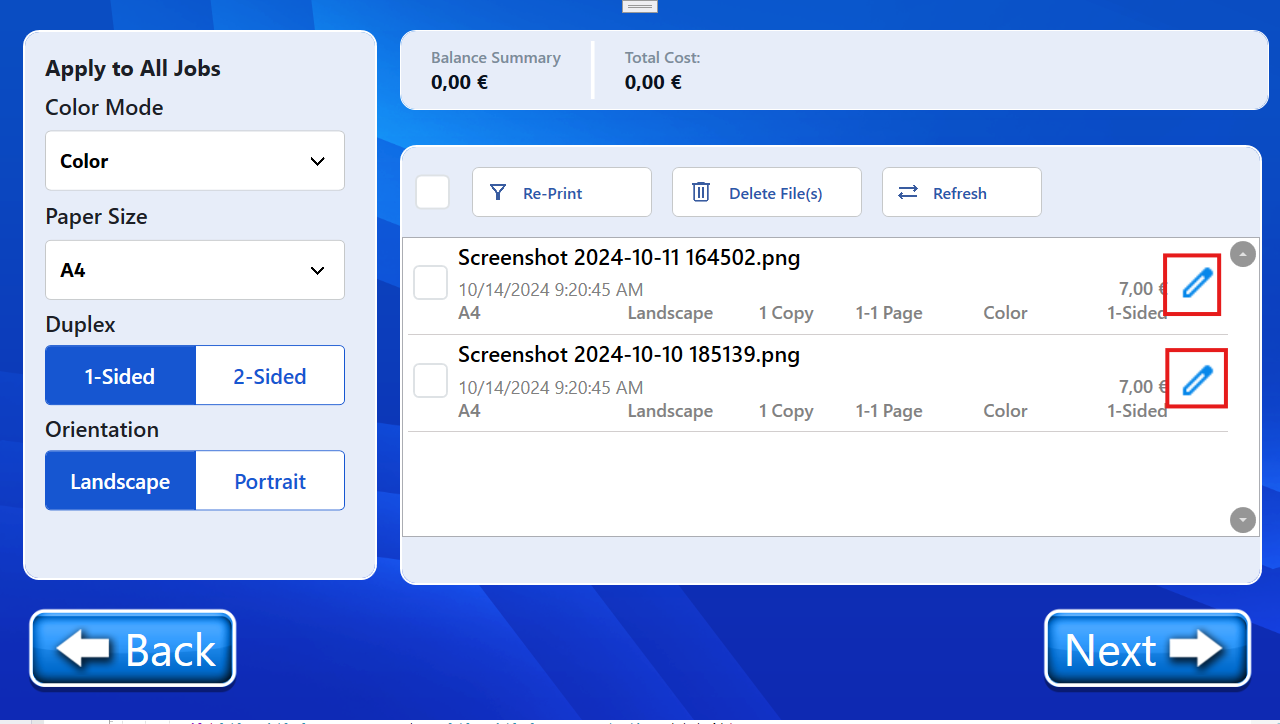
for the Edit Window ePRINTit_EditMode_Standard.xaml used
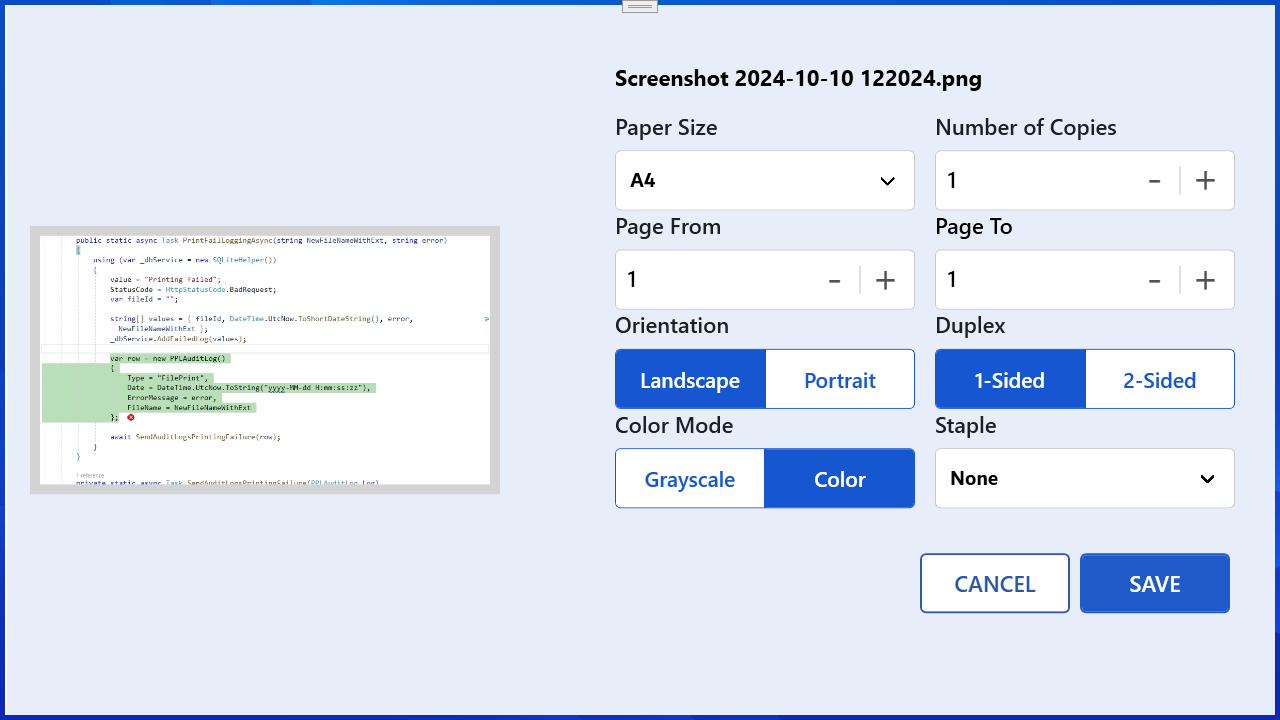
All the Configuration are applied in selected record only
PaperSize will be Filled at load time
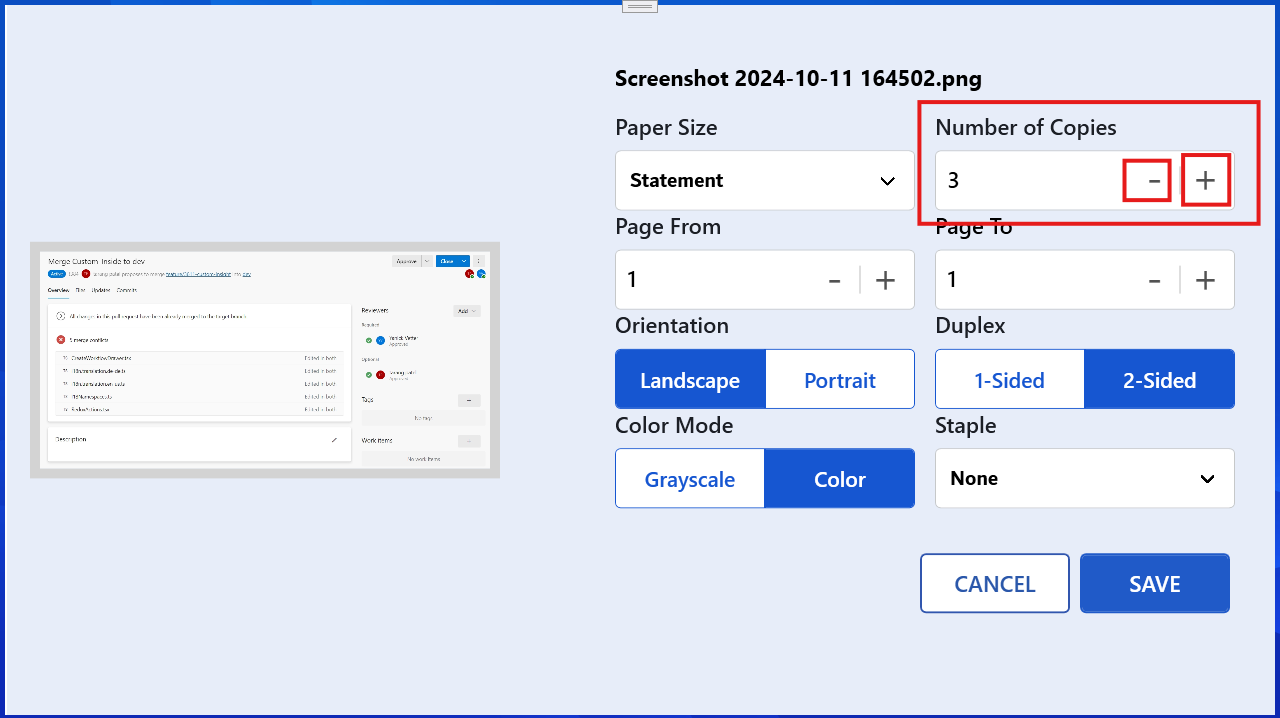
Number Of Copies can be change using + or - button click
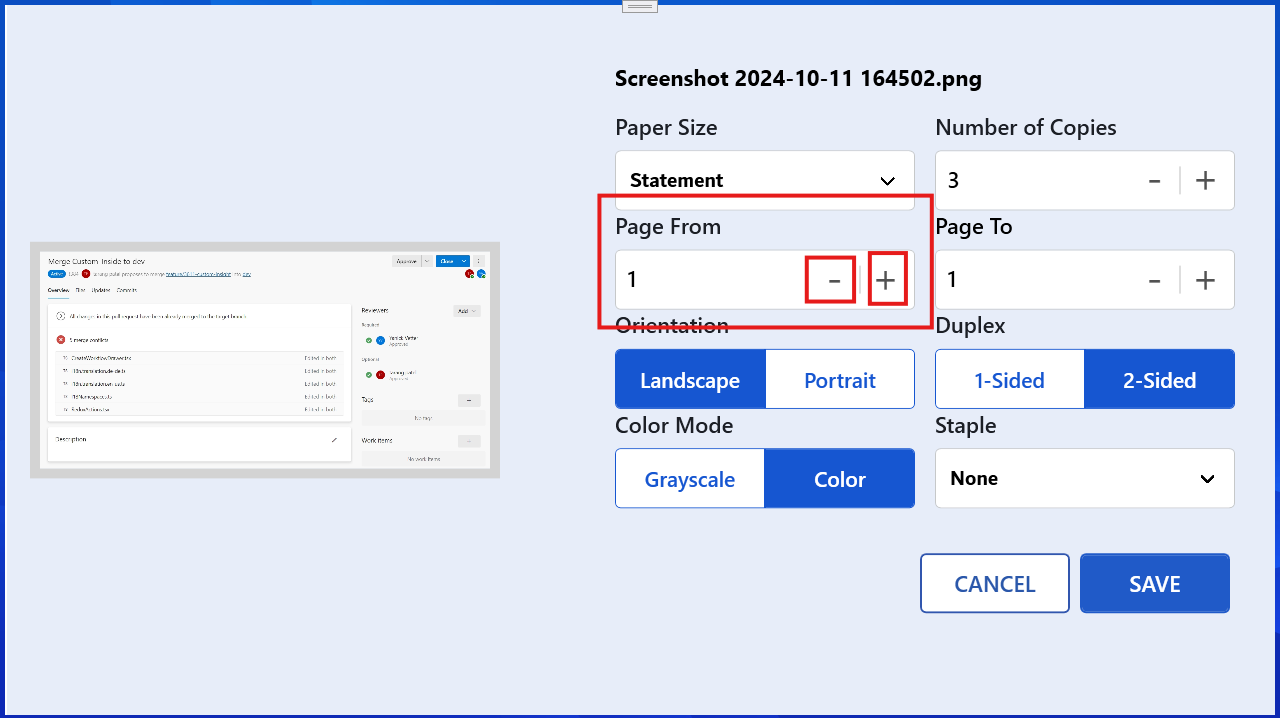
Page From and To can be change using + or - button click .
it’s only useful for multiple image or document appear.
Page Orientation , Duplexity and Color Mode.
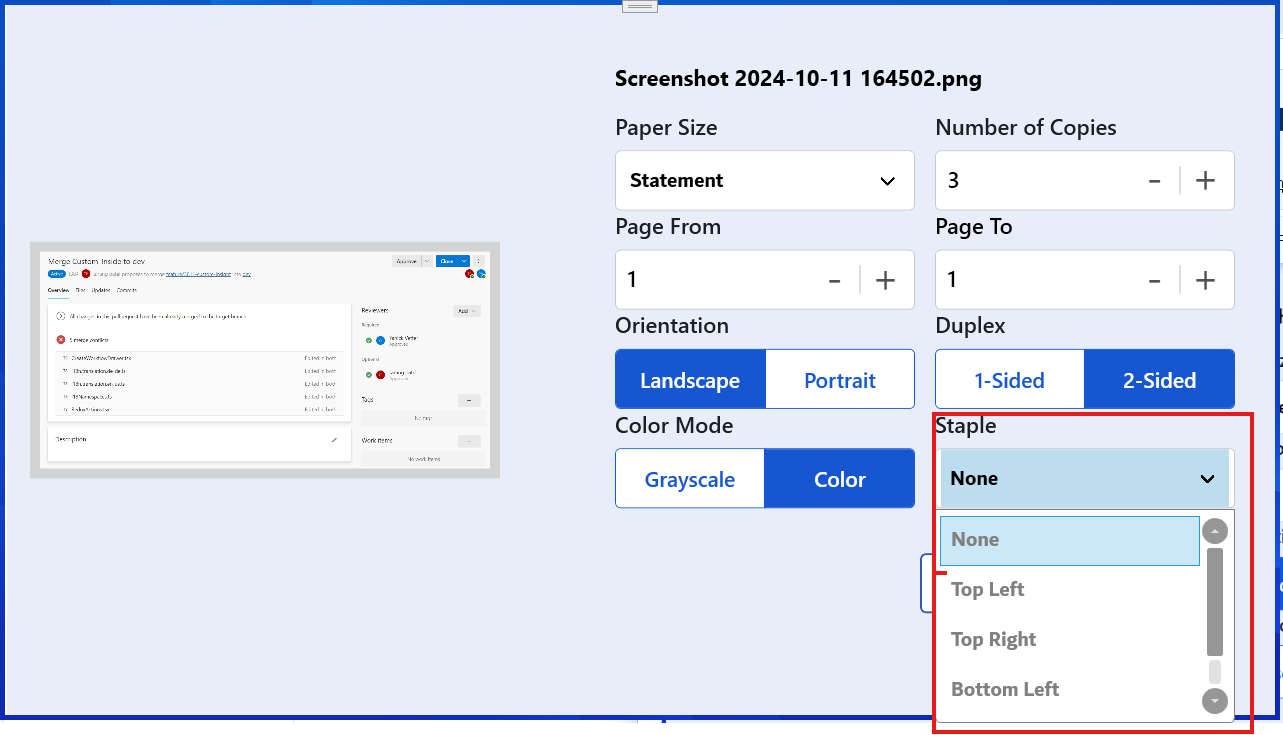
Staple Option are Load Dynamically from Page Load
When the page (ePRINTit_FileList_Ne.xaml) it will attempt to load balance settings using kiosk token and graphql. If there is no balance data found then it will show 0 and if there is any balance, it will display the total of all accounts as summary.
Based on the balance, Total cost and the Payment option, Next button and PayNow button will be toggled. If the job version is not free and total cost exceeding the balance then the PayNow button will be displayed, otherwise it will show only Next button.
The control will go to the PrintConvertedImage_ePRINT() function, which is responsible for printing the document.
After successful print or failed print, we send usage log to the IoT using kiosk token. and then user will be navigated to JobDone page regardless of failure of print or successful print.
Quick notes:
The printing functionality are written in
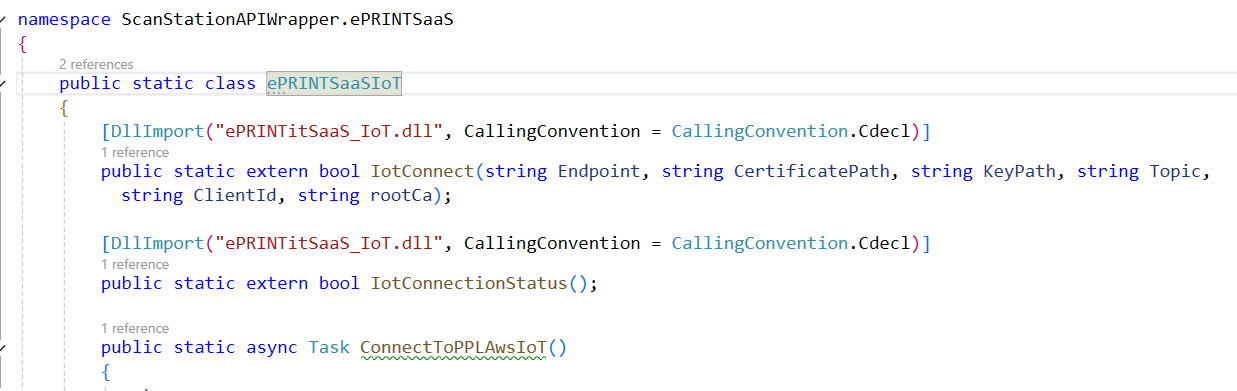
PrnConverter.csfilePPLApi.csfile is having core code for the ePRINTit SaaS.ScanStationAPIWrapperProject, which is responsible to connect and Send MQTT to AWS IoT is also responsible to connect IoT for the ePRINTit SaaS, but we’re using c++ library to connect aws IoT.
SQLiteHelper.csfile is handing the following tables, which are identical to cloud-kiosk-saas application.UsageTable :
FailedLogTable :
FailedRetryTable
Workflow of ePRINTit SaaS