Technical Documentation: IPP Configuration Flow
Overview
This document provides a detailed guide on configuring and managing Internet Printing Protocol (IPP) settings in the system. The IPP configuration determines how the system interacts with printers via IPP, covering various scenarios, including single and multiple printer setups. Key steps include configuring the IPP server settings, enabling or disabling IPP functionality, managing print job routing, and ensuring job status updates based on printer configuration and availability.
Configuration Flow in ScanEZ
The IPP configuration can be set up via the system interface, where users can enable or disable IPP, set up authentication, and route print jobs based on specific printer configurations. The flow includes the following main steps:
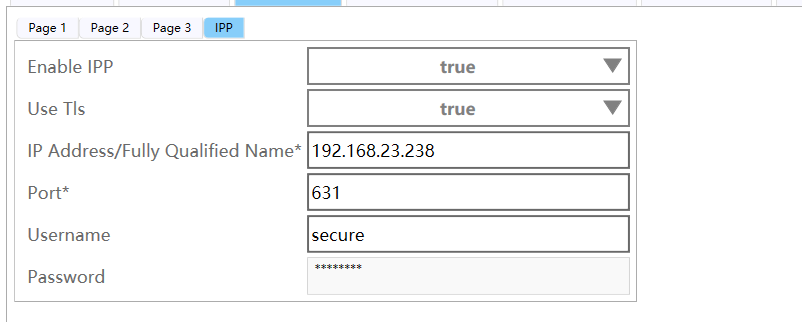
1. Set Up IPP Configuration
Navigation: Go to Configuration → Printer → IPP to access IPP settings.
Configuration Options:
IPP Enable: Toggle IPP functionality on or off.
IPP Address: Enter the IPP server address.
Port: Enter the IPP port number.
Username: Enter the username for IPP authentication.
Password: Enter the password for IPP authentication.
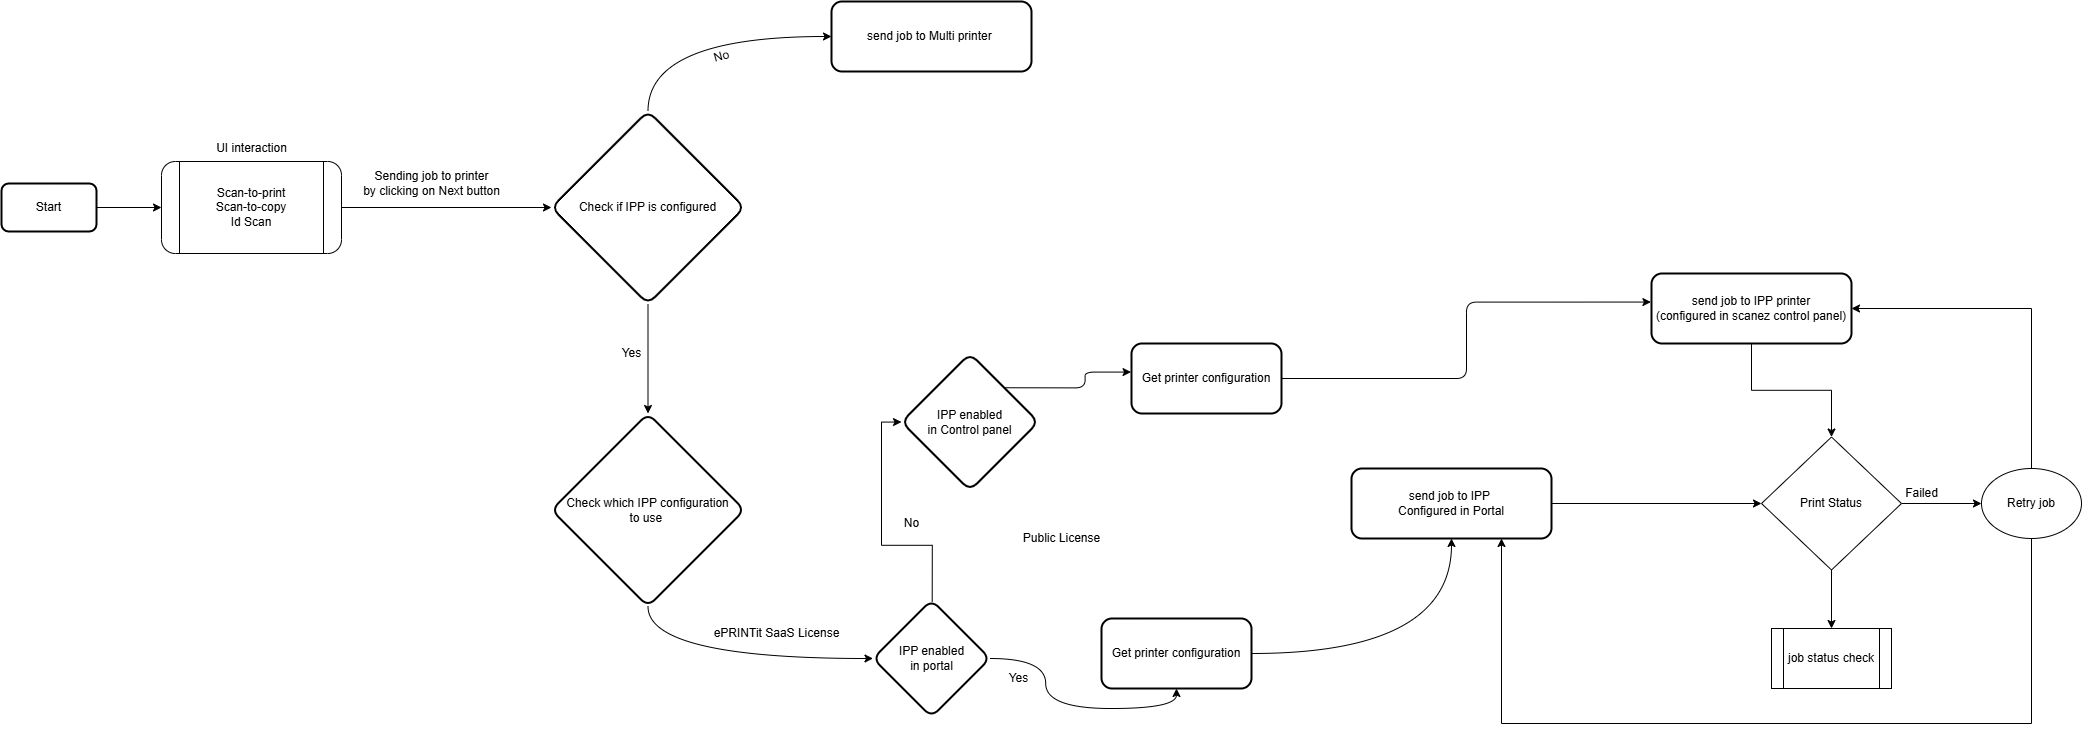
2. Configuring IPP-Enabled Mode
When IPP Enable is turned on, the system will:
Read IPP configuration settings from
Print.XML.Connect to the IPP server using Basic Authentication.
Perform the following actions:
Check Printer Attributes: It will check printer attributes
Send Document for Processing: Transmit the document to the IPP server for processing.
3. Configuring Non-IPP Mode with Multiple Printers
When IPP Enable is turned off, the system will check if multiple printers are configured:
Multiple Printers Enabled:
The system will refer to Configuration → Printer → Page 1 for the following printer types:
Color Printer
Grayscale Printer
Black & White Printer
The print job will be routed to the appropriate printer type based on job requirements and configuration.
4. Configuring Non-IPP Mode with Default Printer
If IPP Enable is off and multiple printers are disabled, the system defaults to using the System Default Printer, typically a LAN-connected printer.
Pre-Job Status Check
Before sending a print job to the printer, the system will:
Verify the printer status and tray information.
Ensure that the printer is available and has the required resources to print the job.
Make adjustments as needed based on the printer's status and tray configuration.
Detailed Configuration Steps
Step 1: Enable or Disable IPP
Enable IPP:
Navigate to the IPP settings and toggle IPP Enable to "On".
Enter the necessary details for IPP connection and authentication.
Save the configuration.
Disable IPP:
Toggle IPP Enable to "Off".
Confirm the configuration to ensure the system follows non-IPP printing logic.
Step 2: Connect to IPP Server (If Enabled)
If IPP is enabled, the system will:
Load the IPP server configuration from
Print.XML.Use Basic Authentication with the configured username and password to connect to the server.
Start a new job session and send the document for processing.
Step 3: Handle Multiple Printer Scenarios
If IPP is disabled and multiple printers are configured:
The system will determine which printer type (Color, Grayscale, Black & White) is suitable for the job based on the configuration and job requirements.
The print job will be routed to the selected printer for processing.
Step 4: Handle Default Printer Scenario
If multiple printers are disabled and IPP is off:
The print job will be sent to the System Default Printer.
This is typically the main LAN-connected printer used for general printing.
Step 5: Pre-Job Status and Tray Information Check
Before each print job is sent, the system:
Checks the current status of the printer to confirm it is ready.
Verifies tray information to ensure the correct media type and resources are available.
Uses this information to adjust job processing steps as necessary, based on printer readiness and available resources.
Error Handling and Troubleshooting
Authentication Errors: Ensure the correct username and password are set up in the IPP configuration.
Connection Failures: Verify the IPP address and port settings.
Printer Status Check Failures: Confirm that the printer is connected, powered on, and properly configured in the system.

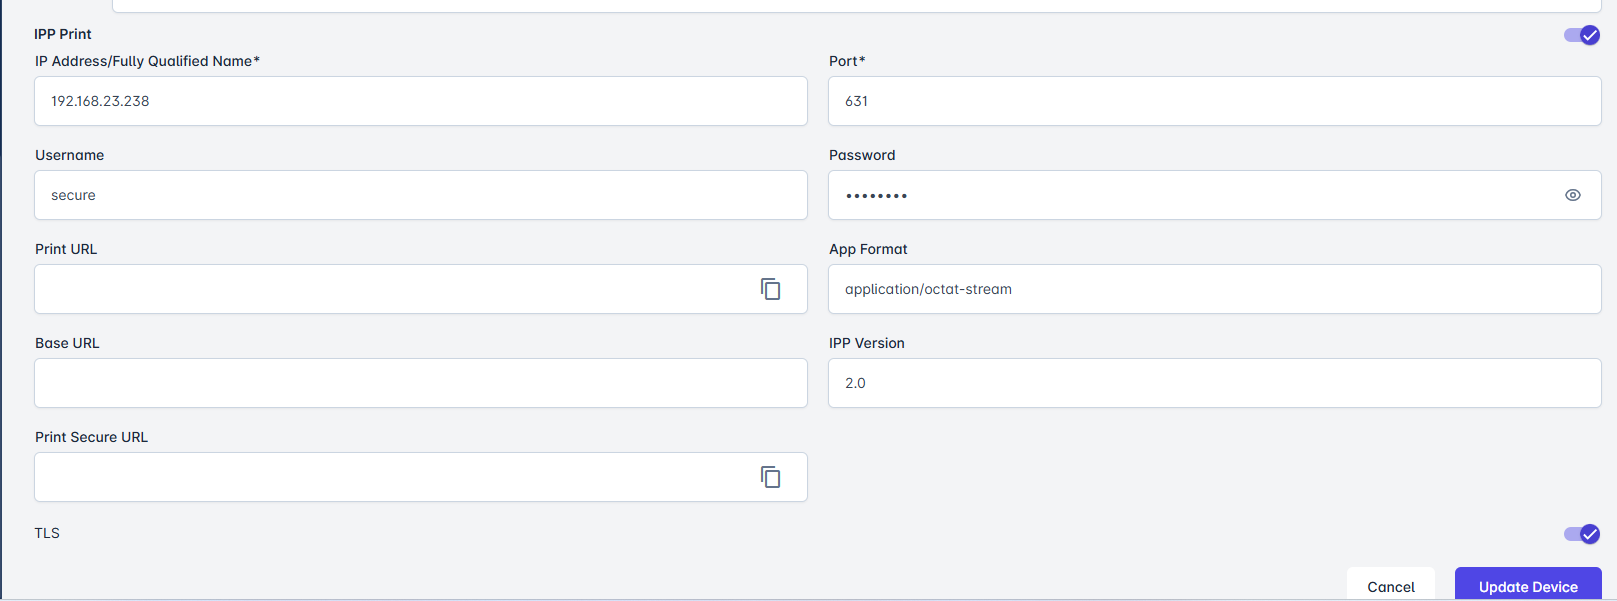
Configure IPP in Portal
In the devices, select your device. at the bottom side the IPP configuration panel is shown. Enable it and enter the required field.


