ScanEZ Cloud Portal Machine Configuration.
On this page, we discuss how we configure our ScanEZ machine from the ScanEZ cloud portal.
We can update and change the settings of our ScanEZ machine from our cloud portal. We can update multiple machines simultaneously. Also, we can schedule an event for machine updates from here.
On this page, we will see how we can update/configure our machine also we will discuss all the configuration settings.
Now, let’s start.
As we discussed in the previous page about all the features of the machine configuration page.
Here we discuss all the settings which we can update from our cloud portal.

In the above screenshot, we can see that there are 6 settings.
General
Features
Configuration
Payment
Log
Display
Now we will discuss all the settings in detail.
General: In this section, we will see all the general settings.
In general, there are 5 different sections.
System
Limit
Abbyy
OmniPage
Onscreen language.
System
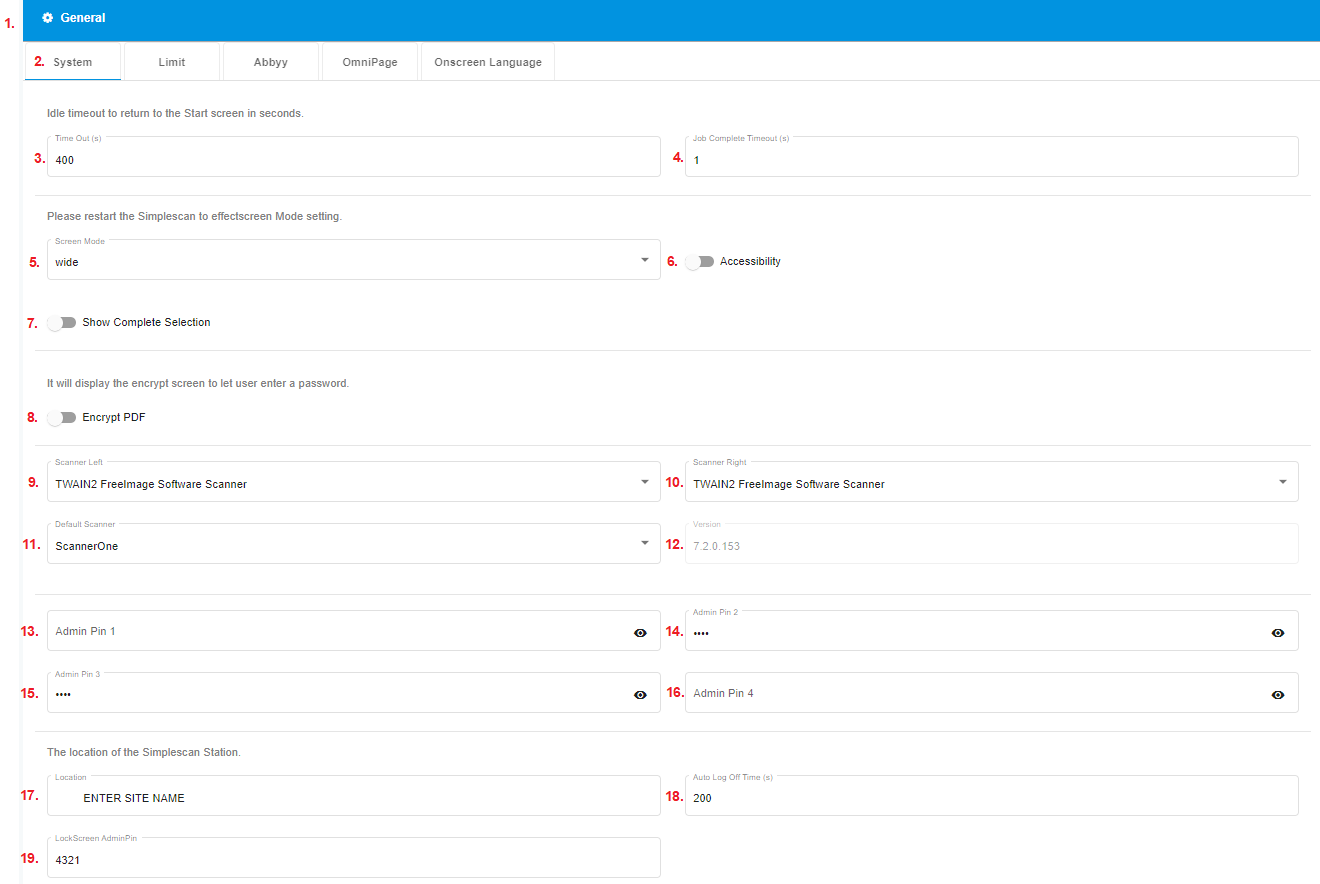

The below points explain the above screenshot:-
Here we see the tag of the main setting name.
Here we see the tag of the sub-setting name.
Time Out(s)- In this textbox, we enter the time at which we want to set timeout. Here timeout means that, the time after which our scanEZ application will automatically go back to the home screen if we are not using it. For example, if we are using scan-to-print and we are on any screen other than the home screen and we left the machine at that page then after defined timeout seconds our application will return back to the home screen automatically.
This value must be a numerical character i.e. from 0-9 only.
Job Complete Timeout(s)- In this textbox, we enter the time duration for which we want to see our job complete message on our screen. When we complete our job then at the end we see this job complete message for the duration which we will enter.
This value must be a numerical character i.e. from 0-9 only.
Screen Mode- From this dropdown, we can select the screen mode that we want. In this dropdown, we can see multiple screen modes here which are as follows:

a. Standard mode.
b. Wide mode
c. Wide rotate mode.
d. Auto fit mode.
6. Accessibility- Here we see a toggle bar by which we can on and off accessibility button visibility.
7. From this toggle bar, we can on and off show the complete section at the end of job completion.
8. From this toggle bar, we can on and off encrypt PDF setting.
9. Scanner Left- From this dropdown, we can select any one scanner which we want to use in our scanEZ application. There are multiple scanners which are as follows.
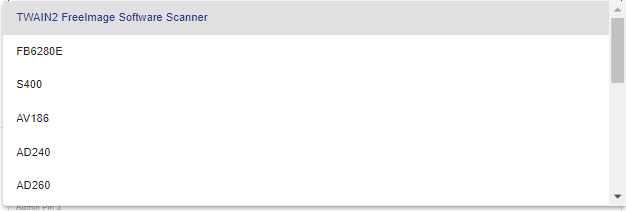
10. Scanner Right- From this dropdown, we can select any one scanner which we want to use in our scanEZ application. There are multiple scanners which are as follows.

11. Default Scanner- From this dropdown, we can select either Scanner left as default or scanner right as default.
12. Here we see the version of the scanEZ application which we are using.
Admin pin is used to access the control panel of the scanEZ application. We can choose 4 admin pins.
13. We can choose admin pin 1.
14. We can choose admin pin 2.
15. We can choose admin pin 3.
16. We can choose admin pin 4.
17. Here we can enter the site name.
18. Auto Log Off Time(s)- After this time, we will automatically log off.
19. We use this pin to unlock our screen when the point number 25 checkbox is checked.
20. This checkbox enables the save to other media button after the job is completed.
21. Enable/Disable the copyright warning screen.
22. This checkbox checks the internet connection before the media page. ScanEZ will test the Internet connection before the media page. If no internet it will not allow Internet-dependent features.
23. Enable/Disable Logoff Button on the main screen. Will log off to the Windows login screen.
24. Enable/Disable the Logoff button on finishing the scan.
25. Enable/Disable the lock of the screen at the end of each session.
26. Time in seconds ScanEZ will auto-log off due to inactivity. Only enabled if point number 24 is checked.
27. Under construction
28. Show the next button on the scanner selection page.
Limit
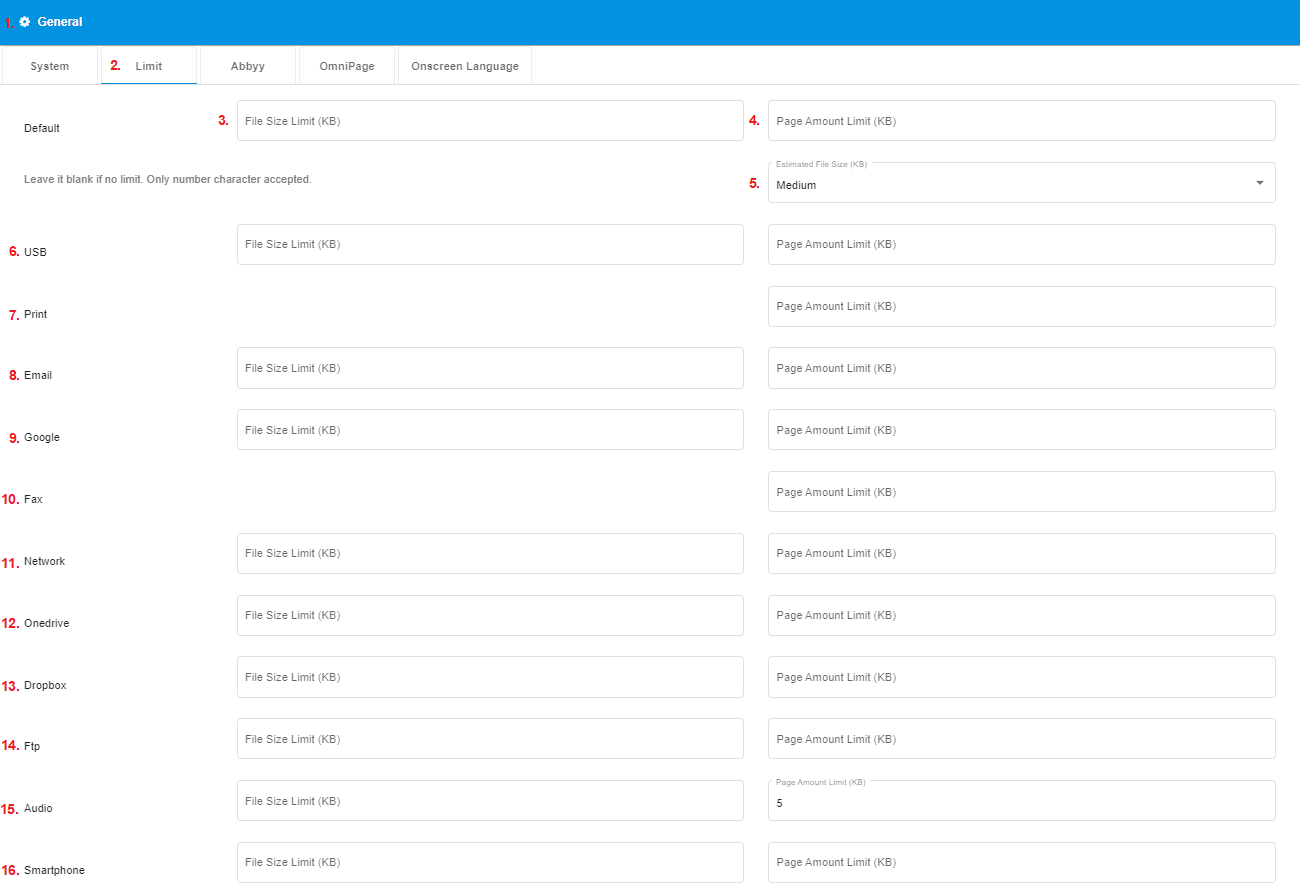
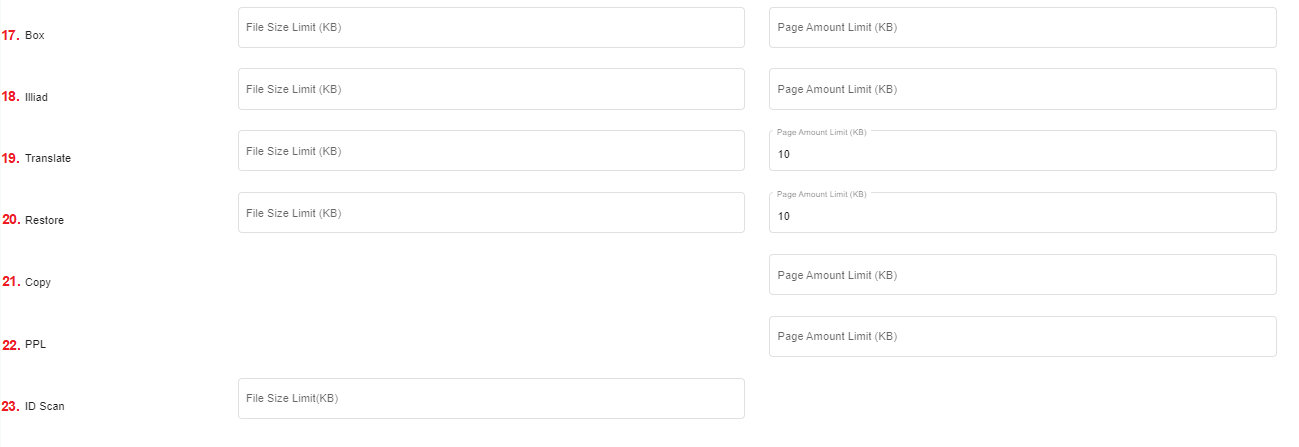
The below points explain the above screenshot:-
Here we see the tag of the main setting name.
Here we see the tag of the sub-setting name.
From here we can set the default “File Size Limit” in KB.
From here we can set the default “Page Amount Limit”.
From this dropdown, we can select the Estimated file size in KB.

6. From here we can set “File Size Limit” in KB and “Page Amount Limit” for USB.
7. From here we can set the “Page Amount Limit” for Print.
8. From here we can set “File Size Limit” in KB and “Page Amount Limit” for Email.
9. From here we can set “File Size Limit” in KB and “Page Amount Limit” for Google.
10. From here we can set the “Page Amount Limit” for FAX.
11. From here we can set “File Size Limit” in KB and “Page Amount Limit” for Network.
12. From here we can set “File Size Limit” in KB and “Page Amount Limit” for OneDrive.
13. From here we can set “File Size Limit” in KB and “Page Amount Limit” for DropBox.
14. From here we can set “File Size Limit” in KB and “Page Amount Limit” for FTP.
15. From here we can set “File Size Limit” in KB and “Page Amount Limit” for Audio.
16. From here we can set “File Size Limit” in KB and “Page Amount Limit” for Smartphones.
17. From here we can set “File Size Limit” in KB and “Page Amount Limit” for Box.
18. From here we can set “File Size Limit” in KB and “Page Amount Limit” for Illiad.
19. From here we can set “File Size Limit” in KB and “Page Amount Limit” for Translate.
20. From here we can set “File Size Limit” in KB and “Page Amount Limit” for Restore.
21. From here we can set the “Page Amount Limit” for Copy.
22. From here we can set the “Page Amount Limit” for PPL.
23. From here we can set “File Size Limit” in KB for ID scan.
Abbyy
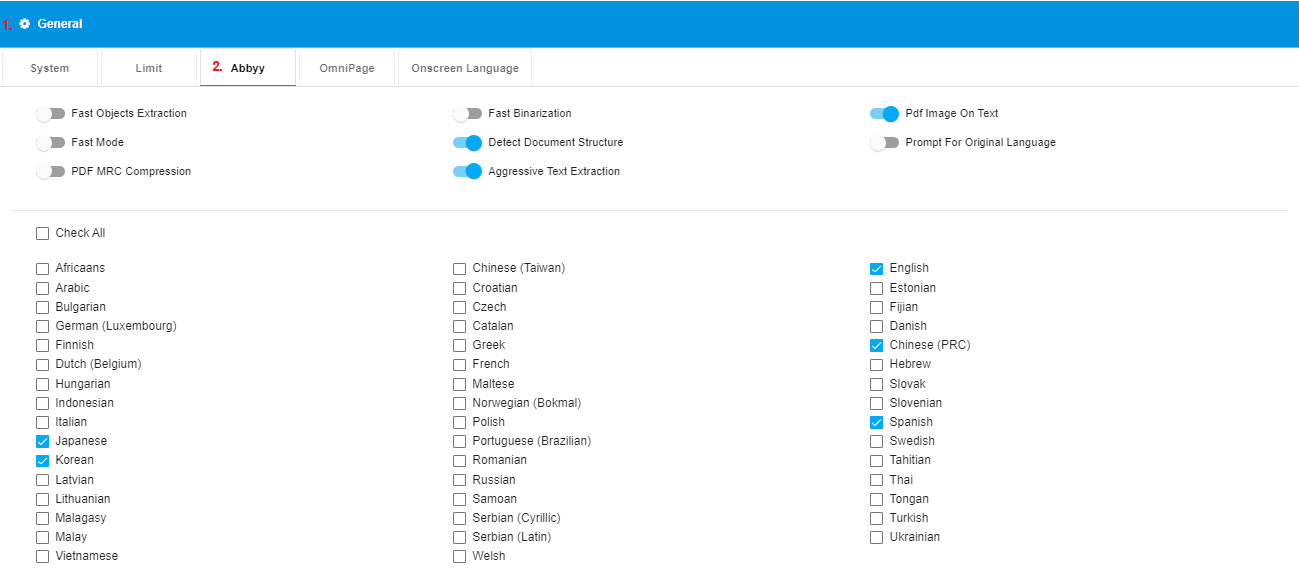
The below points explain the above screenshot:-
Here we see the tag of the main setting name.
Here we see the tag of the sub-setting name.
Settings for the ABBYY Finereader OCR Software can be configured from here.
The ScanEZ will only search for the checked languages to OCR.
On Screen Language

The below points explain the above screenshot:-
Here we see the tag of the main setting name.
Here we see the tag of the sub-setting name.
From this dropdown, we can select any default language. By default it is English.
We can select/deselect all the below language by using this checkbox.
We can choose all the languages which we want.
2. Features: In this section, we see all the features. All features are as follows:-
Customs
Cloud Source
General
Options
Color
Resolution
Copyright
Scan Copyright
Customs:

The below points explain the above screenshot:-
Here we see the tag of the main setting name.
Here we see the tag of the sub-setting name.
From here we can Enable/Disable the custom start screen.
From here we can Hide/Unhide the start screen.
From this dropdown, we can select media for Job 1.
From this dropdown, we can select media for Job 4.
From this dropdown, we can select media for Job 7.
From this dropdown, we can select media for Job 2.
From this dropdown, we can select media for Job 5.
From this dropdown, we can select media for Job 8.
From this dropdown, we can select media for Job 3.
From this dropdown, we can select media for Job 6.
The above dropdown contains the following list of media:-
None- we are not selecting any media.
Audio
Box
Cloud Source
Copy
DropBox
Email
Fax
FTP
Google Drive
Id Scan
Network
One Drive
Print
Print release
Restore
Scan
Smartphone
Translation
USB
USB source
General

The below points explain the above screenshot:-
Here we see the tag of the main setting name.
Here we see the tag of the sub-setting name.
From this dropdown, we can select our first job.
From this dropdown, we can select our second job.
From this dropdown, we can select our third job.
From this dropdown, we can select our fourth job.
From this dropdown, we can select our fifth job.
From this dropdown, we can select our sixth job.
From this dropdown, we can select our seventh job.
From this dropdown, we can select our eighth job.
From this dropdown, we can select our ninth job.
From this dropdown, we can select our tenth job.
From this dropdown, we can select our eleventh job.
From this dropdown, we can select our twelfth job.
From this dropdown, we can select our default job selection.
From this dropdown, we can select our first cloud service job.
From this dropdown, we can select our second cloud service job.
From this dropdown, we can select our third cloud service job.
From this dropdown, we can select our fourth cloud service job.
From this dropdown, we can select our default cloud service selection job.
Options
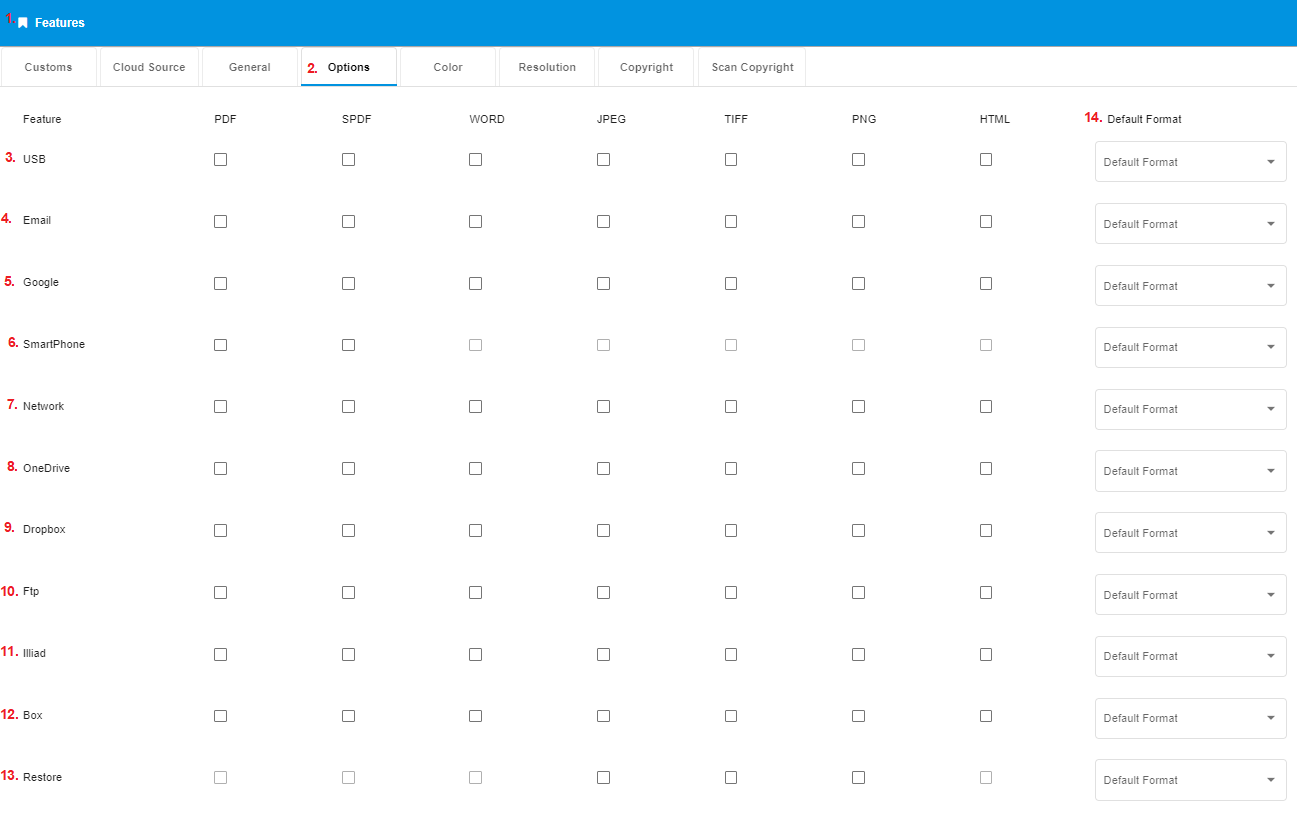
The below points explain the above screenshot:-
Here we see the tag of the main setting name.
Here we see the tag of the sub-setting name.
We can choose the options which we want to give customers while scanning any document for the USB feature.
We can choose the options which we want to give customers while scanning any document for the email feature.
We can choose the options which we want to give customers while scanning any document for the google feature.
We can choose the options which we want to give customers while scanning any document for smartphone feature.
We can choose the options which we want to give customers while scanning any document for network features.
We can choose the options which we want to give customers while scanning any document for one drive feature.
We can choose the options which we want to give customers while scanning any document for the dropbox feature.
We can choose the options which we want to give customers while scanning any document for the FTP feature.
We can choose the options which we want to give customers while scanning any document for the Illiad feature.
We can choose the options which we want to give customers while scanning any document for the box feature.
We can choose the options which we want to give customers while scanning any document for the restore feature.
We can select the default format for every feature here.
Color
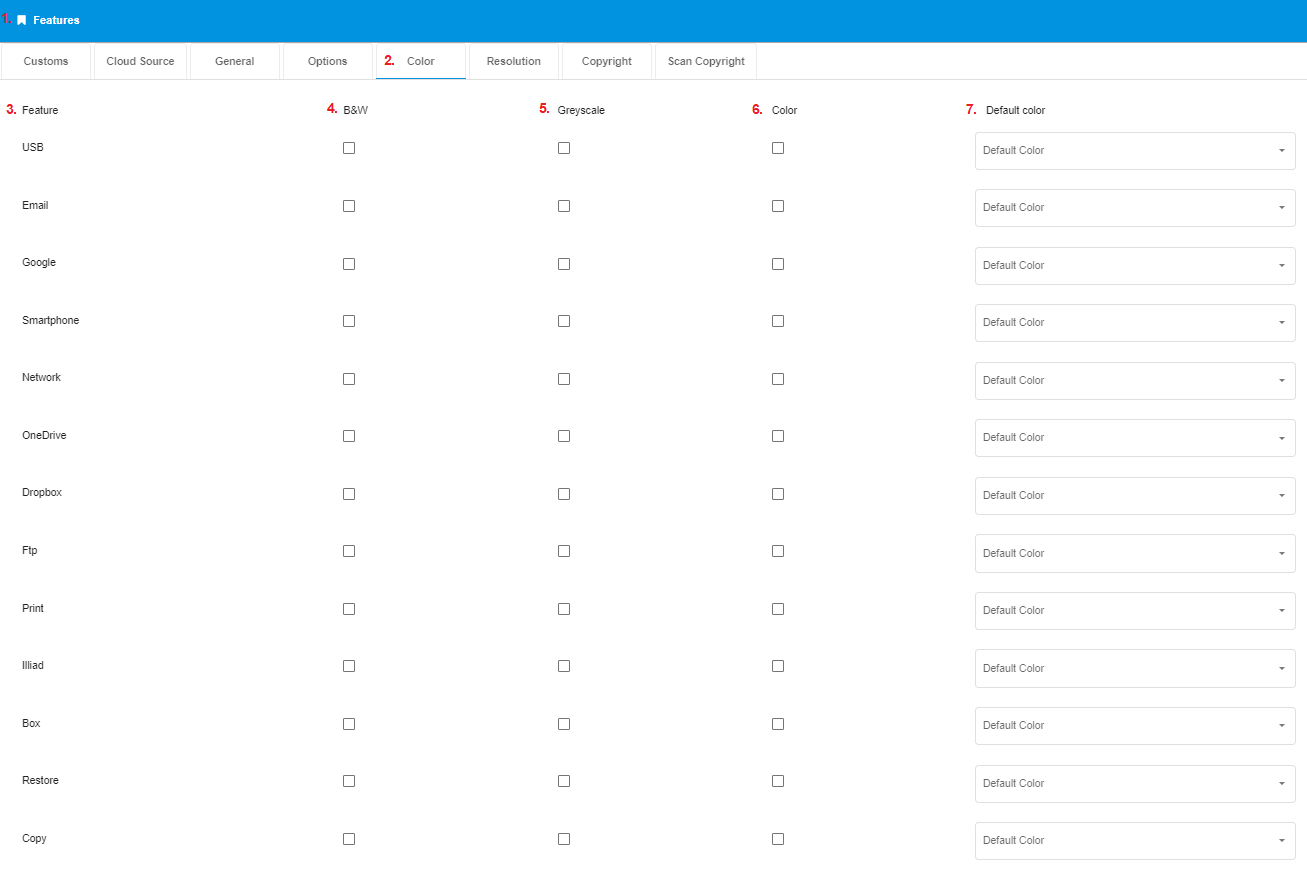
The below points explain the above screenshot:-
Here we see the tag of the main setting name.
Here we see the tag of the sub-setting name.
Here we can see a list of all the features.
From this checkbox, we can select which feature will get B&W color.
From this checkbox, we can select which feature will get greyscale color.
From this checkbox, we can select which feature will get Color.
From this dropdown, we can select the default color mode for any feature.
Resolution
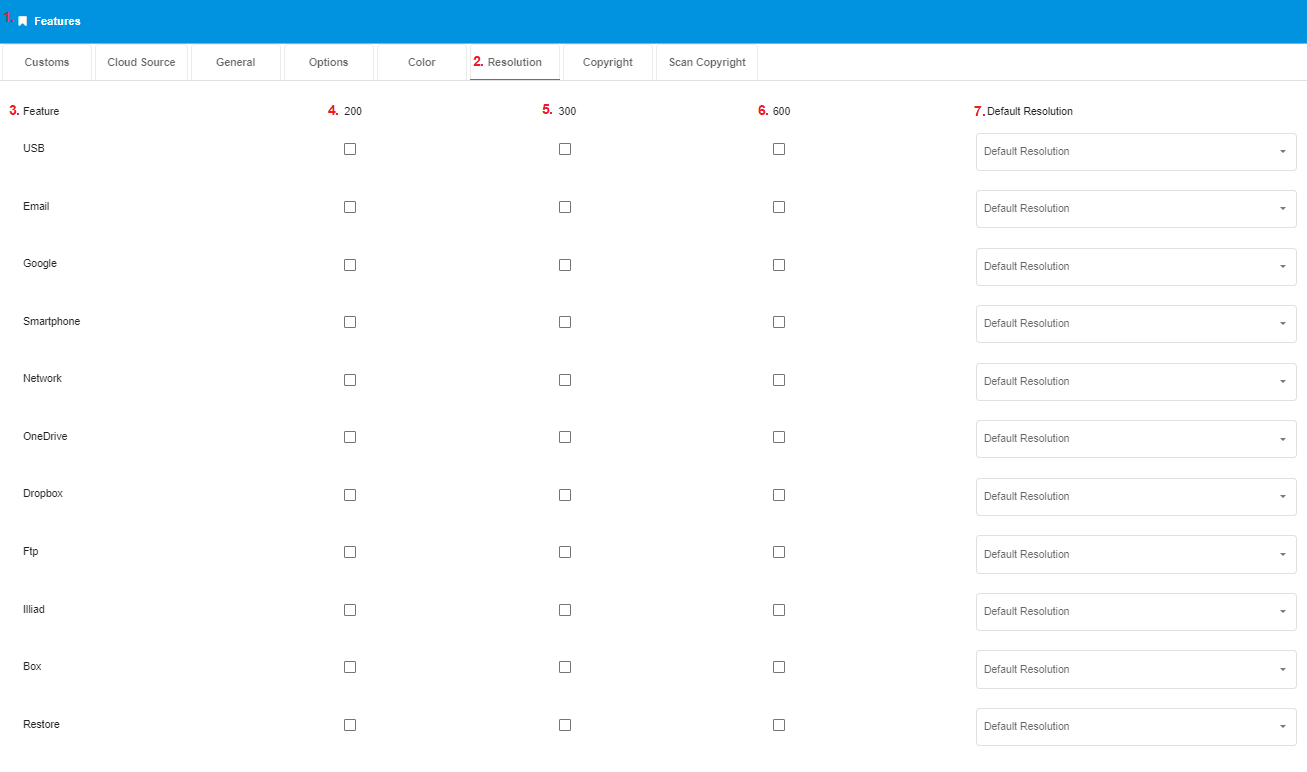
The below points explain the above screenshot:-
Here we see the tag of the main setting name.
Here we see the tag of the sub-setting name.
From here we can see a list of all features.
From this checkbox, we can enable/disable resolution unit 200.
From this checkbox, we can enable/disable resolution unit 300.
From this checkbox, we can enable/disable resolution unit 600.
From this dropbox, we can select the default resolution.
Copyright

The below points explain the above screenshot:-
Here we see the tag of the main setting name.
Here we see the tag of the sub-setting name.
From here we can enable/disable left alignment.
From here we can enable/disable center alignment.
From here we can enable/disable the right alignment.
In this textbox, we have to enter the copyright message.
Scan Copyright

The below points explain the above screenshot:-
Here we see the tag of the main setting name.
Here we see the tag of the sub-setting name.
From here we can enable/disable left alignment.
From here we can enable/disable center alignment.
From here we can enable/disable the right alignment.
In this textbox, we have to enter the copyright message.
3. Configuration: In this section, we will discuss the configuration of all the features. All the features are as follows -
USB
Email
Print
Copy
PPL
Google Drive
One Drive
Dropbox
Smartphone
Network
Fax
FTP
Translation
Audio
Illiad
Restore
Box
Now, we will discuss the configuration of all the features one by one.
USB: Here we see the configuration of the USB feature.

The below points explain the above screenshot:-
Here we see the tag of the main setting name.
Here we see the tag of the sub-setting name.
We can Enable/Disable check USB first by this toggle bar.
We can enter the default file name in this text box.
Email: Here we see the configuration of the Email feature.
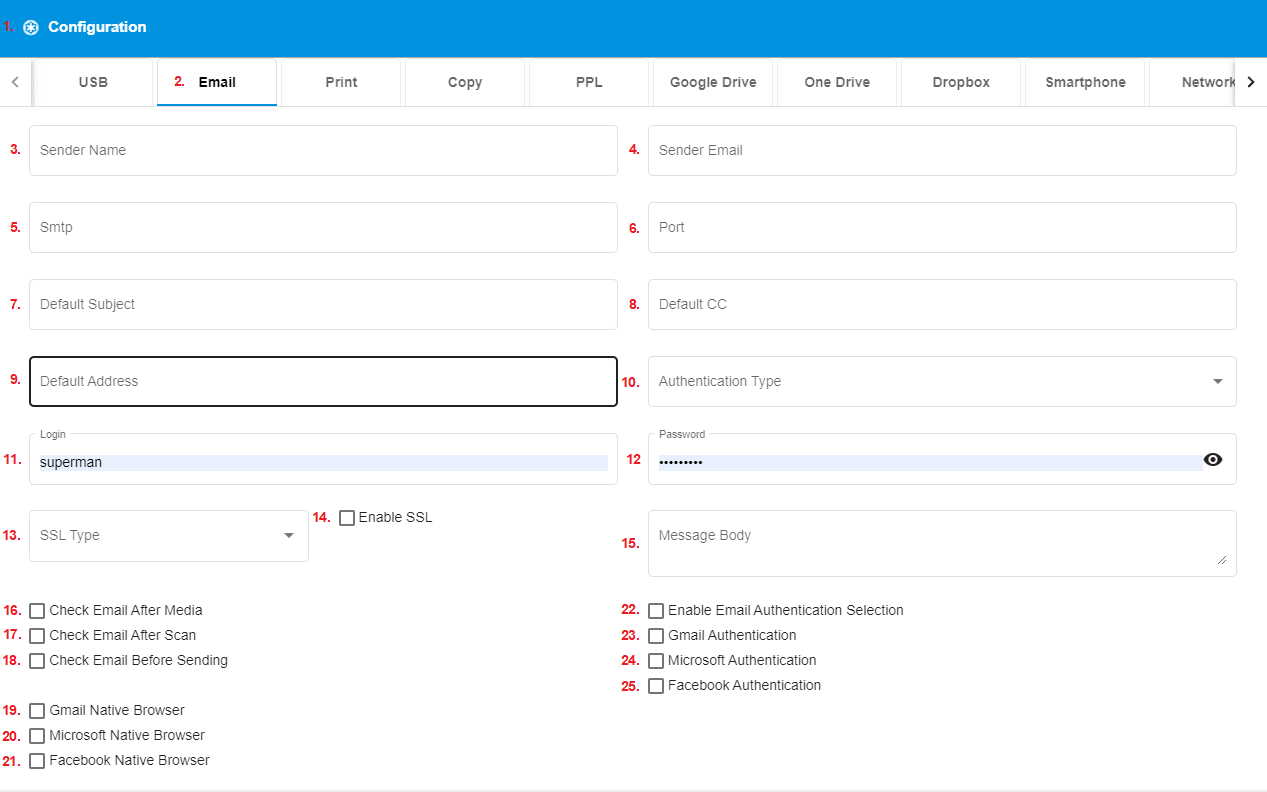
The below points explain the above screenshot:-
Here we see the tag of the main setting name.
Here we see the tag of the sub-setting name.
Here we can enter the default sender name.
Here we can enter the default sender email.
Here we have to enter the SMTP server URL.
Here we have to enter the port number.
Here we can enter the default subject.
Here we can enter the default CC address.
Here we can enter the default address to whom we want to send the email.
There are two types of authentication. We can choose any one of them from this dropdown.
Default.
NTLM.
ScanEZ email ID for logging in.
ScanEZ password for logging in.
We can choose SSL type from this dropdown. There are two types of SSL
Explicit.
Implicit.
We can Enable/Disable SSL from this checkbox.
We can enter the Default message body here.
We can Enable/Disable email connection check after media.
We can Enable/Disable the email connection check after the scan.
We can Enable/Disable email connection check before sending.
We can Enable/Disable the opening of the native browser for Gmail.
We can Enable/Disable the opening of the native browser for Microsoft.
We can Enable/Disable the opening of the native browser for Facebook.
Rather than using a generic email, we can Enable/Disable patrons to log in with their own accounts to send out emails.
We can Enable/Disable Gmail authentication.
We can Enable/Disable Microsoft authentication.
We can Enable/Disable Facebook authentication.
Print: Here we see the configuration of the Print feature.
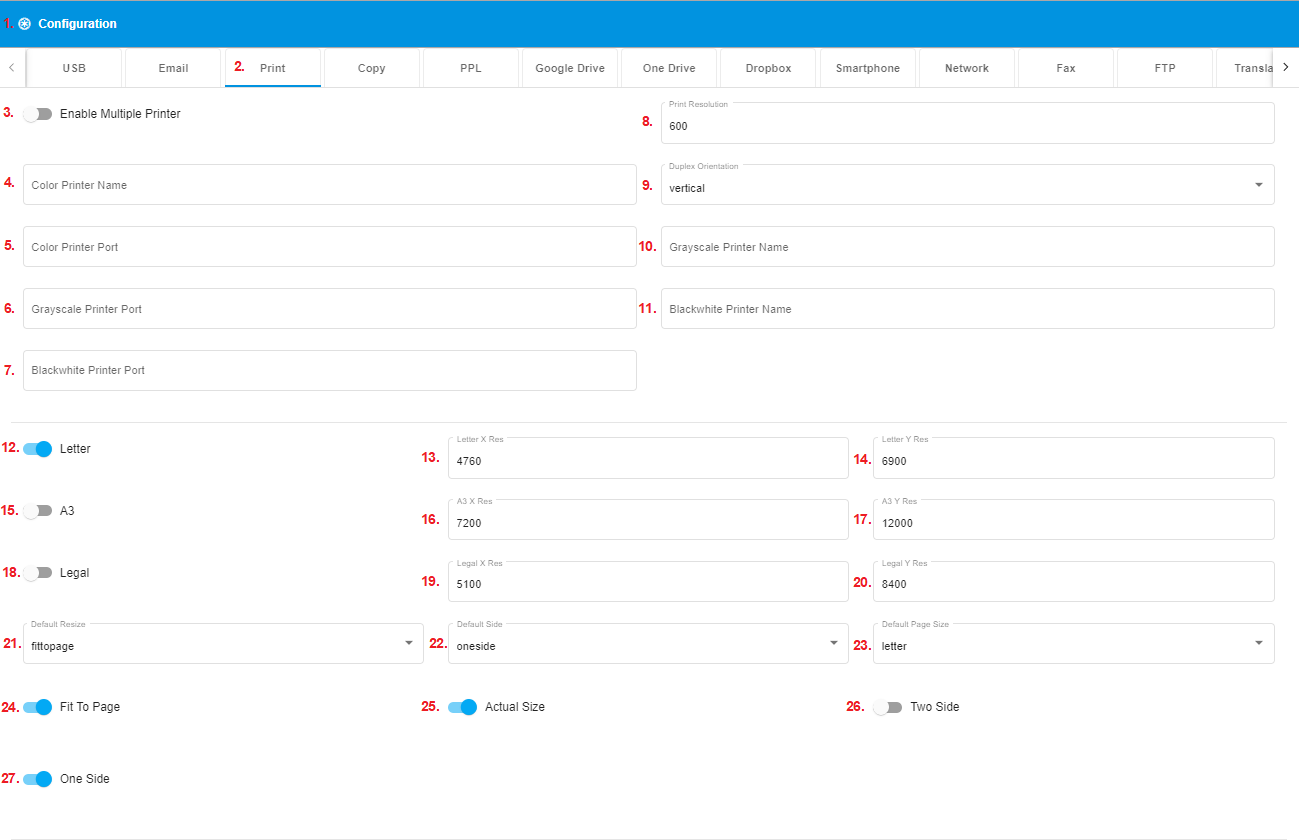

The below points explain the above screenshot:-
Here we see the tag of the main setting name.
Here we see the tag of the sub-setting name.
Enable/Disable multiple printers from this toggle bar.
Here we can enter the color printer’s name.
Here we can enter the color printer’s port.
Here we can enter the grayscale printer’s port.
Here we can enter the black-white printer’s port.
Here we have to enter print resolution.
From this dropdown, we can select Duplex orientation.
Vertical.
Horizontal.
Here we can enter the Grayscale printer name.
Here we can enter the black-white printer name.
From this toggle bar, we can enable/disable the Letter format.
In this textbox, we have to enter Letter X Resolution.
In this textbox, we have to enter Letter Y Resolution.
From this toggle bar, we can enable/disable the A3 format.
In this textbox, we have to enter A3 X Resolution.
In this textbox, we have to enter A3 Y Resolution.
From this toggle bar, we can enable/disable the Legal format.
In this textbox, we have to enter Legal X Resolution.
In this textbox, we have to enter Legal Y Resolution.
From this dropdown, we can select Default to resize.
FitToPage.
ActualSize.
From this dropdown, we can select the default side.
One Side.
Two Side.
From this dropdown, we can select the default page size.
Letter.
Legal.
A3.
From this toggle bar, we can enable/disable fit-to-page mode.
From this toggle bar, we can enable/disable actual size mode.
From this toggle bar, we can enable/disable two side mode.
From this toggle bar, we can enable/disable one side mode.
From this toggle bar, we can enable/disable print job information.
From this toggle bar, we can enable/disable pricing.
From this dropdown, we can select printer job input.
Keyboard.
Barcode.
From this toggle bar, we can enable/disable print rotate.
From this textbox, we can enter the percentage by which we want to reduce actual size.
From this toggle bar, we can enable/disable full-page image only.
From this dropdown, we can select the Tabloid option.
Tabloid.
11 X 17.
Copy: Here we see the configuration of the Print feature.
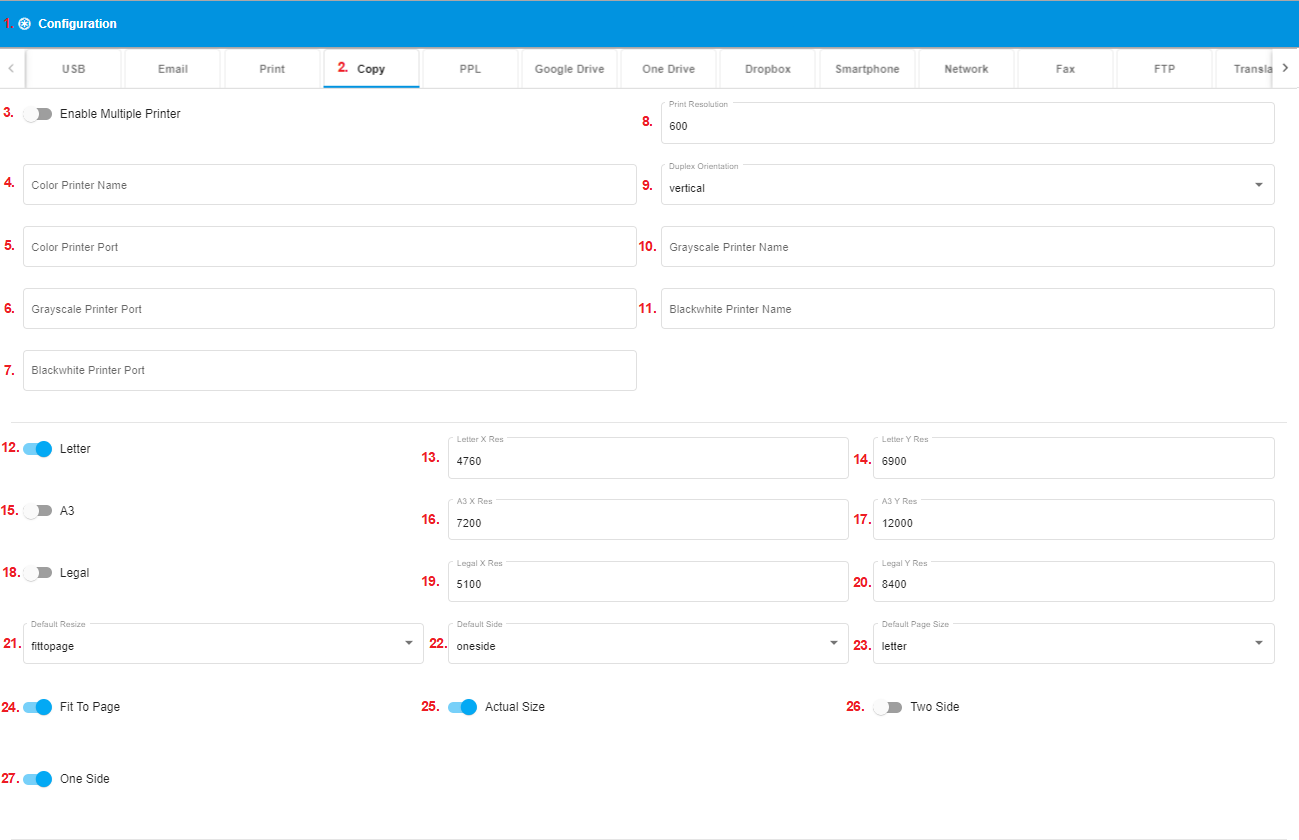

The below points explain the above screenshot:-
Here we see the tag of the main setting name.
Here we see the tag of the sub-setting name.
Enable/Disable multiple printers from this toggle bar.
Here we can enter the color printer’s name.
Here we can enter the color printer’s port.
Here we can enter the grayscale printer’s port.
Here we can enter the black-white printer’s port.
Here we have to enter print resolution.
From this dropdown, we can select Duplex orientation.
Vertical.
Horizontal.
Here we can enter the Grayscale printer name.
Here we can enter the black-white printer name.
From this toggle bar, we can enable/disable the Letter format.
In this textbox, we have to enter Letter X Resolution.
In this textbox, we have to enter Letter Y Resolution.
From this toggle bar, we can enable/disable the A3 format.
In this textbox, we have to enter A3 X Resolution.
In this textbox, we have to enter A3 Y Resolution.
From this toggle bar, we can enable/disable the Legal format.
In this textbox, we have to enter Legal X Resolution.
In this textbox, we have to enter Legal Y Resolution.
From this dropdown, we can select Default to resize.
FitToPage.
ActualSize.
From this dropdown, we can select the default side.
One Side.
Two Side.
From this dropdown, we can select the default page size.
Letter.
Legal.
A3.
From this toggle bar, we can enable/disable fit-to-page mode.
From this toggle bar, we can enable/disable actual size mode.
From this toggle bar, we can enable/disable two side mode.
From this toggle bar, we can enable/disable one side mode.
From this toggle bar, we can enable/disable print job information.
From this toggle bar, we can enable/disable pricing.
From this dropdown, we can select printer job input.
Keyboard.
Barcode.
From this toggle bar, we can enable/disable print rotate.
From this textbox, we can enter the percentage by which we want to reduce actual size.
From this toggle bar, we can enable/disable full-page image only.
From this dropdown, we can select the Tabloid option.
Tabloid.
11 X 17.
PPL: Here we see the configuration of the PPL feature.
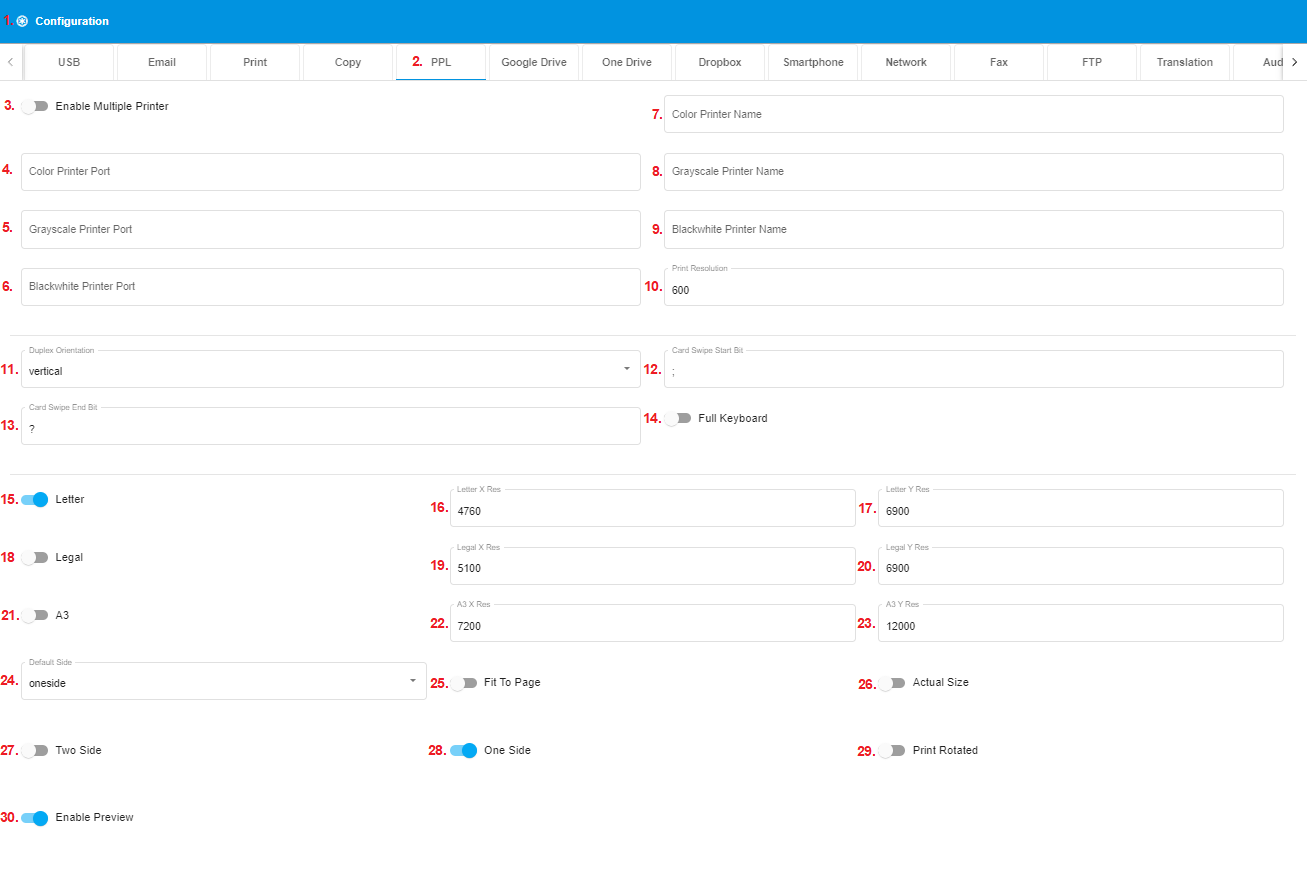

The below points explain the above screenshot:-
Here we see the tag of the main setting name.
Here we see the tag of the sub-setting name.
Enable/Disable multiple printers from this toggle bar.
Here we can enter the color printer’s port.
Here we can enter the grayscale printer’s port.
Here we can enter the black-white printer’s port.
Here we can enter the color printer name.
Here we can enter the Grayscale printer name.
Here we can enter the black-white printer name.
Here we have to enter print resolution.
From this dropdown, we can select Duplex orientation.
Vertical.
Horizontal.
In this textbox, we have to enter the card swipe start bit.
In this textbox, we have to enter the card swipe end bit.
From this toggle bar, we can enable/disable the full keyboard.
From this toggle bar, we can enable/disable the Letter format.
In this textbox, we have to enter Letter X Resolution.
In this textbox, we have to enter Letter Y Resolution.
From this toggle bar, we can enable/disable the A3 format.
In this textbox, we have to enter A3 X Resolution.
In this textbox, we have to enter A3 Y Resolution.
From this toggle bar, we can enable/disable the Legal format.
In this textbox, we have to enter Legal X Resolution.
In this textbox, we have to enter Legal Y Resolution.
From this dropdown, we can select the default side.
One Side.
Two Side.
From this toggle bar, we can enable/disable fit to the page.
From this toggle bar, we can enable/disable actual size mode.
From this toggle bar, we can enable/disable two side mode.
From this toggle bar, we can enable/disable one side mode.
From this toggle bar, we can enable/disable print-rotated mode.
From this toggle bar, we can enable/disable preview mode.
From this toggle bar, we can enable/disable print job information mode.
From this toggle bar, we can enable/disable pricing.
From this dropdown, we can select printer job input.
Keyboard.
Barcode.
Here we have to enter the print name.
Here we have to enter the print port.
We have to enter the page amount limit.
From this dropdown, we can select the default orientation.
Landscape.
Portrait.
From this dropdown, we can select the Tabloid option.
Tabloid.
11 X 17.
Google Drive: Here we see the configuration of the Google drive feature.

The below points explain the above screenshot:-
Here we see the tag of the main setting name.
Here we see the tag of the sub-setting name.
Here we have to enter the client ID.
Here we have to enter the client’s secret.
Here we have to enter a default file name.
From this checkbox, we can enable/disable the native browser.
One Drive: Here we see the configuration of the One Drive feature.

The below points explain the above screenshot:-
Here we see the tag of the main setting name.
Here we see the tag of the sub-setting name.
Here we have to enter the client ID.
Here we have to enter the client’s secret.
Here we have to enter a default file name.
From this checkbox, we can enable/disable the native browser.
Dropbox: Here we see the configuration of the Dropbox feature.

The below points explain the above screenshot:-
Here we see the tag of the main setting name.
Here we see the tag of the sub-setting name.
Here we have to enter the client ID.
Here we have to enter the client’s secret.
Here we have to enter a default file name.
From this checkbox, we can enable/disable the native browser.
Smartphone: Here we see the configuration of the smartphone feature.
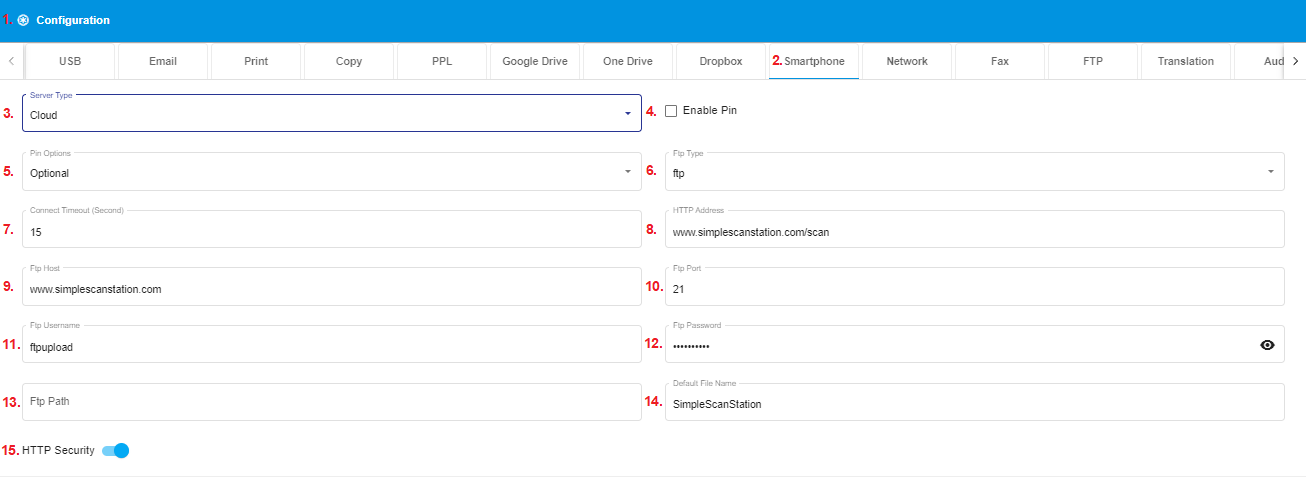
The below points explain the above screenshot:-
Here we see the tag of the main setting name.
Here we see the tag of the sub-setting name.
From this dropdown, we can choose server type. Here we have two options-
Cloud.
FTP.
From this checkbox, we can enable/disable the pin.
From this dropdown, we can select the pin option-
Optional.
Required.
From this dropdown, we can select FTP type-
FTP.
SFTP.
From here we can enter connect timeout in seconds.
Here we have to enter the HTTP address.
Here we have to enter the FTP hostname.
Here we have to enter the FTP port.
Here we have to enter the FTP username.
Here we have to enter the FTP password.
Here we have to enter the default FTP path where we want to save our document.
Here we have to enter the default file name.
From this toggle bar, we can enable/disable HTTP security.
Network: Here we see the configuration of the network feature.

The below points explain the above screenshot:-
Here we see the tag of the main setting name.
Here we see the tag of the sub-setting name.
Here we have to enter the server address.
Here we have to enter the path of the shared folder.
Here we have to enter the username of the device where we want to save our document.
Here we have to enter the password of the device where we want to save our document.
FAX: Here we see the configuration of the fax feature.
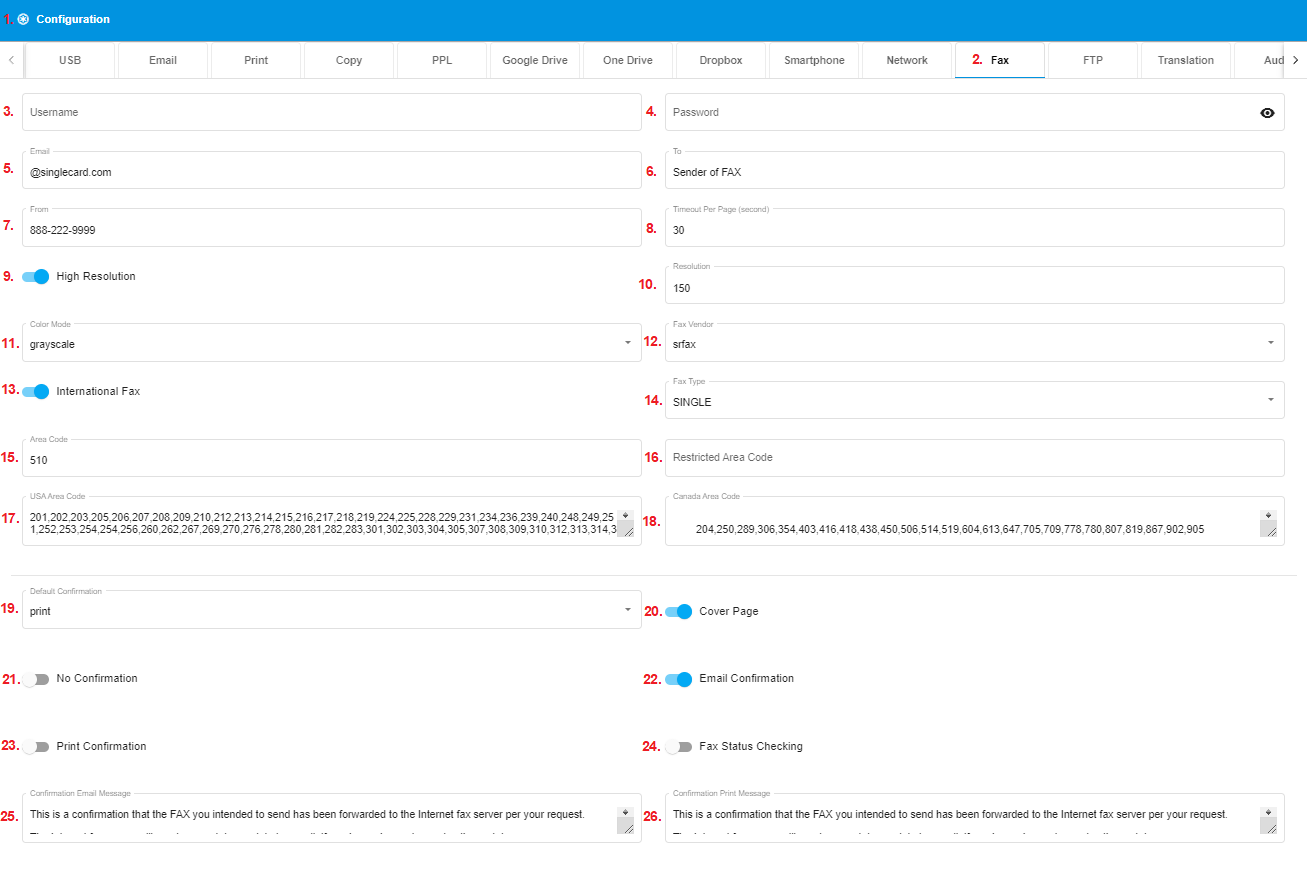
The below points explain the above screenshot:-
Here we see the tag of the main setting name.
Here we see the tag of the sub-setting name.
Here we have to enter the username.
Here we have to enter the password.
Here we have to enter the email.
Here we have to enter the fax number of the receiver.
Here we have to enter the fax number of the sender.
Here we can enter timeout per page in seconds.
From this toggle bar, we can enable/disable high resolution.
Here we can set resolution.
From this dropdown, we can select color mode. Here we have the following options-
Black and white.
Grayscale.
From this dropdown, we can select a fax vendor. We have the following options-
srfax.
interfax.
From this toggle bar, we can enable/disable international fax.
From this dropdown, we can select the fax type. We have the following options-
Single.
Here we have to add an area fax code.
Here we can add a restricted area fax code.
Here we can add all the USA area codes.
Here we can add all the Canada area codes.
From this dropdown, we can select default confirmation. We have the following options-
no.
email.
print.
From this toggle bar, we can enable/disable the cover page.
From this toggle bar, we can enable/disable confirmation.
From this toggle bar, we can enable/disable email confirmation.
From this toggle bar, we can enable/disable print confirmation.
From this toggle bar, we can enable/disable fax status checking.
Here we can add an email confirmation message body.
Here we can add a print confirmation message body.
FTP: Here we see the configuration of the FTP feature.

The below points explain the above screenshot:-
Here we see the tag of the main setting name.
Here we see the tag of the sub-setting name.
Here we have to add the FTP host.
Here we have to add the FTP port number.
Here we have to add the FTP username.
Here we have to add the FTP Password.
Here we have to add the FTPS host.
Here we have to add the FTPS port number.
Here we have to add the FTPS username.
Here we have to add the FTPS Password.
Here we have to add the SFTP host.
Here we have to add the SFTP port number.
Here we have to add the SFTP username.
Here we have to add the SFTP Password.
16. Here we can add a default file name.
Translation: Here we see the configuration of the translation feature.
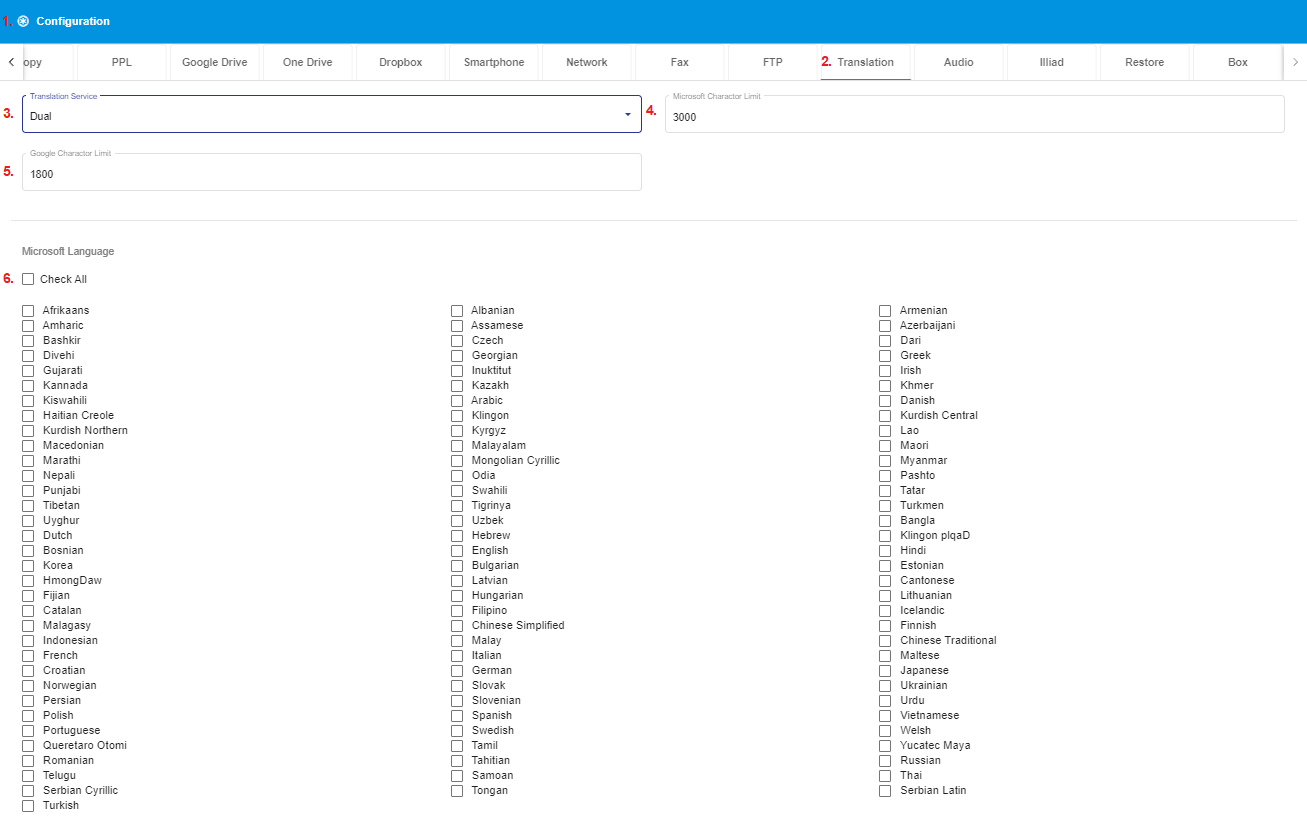
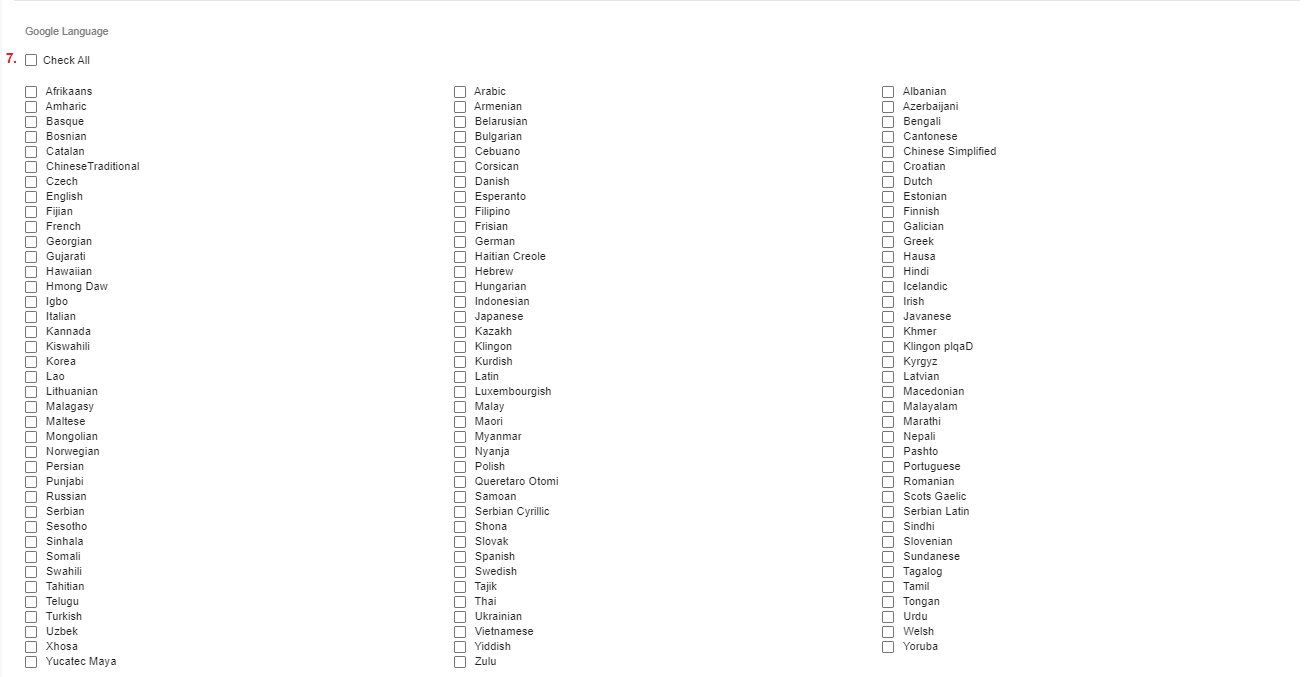
The below points explain the above screenshot:-
Here we see the tag of the main setting name.
Here we see the tag of the sub-setting name.
From this dropdown, we can select the translation service which is as follows-
Microsoft.
Google.
Dual.
From here we can set the Microsoft character limit.
From here we can set the Google character limit.
From this checkbox, we can select all the Microsoft languages.
From this checkbox, we can select all the Google languages.
Audio: Here we see the configuration of the audio feature.
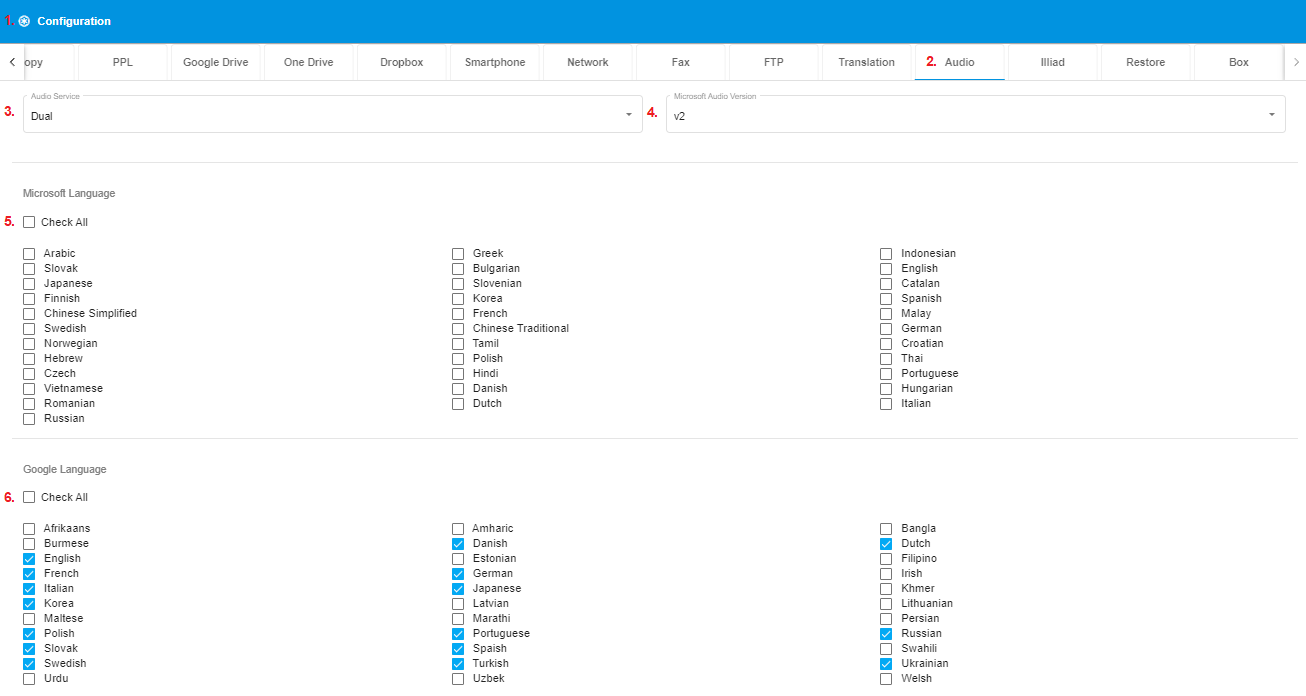
The below points explain the above screenshot:-
Here we see the tag of the main setting name.
Here we see the tag of the sub-setting name.
From this dropdown, we can select audio service. We have the following options-
Microsoft.
Google.
Dual.
From this dropdown, we can select the Microsoft audio version. We have the following options-
v1.
v2.
From this checkbox, we can select all the Microsoft languages.
From this checkbox, we can select all the Google languages.
Illiad: Here we see the configuration of the Illiad feature.

The below points explain the above screenshot:-
Here we see the tag of the main setting name.
Here we see the tag of the sub-setting name.
Here we have to add the server address.
Here we have to add a shared folder path.
Here we have to add the username.
Here we have to add the Password.
Restore: Here we see the configuration of the Restore feature.
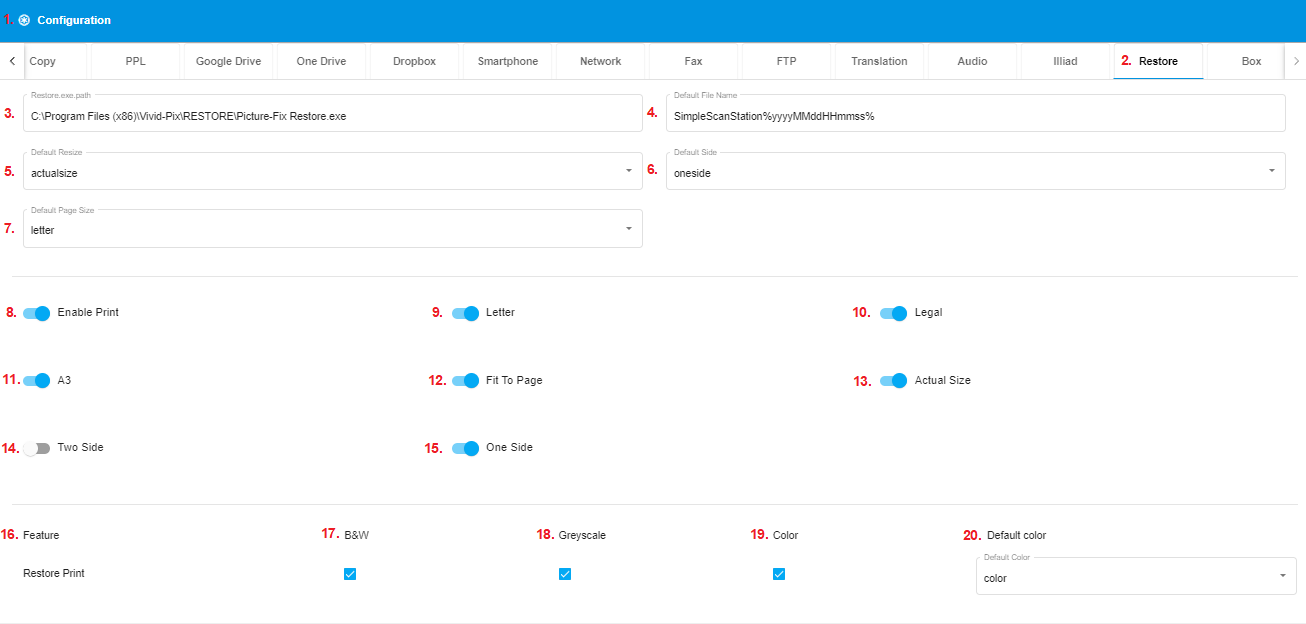
The below points explain the above screenshot:-
Here we see the tag of the main setting name.
Here we see the tag of the sub-setting name.
Here we have to add Restore.exe path.
Here we have to add default file name.
From this dropdown, we have to select default resize option. We have the following options-
Actual size.
Fit To Page.
From this dropdown, we have to select default side. We have following options-
One side.
Two side.
From this dropdown, we have to select default page size. We have the following options-
Letter.
Legal.
A3.
From this toggle bar, we can enable/disable print.
From this toggle bar, we can enable/disable letter.
From this toggle bar, we can enable/disable legal.
From this toggle bar, we can enable/disable A3.
From this toggle bar, we can enable/disable fittopage.
From this toggle bar, we can enable/disable actualsize.
From this toggle bar, we can enable/disable twoside.
From this toggle bar, we can enable/disable oneside.
Here we can see feature.
From this checkbox, we can enable/disable B&W color mode.
From this checkbox, we can enable/disable Greyscale color mode.
From this checkbox, we can enable/disable Color mode.
From this dropdown, we can select default color mode. We have following options-
color.
greyscale.
blackandwhite.
Box: Here we see the configuration of the Box feature.

The below points explain the above screenshot:-
Here we see the tag of the main setting name.
Here we see the tag of the sub-setting name.
Here we have to enter the client ID.
Here we have to enter the client’s secret.
Here we have to enter a default file name.
From this checkbox, we can enable/disable the native browser.
4. Payment: In this section, we will discuss the payment for all the features. All the features are as follows-
USB.
Print.
Email.
Google.
Fax.
Smartphone.
Network.
One Drive.
Dropbox.
FTP.
Audio.
Translation.
Illiad.
Box.
Restore.
Copy.
PPL
General: Here we will see general features of payment.
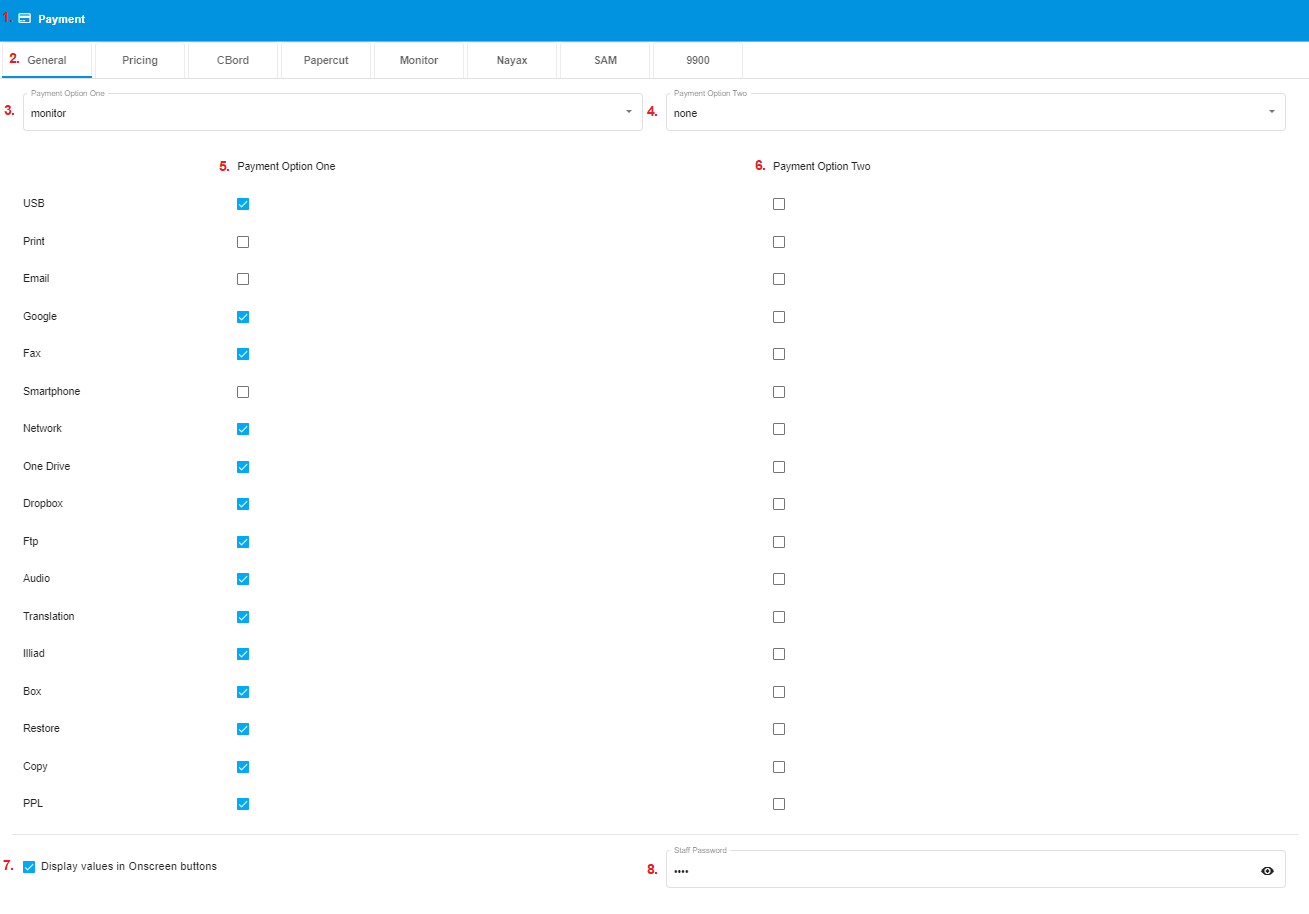
The below points explain the above screenshot:-
Here we see the tag of the main setting name.
Here we see the tag of the sub-setting name.
From this dropdown, we can select payment option one. We have the following options-
none.
blackboard.
cbord.
itc1500
itc5400
itc7210
jamex.
monitor.
nayax.
papaercuting.
sam.
tbs9900.
tbs9500.
From this dropdown, we can select payment option two. We have the following options-
none.
blackboard.
cbord.
itc1500
itc5400
itc7210
jamex.
monitor.
nayax.
papaercuting.
sam.
tbs9900.
tbs9500.
From these checkbox, we can enable/disable payment option one for the below features.
From these checkbox, we can enable/disable payment option two for the below features.
From this checkbox, we can enable/disable display values in onscreen button.
Here we can add password for staff.
Pricing: Here we will see pricing features of payment.
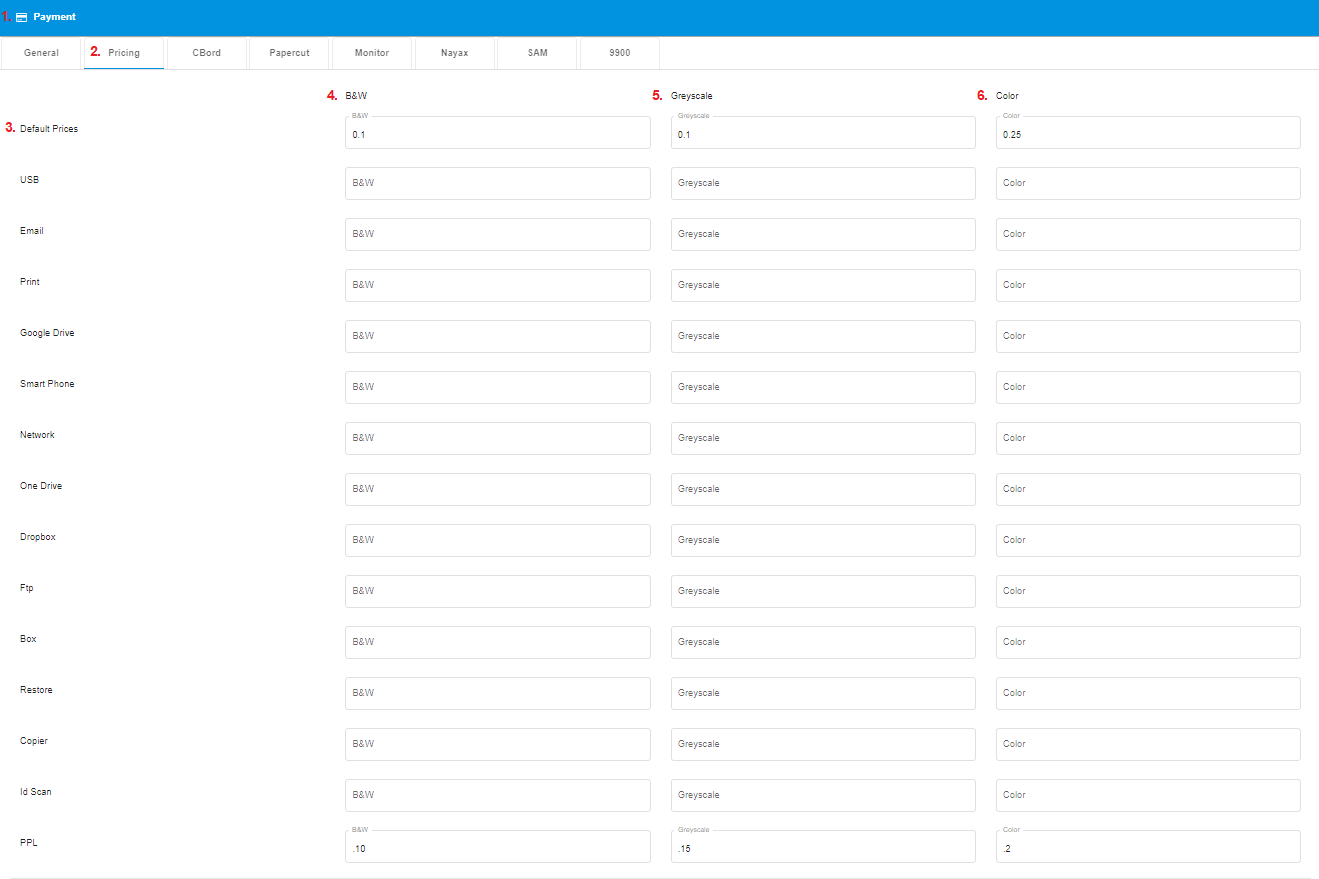

The below points explain the above screenshot:-
Here we see the tag of the main setting name.
Here we see the tag of the sub-setting name.
Here we can add the default price for B&W, Greyscale and Color of every feature.
Here we can add the price for B&W for every feature.
Here we can add the price for Greyscale for every feature.
Here we can add the price for Color for every feature.
Here we can add the price for translation in mp3 audio per page.
Here we can add the price for translation in document per page.
Here we can enable/disable individual price for translated document and Mp3.
Here we can add price for US/Canada fax payment.
Here we can add price for International fax payment.
Here we can add price for US/Canada cover page.
Here we can add price for International cover page.
Here we can add the price for US/Canada first page.
Here we can add the price for International first page.
5. Logs: In this section, we will discuss the Logs.
Log Settings: From here we can enable/disable logs for multiple features.
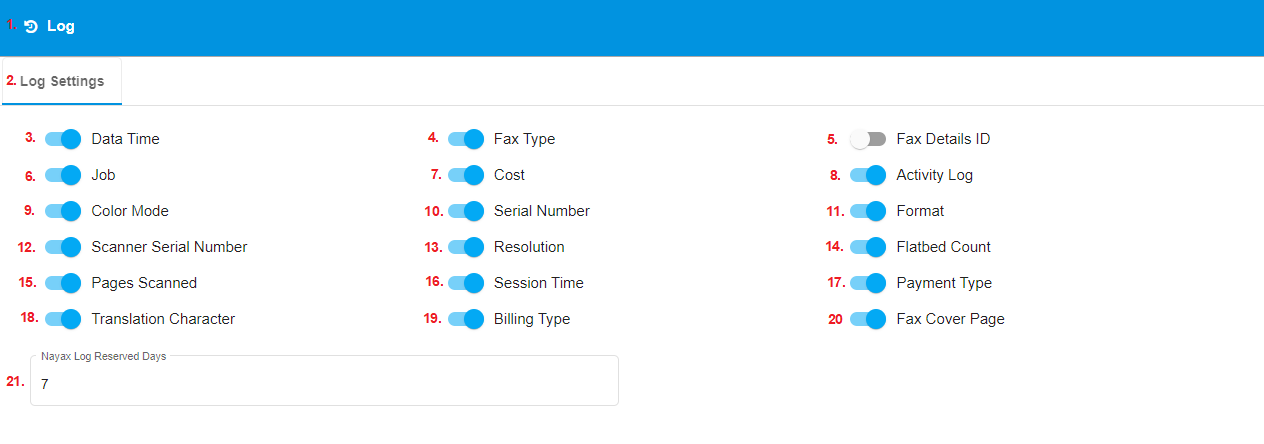
The below points explain the above screenshot:-
Here we see the tag of the main setting name.
Here we see the tag of the sub-setting name.
From this toggle bar, we can enable/disable logs for Date time.
From this toggle bar, we can enable/disable logs for Fax type.
From this toggle bar, we can enable/disable logs for Fax Details ID.
From this toggle bar, we can enable/disable logs for Job.
From this toggle bar, we can enable/disable logs for Cost.
From this toggle bar, we can enable/disable logs for Activity Log.
From this toggle bar, we can enable/disable logs for Color mode.
From this toggle bar, we can enable/disable logs for Serial Number.
From this toggle bar, we can enable/disable logs for Format.
From this toggle bar, we can enable/disable logs for Scanner Serial Number.
From this toggle bar, we can enable/disable logs for Resolution.
From this toggle bar, we can enable/disable logs for Flatbed Count.
From this toggle bar, we can enable/disable logs for Pages Scanned.
From this toggle bar, we can enable/disable logs for Session Time.
From this toggle bar, we can enable/disable logs for Payment Type.
From this toggle bar, we can enable/disable logs for Translation Character.
From this toggle bar, we can enable/disable logs for Billing Type.
From this toggle bar, we can enable/disable logs for Fax Cover Page.
Here we can add days for which Nayax Log reserved days.
6. Display: In this section, we will discuss the display message and other things.
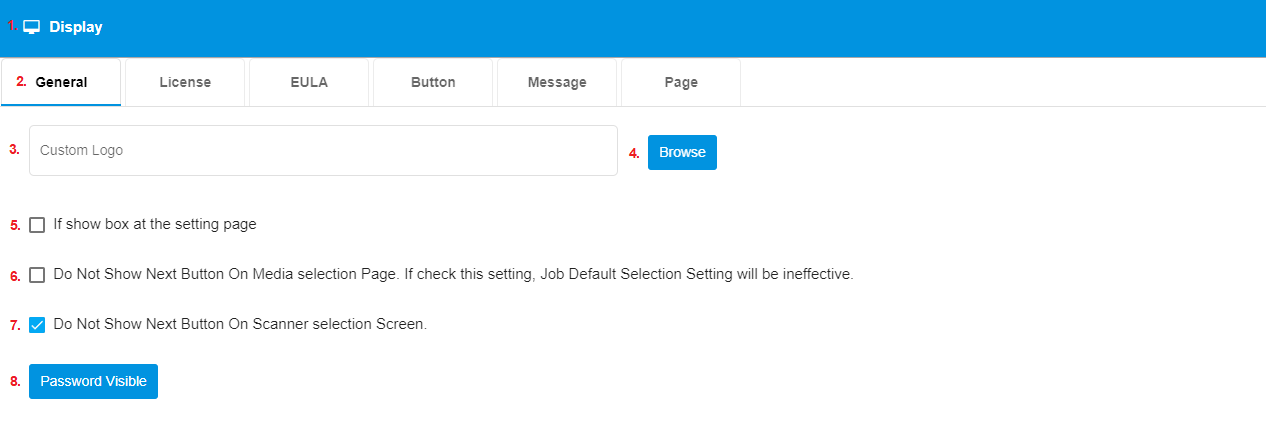
The below points explain the above screenshot:-
Here we see the tag of the main setting name.
Here we see the tag of the sub-setting name.
From here we can browse the custom logo for our scanEZ application.
Using this button we can add custom logo.
From this checkbox, we can enable/disable box at the setting page.
From this checkbox, we can enable/disable show next button on the media selection page. If check this setting, job default selection setting will be ineffective.
From this checkbox, we can enable/disable show next button on scanner selection screen.
From this button, we can make password visible.
License: From here we can add licence to our physical machine.

The below points explain the above screenshot:-
Here we see the tag of the main setting name.
Here we see the tag of the sub-setting name.
Here we can add license number.
Here we can add our MAC address.
Here we can add expiration date of license.
Here we can add the Serial Number.
Here we have to add Customer name.
Here we have to add Customer email.
Button: Here we configure button name.
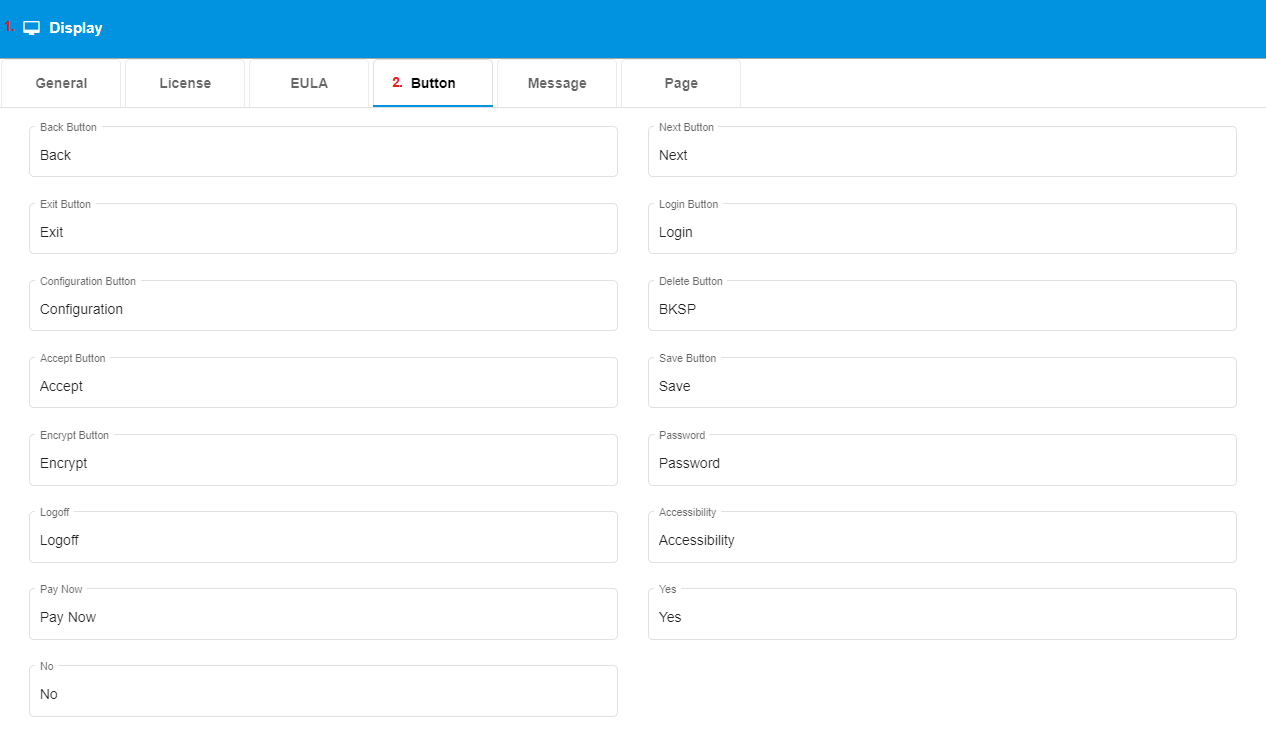
We can configure every button name here.
Message : Here we configure message for every feature.
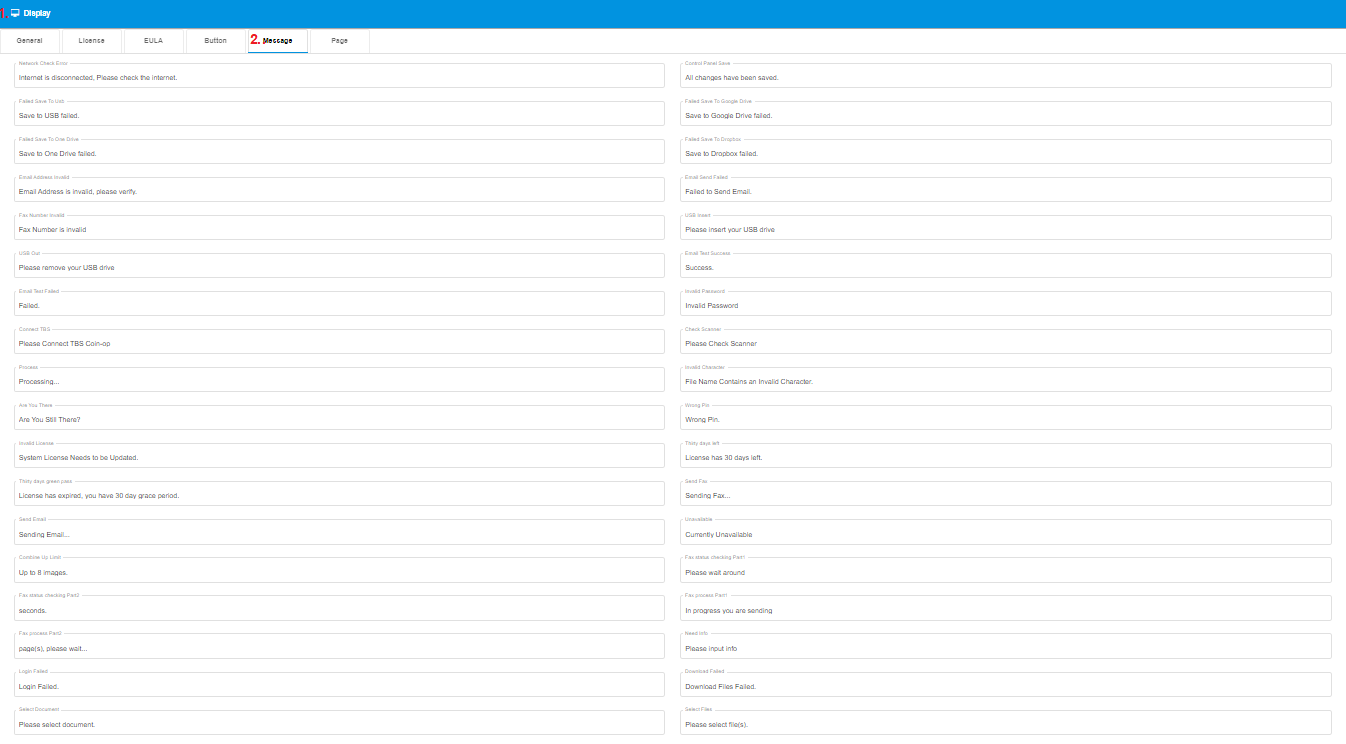
The below points explain the above screenshot:-
Here we see the tag of the main setting name.
Here we see the tag of the sub-setting name.
Here we can add message for every feature.
