Print Release(PPL)
In this section, we will see how to configure the PPL service from control/admin panel. Let’s see it in detail.
📘 Configuration
A step-by-step guide to access this service.
On the control panel, select Configuration>PPL>Page 4
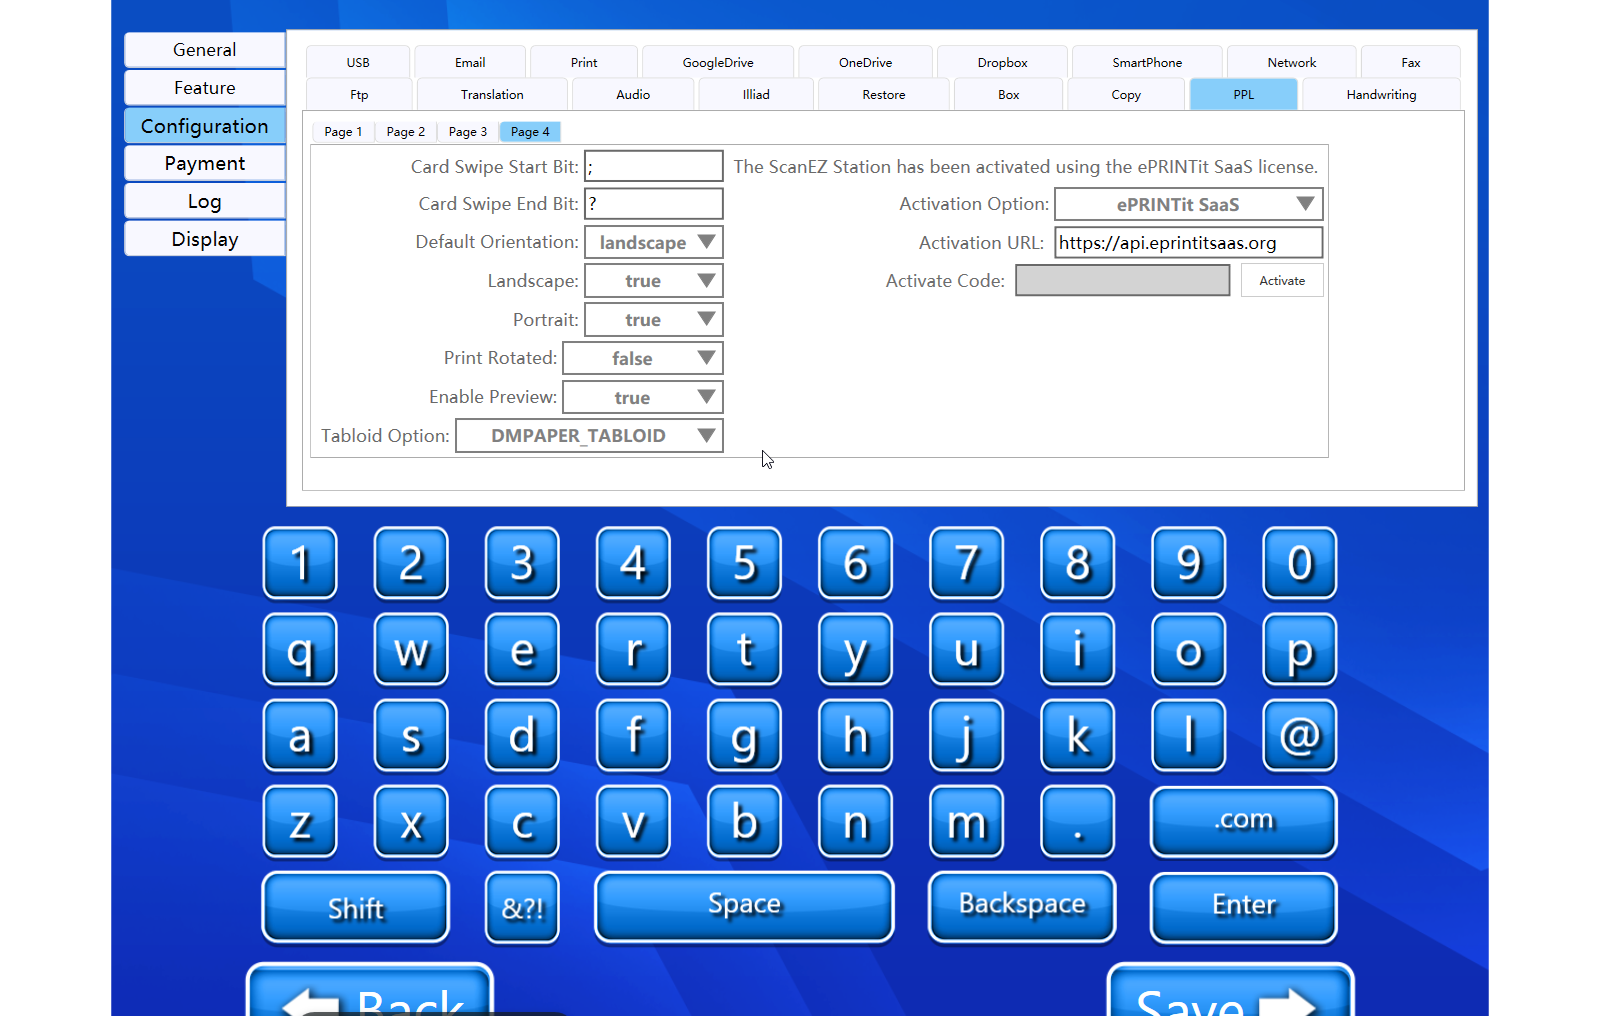
In the Activation Option, from the dropdown, select ePRINTit SaaS.
For Activation URL, we can enter the URL to activate ScanEz with ePRINTIT Saas. The URL is : https://api.eprintitsaas.org
For Activate code, we can activate our scan station by entering the activation code here. We can create our activation code using Activate ScanEZ document.
For next steps, on the control panel, select Feature>Customs
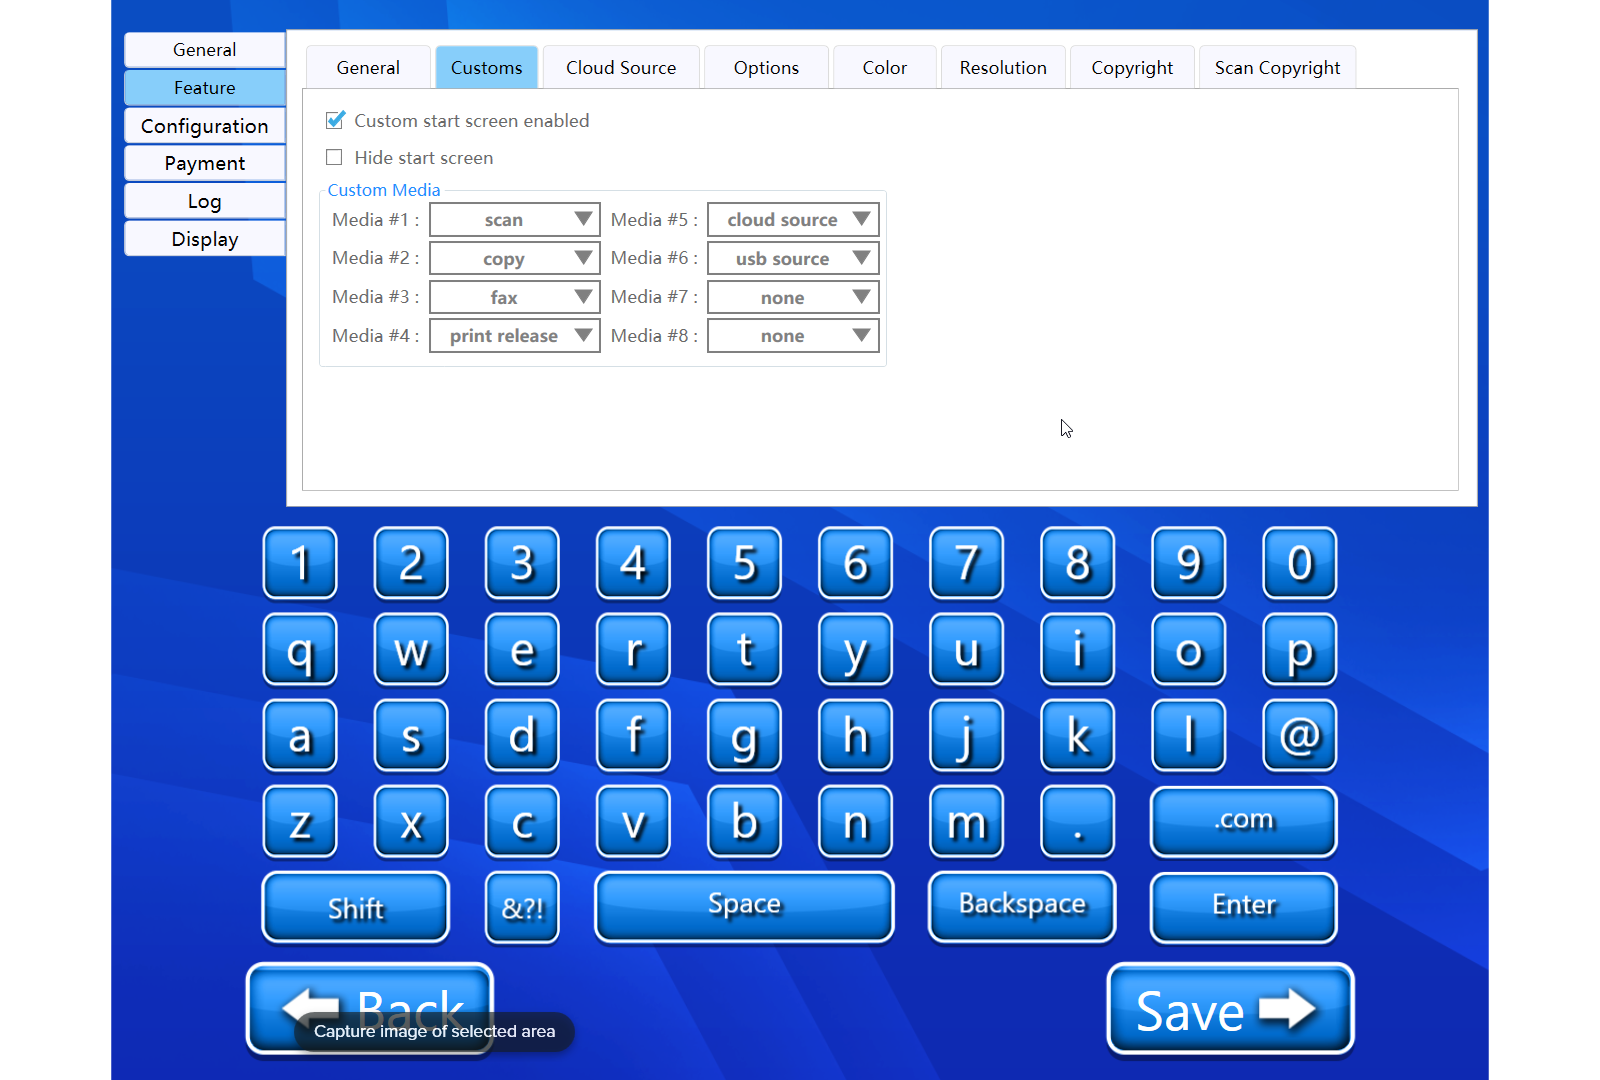
On Customs page, select Custom start screen enabled checkbox.
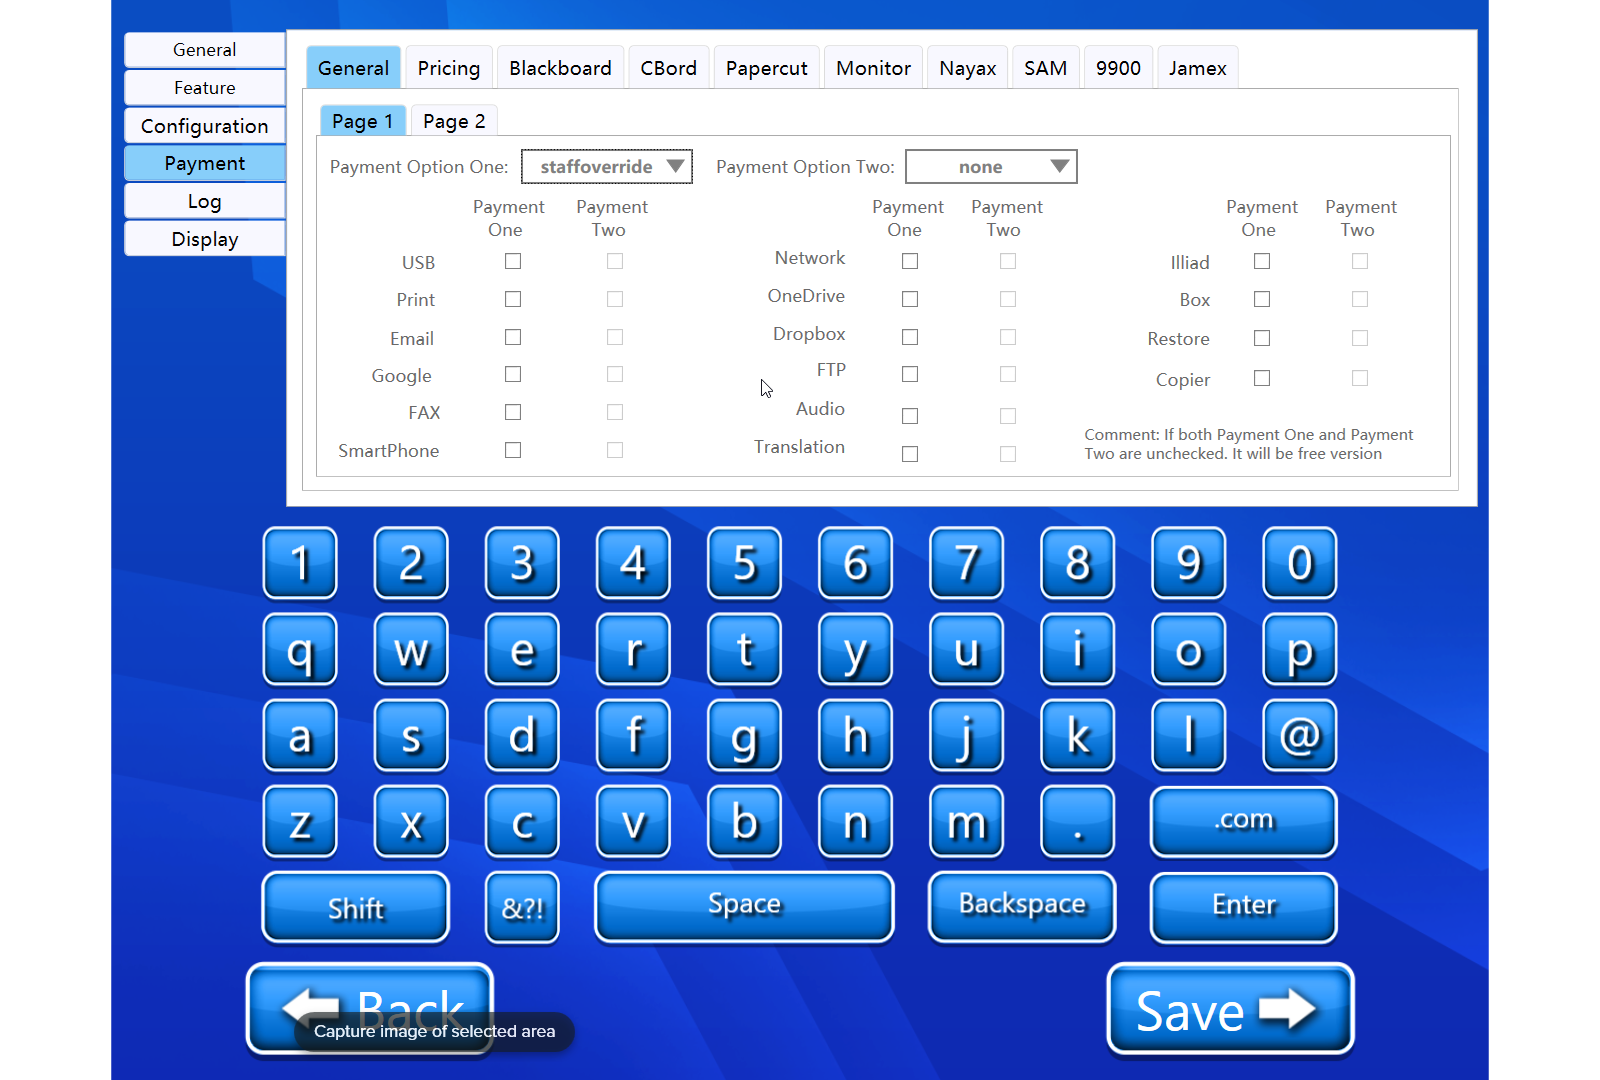
For further steps now select Payment. To access the paid version, we need to enable From Page 1, any Payment Option from the dropdown (for example, here staffoverride).
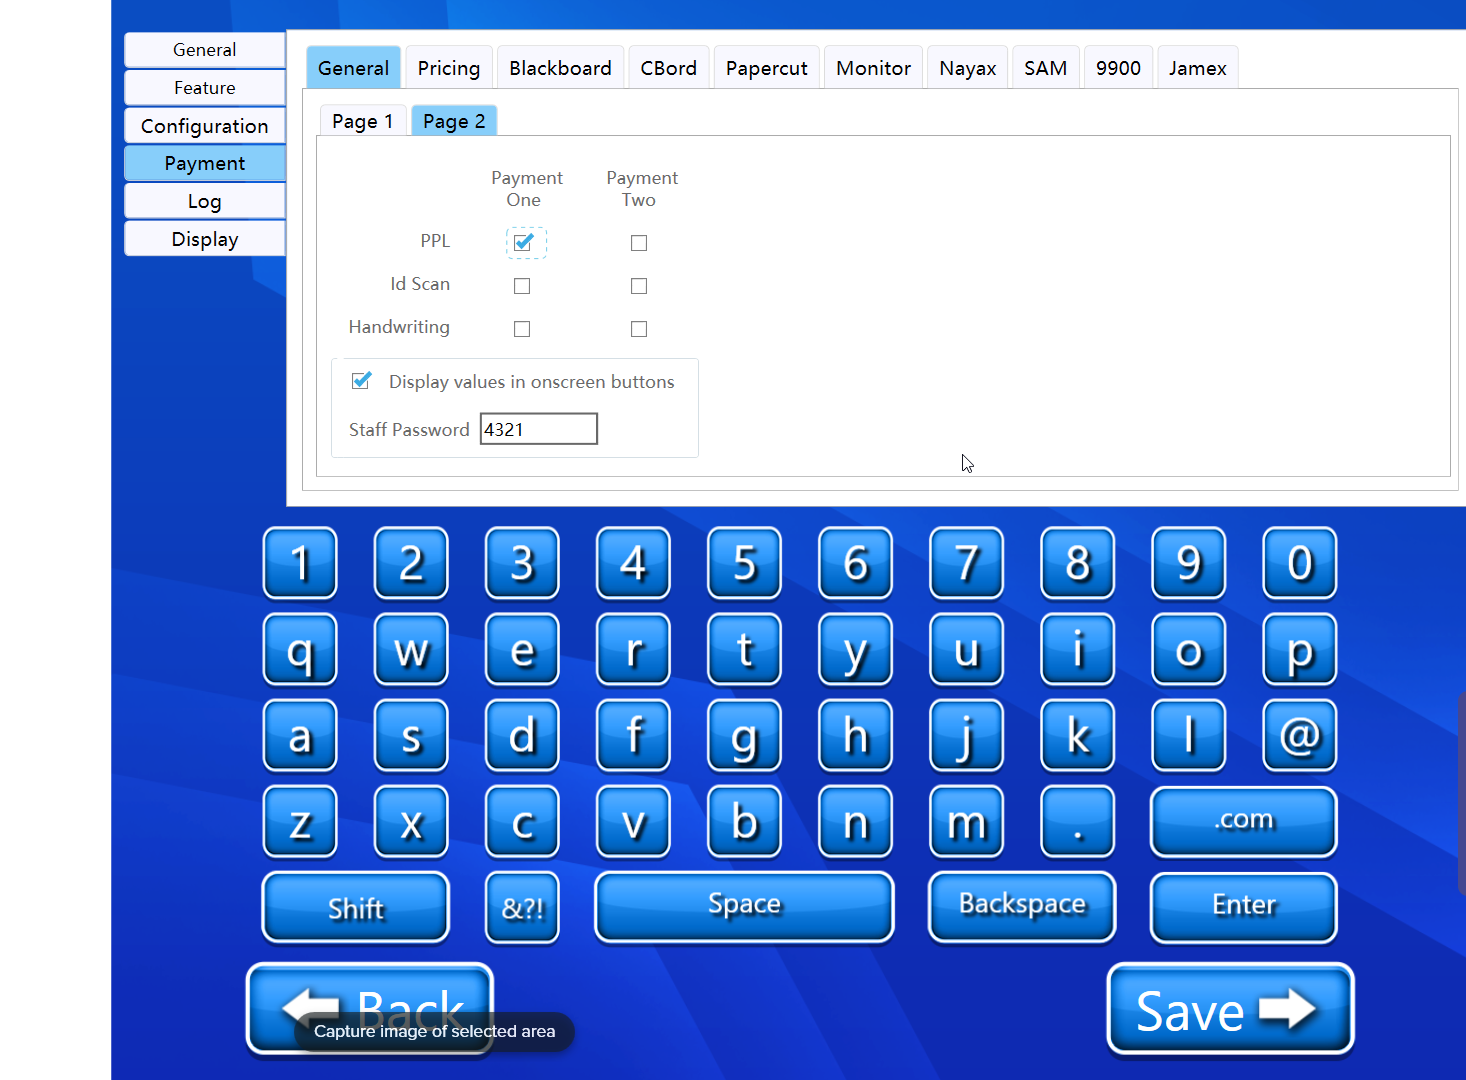
From Page 2, select PPL and save these changes by selecting the Save button on bottom right of the screen.
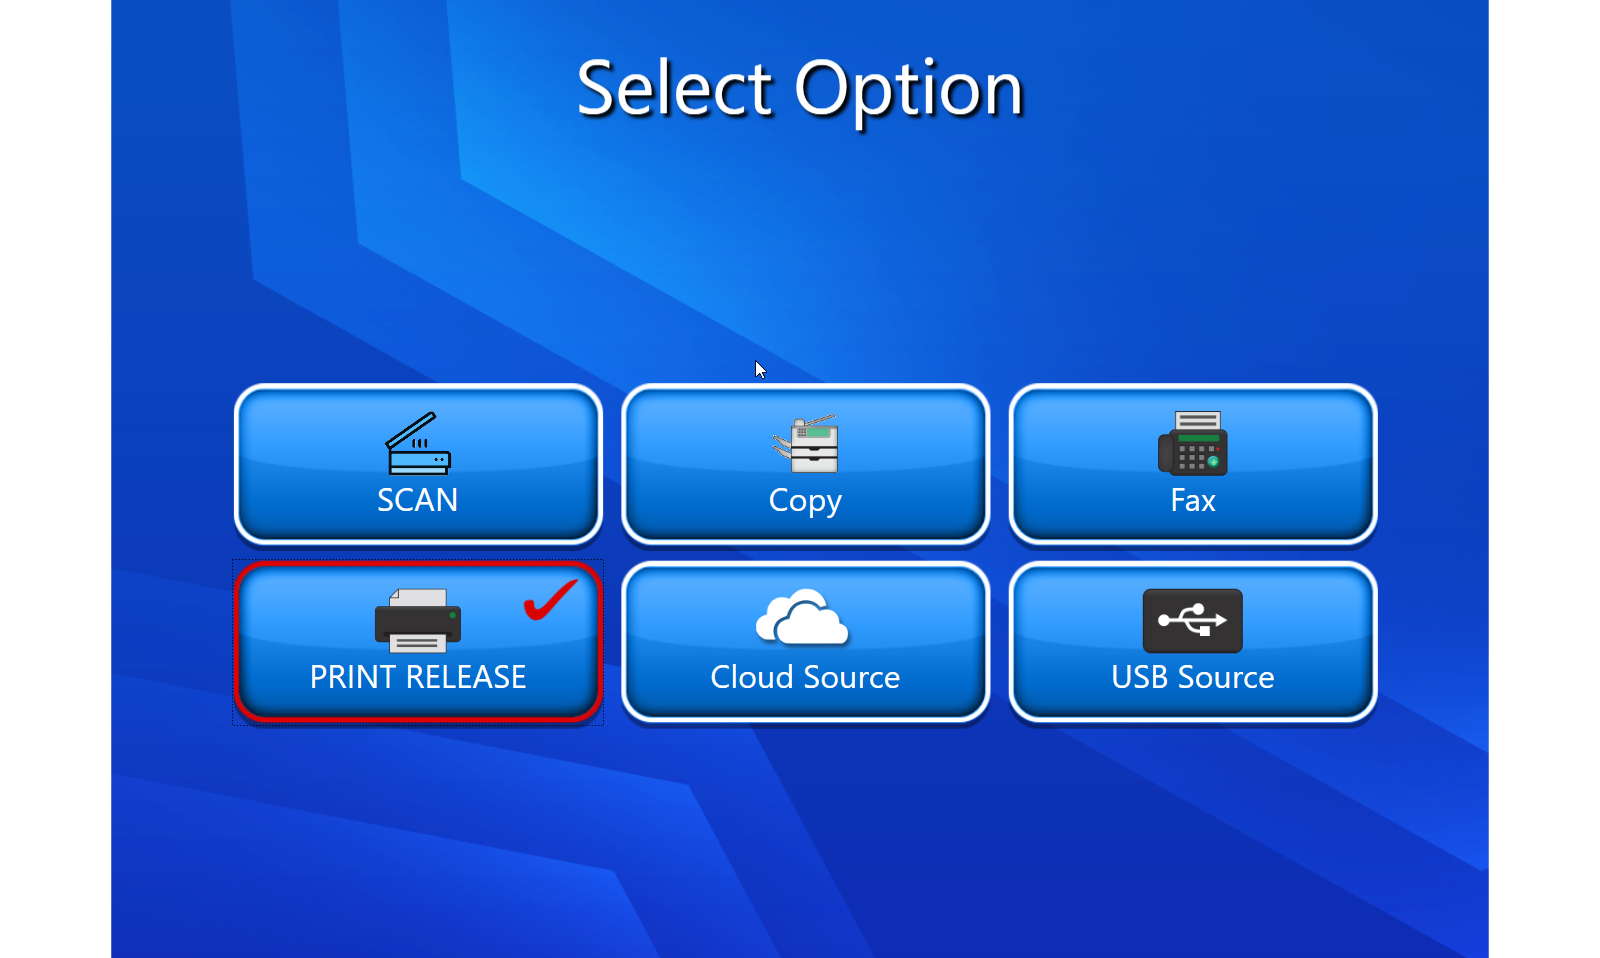
Now on the customer panel, select Print Release.
Below Login screen will open, where we can select any of the provided login option accordingly.
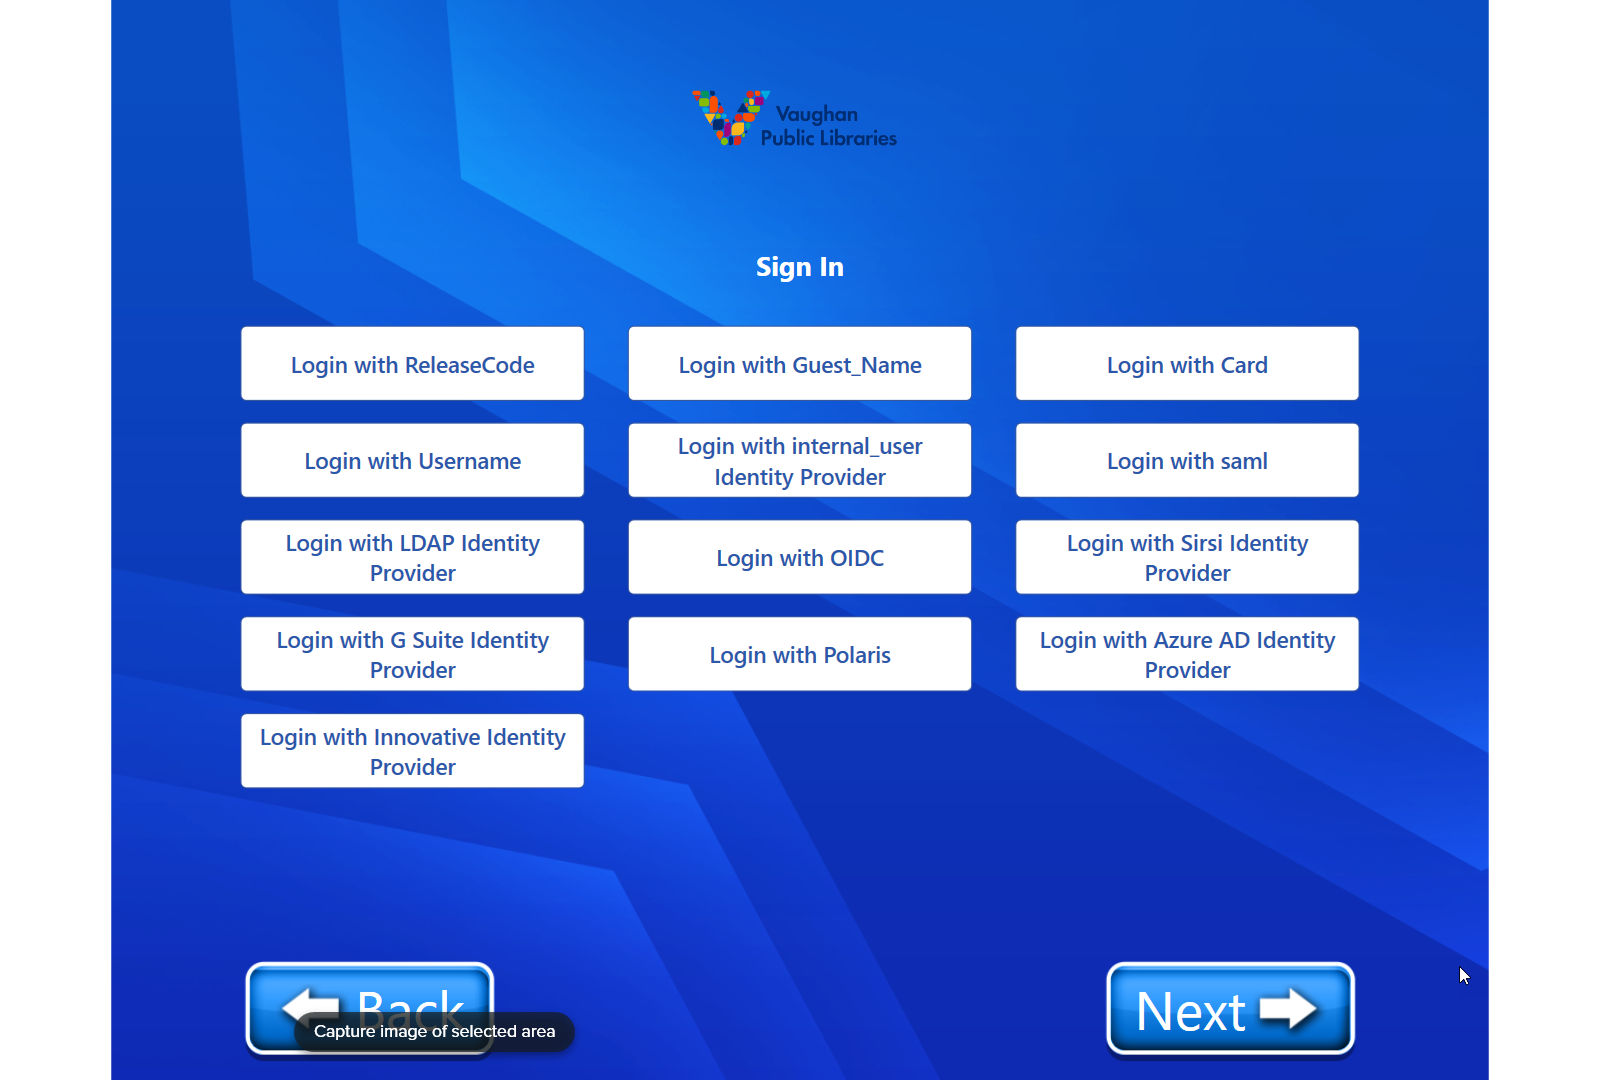
We will see how to access every login option in detail in the below section.
In this section, we will see how to configure the PPL service from the customer panel. Let’s see it in detail.
📘 Configuration
A step-by-step guide to access this service.
Below, you'll find step-by-step instructions on how to configure the various Login options within PPL.
📘 Log In Options
Release Code
📘 Instructions
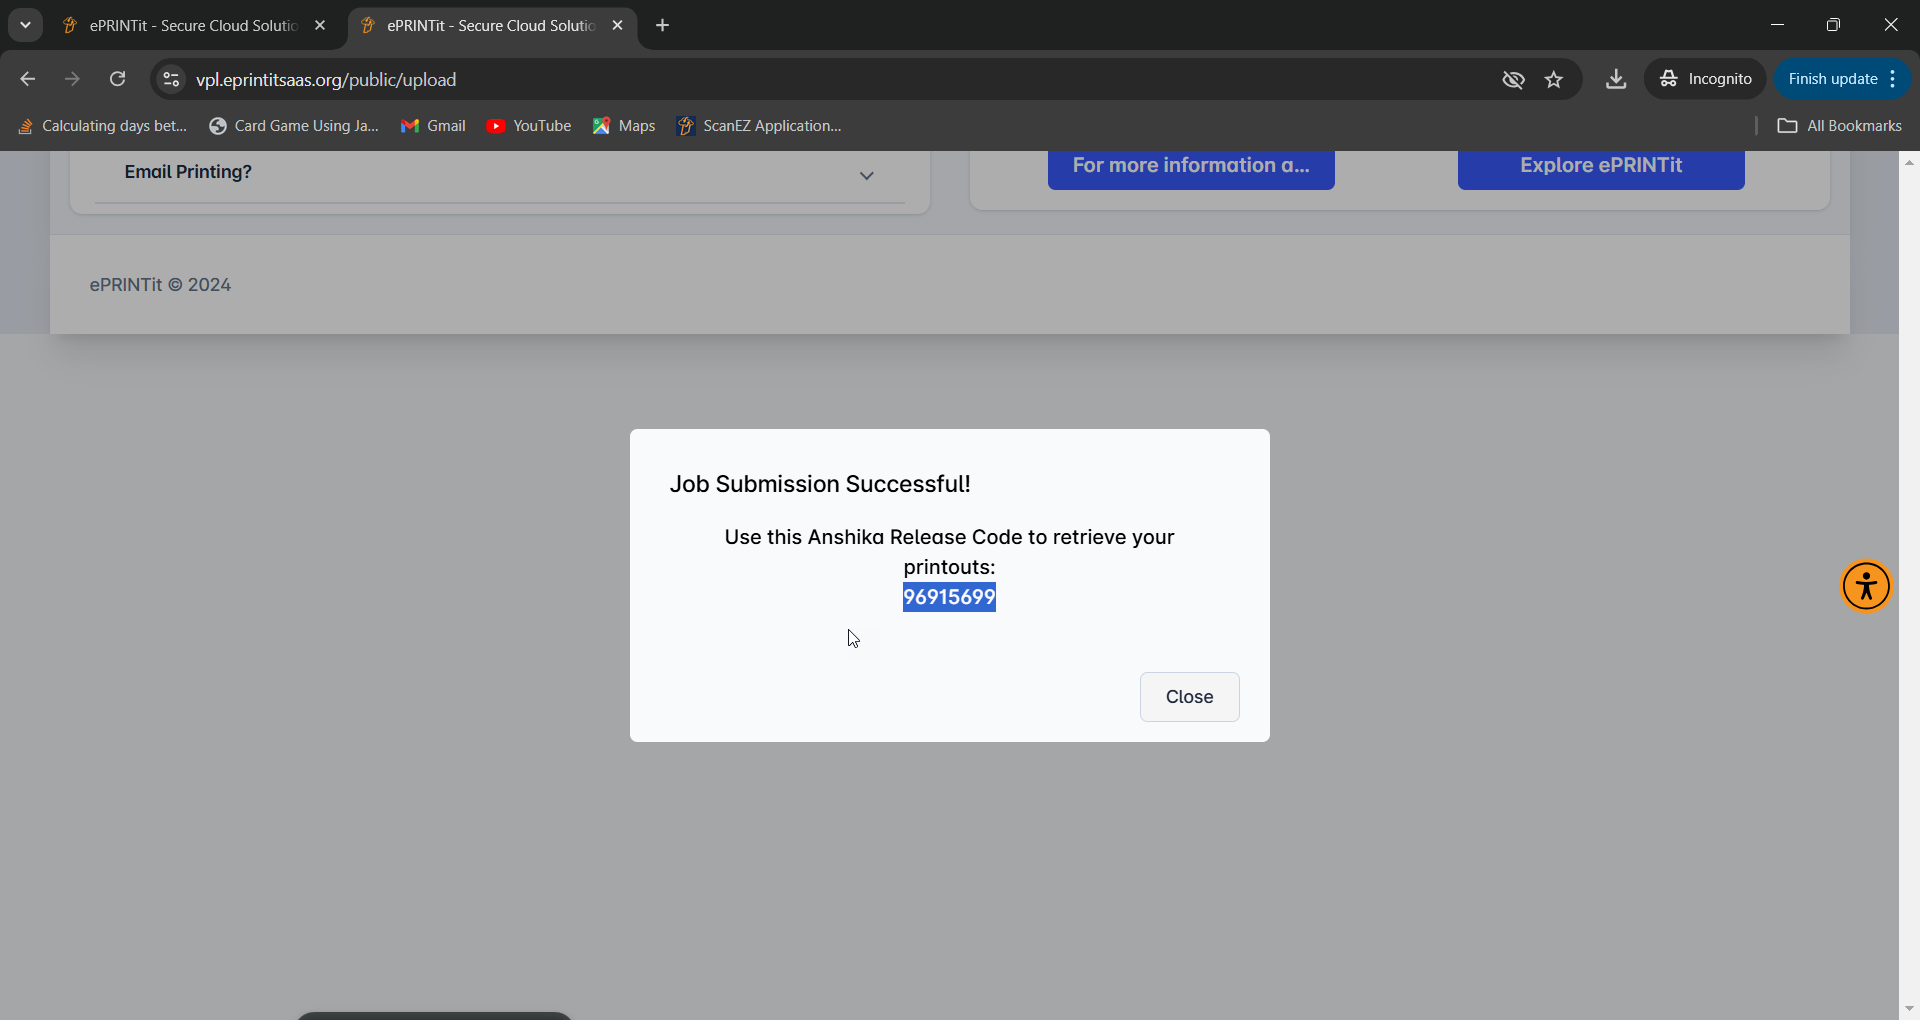
Enter the Release code obtained from public upload page ePRINTit - Secure Cloud Solution (eprintitsaas.org).
We will select the location, enter the email id and then upload a document on the public upload page. From here, we can retrieve and copy the Release code as shown below:
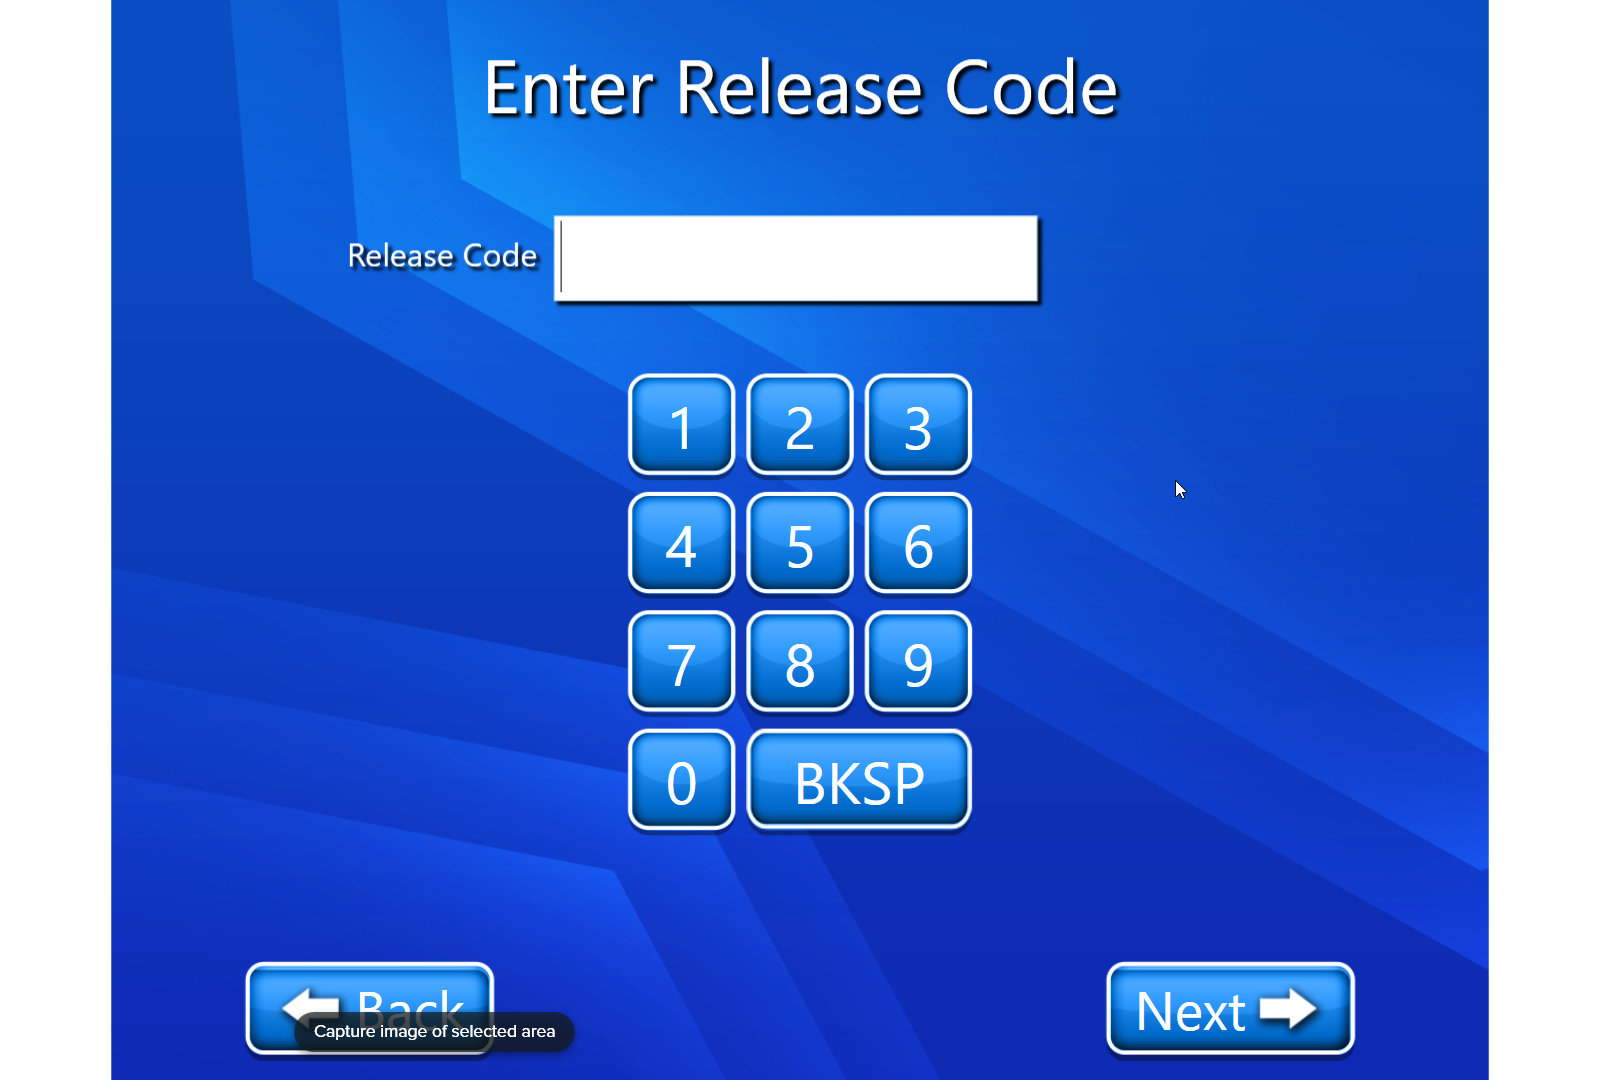
Now will enter this release code in the ScanEz Application and select Next.
On the below Page, we can modify and apply settings for all jobs using various options
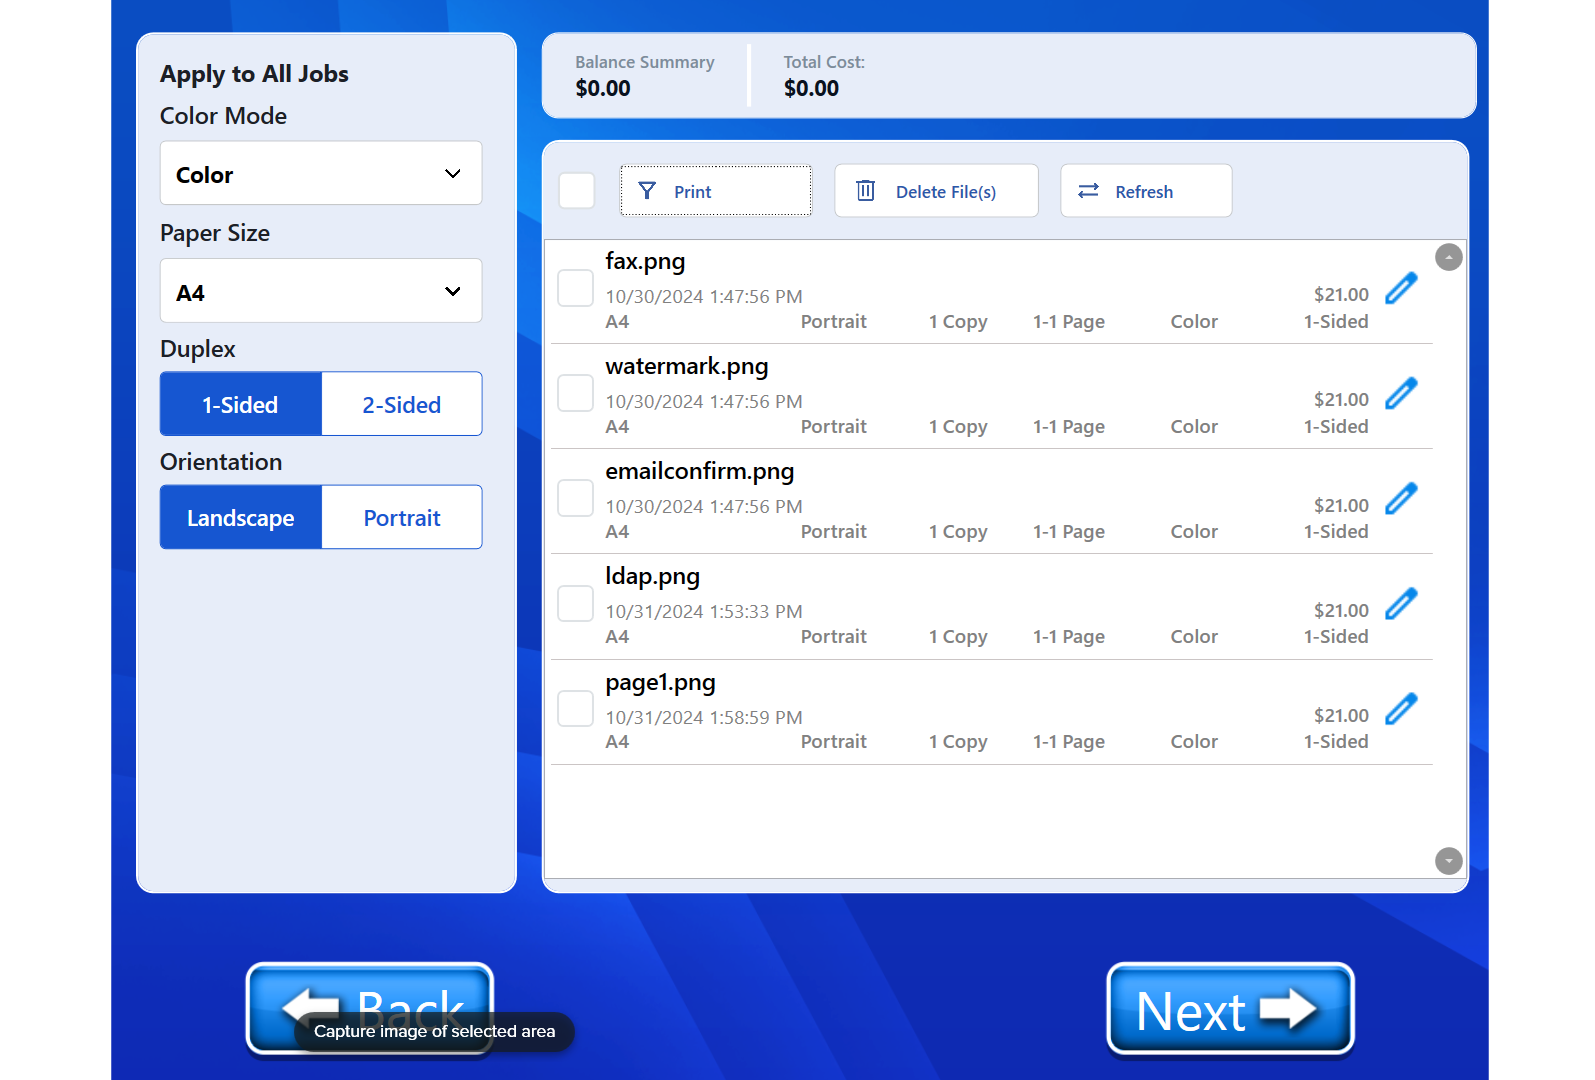
Color mode
Here we can select the color for all jobs:
Grayscale
Color
Paper Size
We have the following paper sizes:
Letter
Legal
Ledger
Tabloid
A4
A3
A2
A1
A0
Standard
Letter Small
Executive
Statement
Duplex
This shows that the job(s) will be printed One side or Two side.
Orientation
Here we can select the orientation for our print jobs,
Landscape
Portrait
Print/Re-Print
We can check list of jobs which we have to print in Print and the jobs that are already printed in Re-Print.
Delete
We can delete a particular selected job(s) using the delete button.
Refresh
We can select the Refresh button to refresh the job(s).
Edit
We can also select a particular job and apply the changes on just the selected job. After selecting the edit button, we will be directed to the below screen
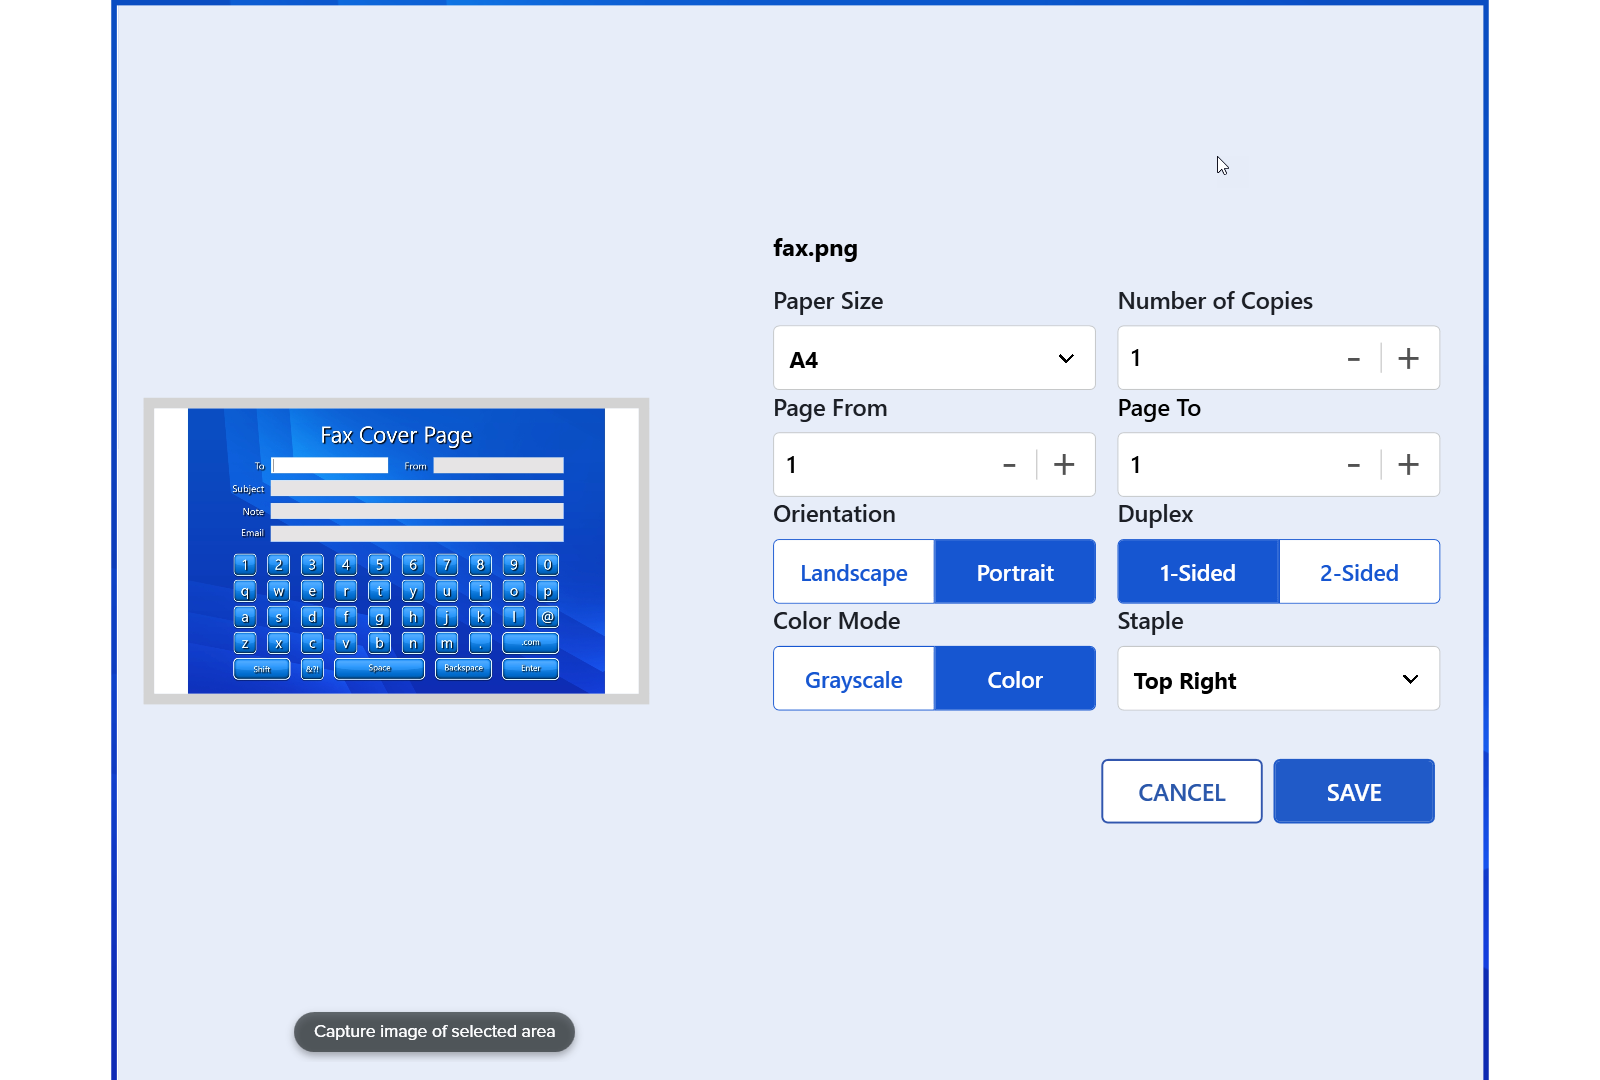
Here we can modify the following settings to only the selected job:
Paper Size
We have the following paper sizes:
Letter
Legal
Ledger
Tabloid
A4
A3
A2
A1
A0
Standard
Letter Small
Executive
Statement
Number of copies
Here we can add or remove the number of copies for the selected document.
Page From
By selecting this option, we can select From which page we want to print the selected document.
Page To
By selecting this option, we can select till which page we want to print the selected document.
Orientation
Here we can select the orientation for our print job,
Landscape
Portrait
Duplex
This shows that the job will be printed One side or Two side.
Color mode
Here we can select the color for our job:
Grayscale
Color
Staple
We can choose how we want to staple the selected document. We have the following options:
1. None
2. Top Left
3. Top Right
4. Bottom Left
5. Bottom Right
Select the Save button to save the changes you made.
On selecting next, the job will be submitted and the below screen is displayed
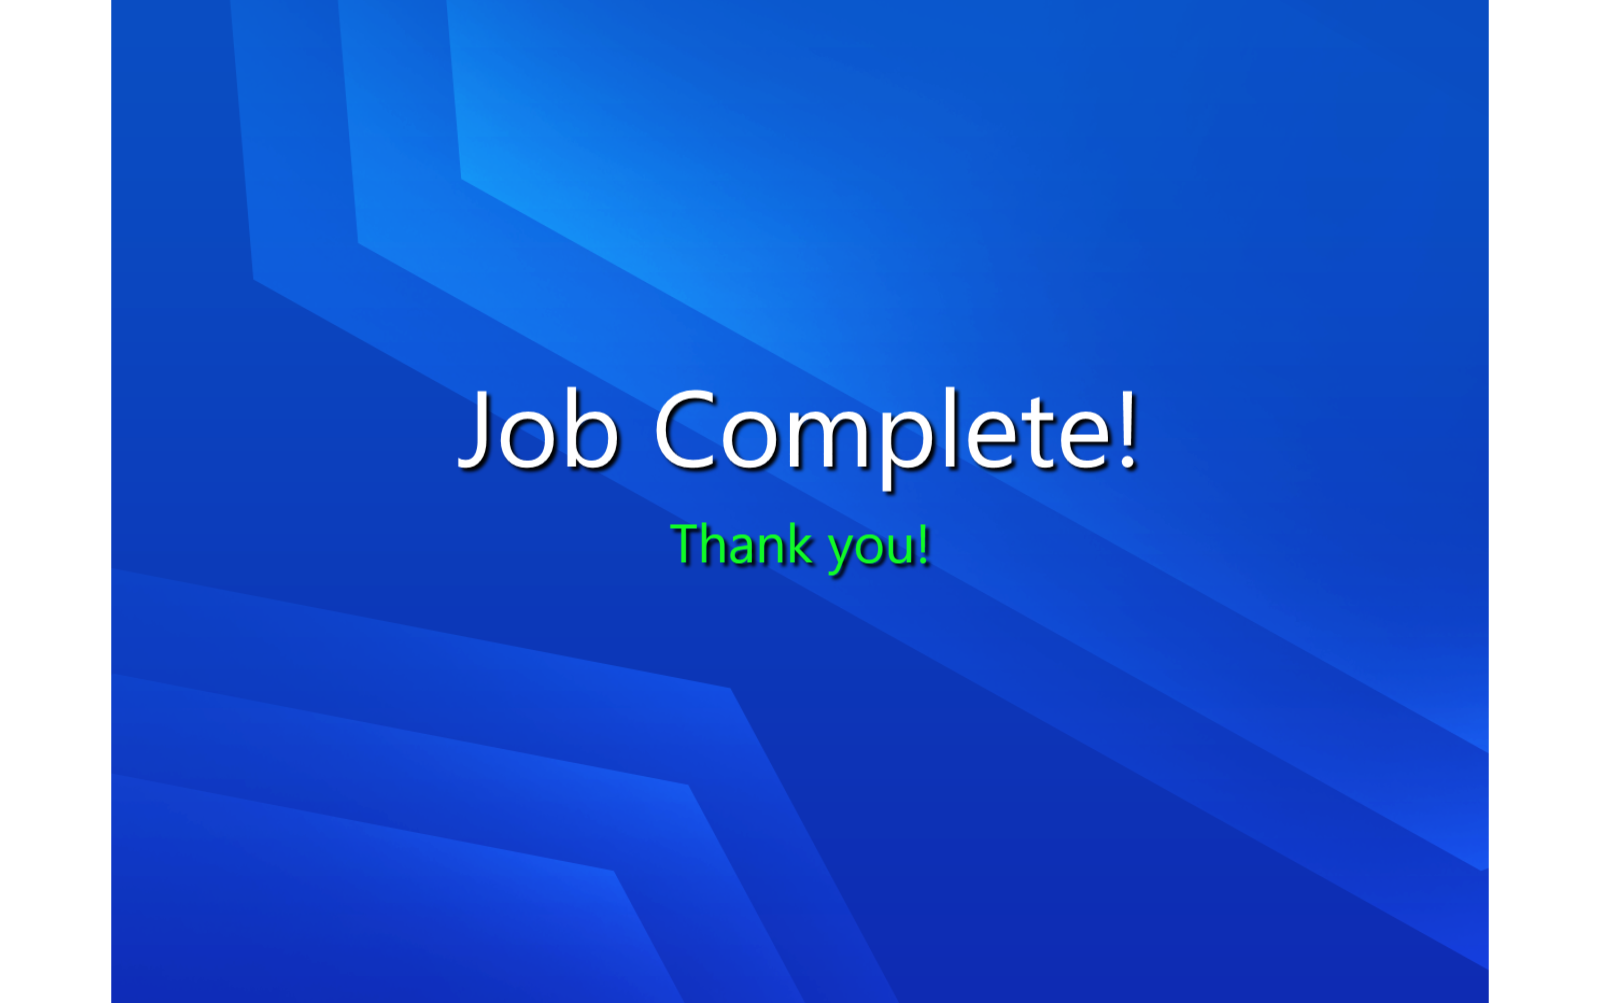
Here’s a video demonstration of how we can upload a job from the portal, select it from ScanEz application and proceed towards payment with successful job submission. Here I am using the Sirsi Log In option. Print Release(PPL) | Job-Submission-and-Payment
Internal User Identity Provider
📘 Instructions
On the login page, fill in the credentials and select next.
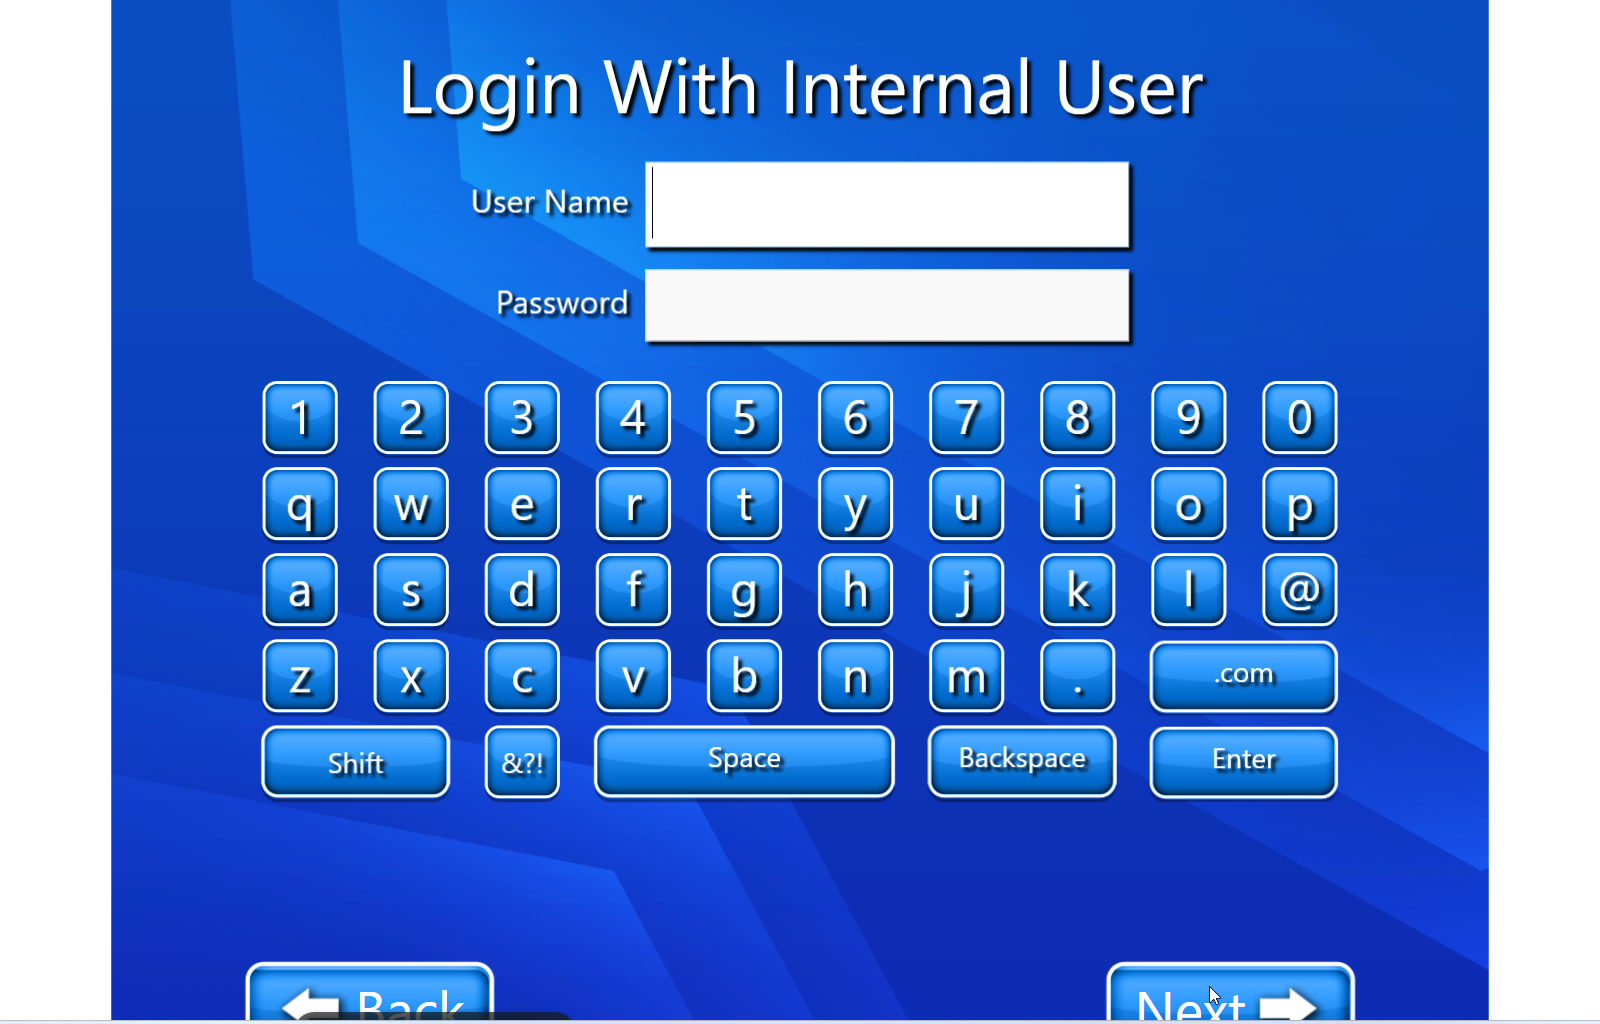
On the below Page, we can modify and apply settings for all jobs using various options

Color mode
Here we can select the color for all jobs:
Grayscale
Color
Paper Size
We have the following paper sizes:
Letter
Legal
Ledger
Tabloid
A4
A3
A2
A1
A0
Standard
Letter Small
Executive
Statement
Duplex
This shows that the job(s) will be printed One side or Two side.
Orientation
Here we can select the orientation for our print jobs,
Landscape
Portrait
Print/Re-Print
We can check list of jobs which we have to print in Print and the jobs that are already printed in Re-Print.
Delete
We can delete a particular selected job(s) using the delete button.
Refresh
We can select the Refresh button to refresh the job(s).
Edit
We can also select a particular job and apply the changes on just the selected job. After selecting the edit button, we will be directed to the below screen

Here we can modify the following settings to only the selected job:
Paper Size
We have the following paper sizes:
Letter
Legal
Ledger
Tabloid
A4
A3
A2
A1
A0
Standard
Letter Small
Executive
Statement
Number of copies
Here we can add or remove the number of copies for the selected document.
Page From
By selecting this option, we can select From which page we want to print the selected document.
Page To
By selecting this option, we can select till which page we want to print the selected document.
Orientation
Here we can select the orientation for our print job,
Landscape
Portrait
Duplex
This shows that the job will be printed One side or Two side.
Color mode
Here we can select the color for our job:
Grayscale
Color
Staple
We can choose how we want to staple the selected document. We have the following options:
None
Top Left
Top Right
Bottom Left
Bottom Right
Select the Save button to save the changes you made.
On selecting next, the job will be submitted and the below screen is displayed

Here’s a video demonstration of how we can upload a job from the portal, select it from ScanEz application and proceed towards payment with successful job submission. Here I am using the Sirsi Log In option. Print Release(PPL) | Job-Submission-and-Payment
Innovative
📘 Instructions
On the login page, fill in the BARCODE and PIN and select next.
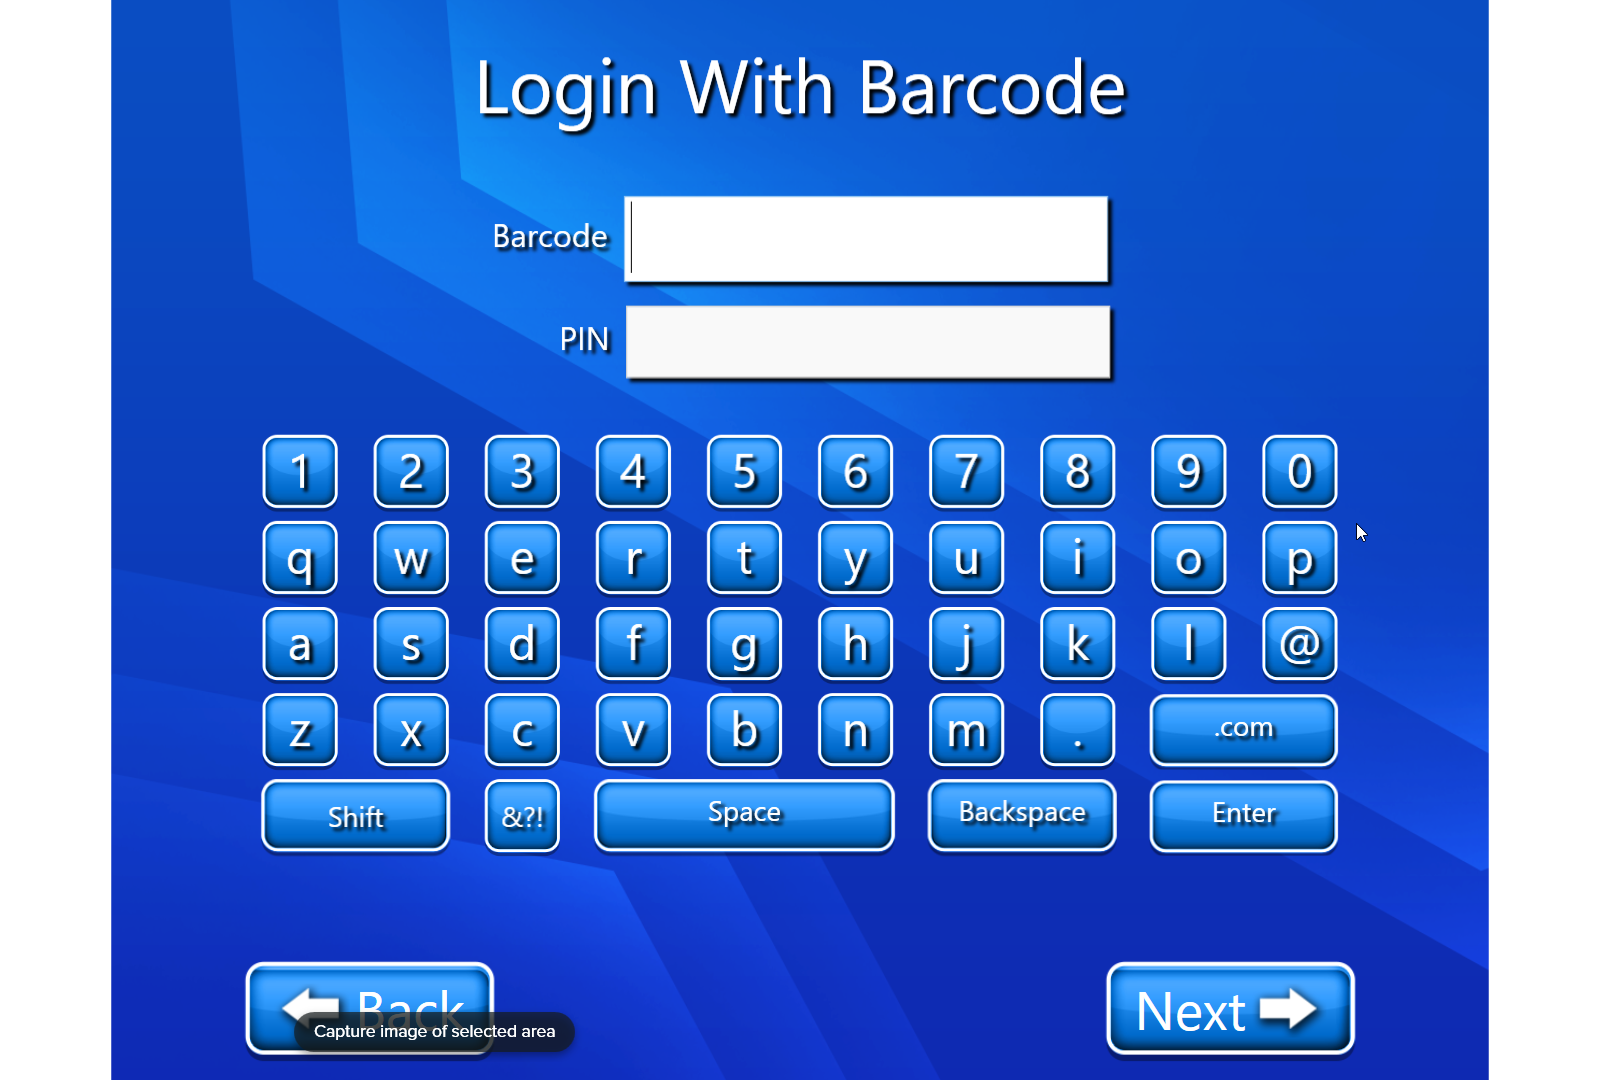
On the below Page, we can modify and apply settings for all jobs using various options

Color mode
Here we can select the color for all jobs:
Grayscale
Color
Paper Size
We have the following paper sizes:
Letter
Legal
Ledger
Tabloid
A4
A3
A2
A1
A0
Standard
Letter Small
Executive
Statement
Duplex
This shows that the job(s) will be printed One side or Two side.
Orientation
Here we can select the orientation for our print jobs,
Landscape
Portrait
Print/Re-Print
We can check list of jobs which we have to print in Print and the jobs that are already printed in Re-Print.
Delete
We can delete a particular selected job(s) using the delete button.
Refresh
We can select the Refresh button to refresh the job(s).
Edit
We can also select a particular job and apply the changes on just the selected job. After selecting the edit button, we will be directed to the below screen

Here we can modify the following settings to only the selected job:
Paper Size
We have the following paper sizes:
Letter
Legal
Ledger
Tabloid
A4
A3
A2
A1
A0
Standard
Letter Small
Executive
Statement
Number of copies
Here we can add or remove the number of copies for the selected document.
Page From
By selecting this option, we can select From which page we want to print the selected document.
Page To
By selecting this option, we can select till which page we want to print the selected document.
Orientation
Here we can select the orientation for our print job,
Landscape
Portrait
Duplex
This shows that the job will be printed One side or Two side.
Color mode
Here we can select the color for our job:
Grayscale
Color
Staple
We can choose how we want to staple the selected document. We have the following options:
None
Top Left
Top Right
Bottom Left
Bottom Right
Select the Save button to save the changes you made.
On selecting next, the job will be submitted and the below screen is displayed

Here’s a video demonstration of how we can upload a job from the portal, select it from ScanEz application and proceed towards payment with successful job submission. Here I am using the Sirsi Log In option. Print Release(PPL) | Job-Submission-and-Payment
LDAP
📘 Instructions
On the login page, fill in the BARCODE and PIN and select next.
.png?inst-v=0e59a41b-3956-4360-9f24-969a2e02f064)
On the below Page, we can modify and apply settings for all jobs using various options

Color mode
Here we can select the color for all jobs:
Grayscale
Color
Paper Size
We have the following paper sizes:
Letter
Legal
Ledger
Tabloid
A4
A3
A2
A1
A0
Standard
Letter Small
Executive
Statement
Duplex
This shows that the job(s) will be printed One side or Two side.
Orientation
Here we can select the orientation for our print jobs,
Landscape
Portrait
Print/Re-Print
We can check list of jobs which we have to print in Print and the jobs that are already printed in Re-Print.
Delete
We can delete a particular selected job(s) using the delete button.
Refresh
We can select the Refresh button to refresh the job(s).
Edit
We can also select a particular job and apply the changes on just the selected job. After selecting the edit button, we will be directed to the below screen

Here we can modify the following settings to only the selected job:
Paper Size
We have the following paper sizes:
Letter
Legal
Ledger
Tabloid
A4
A3
A2
A1
A0
Standard
Letter Small
Executive
Statement
Number of copies
Here we can add or remove the number of copies for the selected document.
Page From
By selecting this option, we can select From which page we want to print the selected document.
Page To
By selecting this option, we can select till which page we want to print the selected document.
Orientation
Here we can select the orientation for our print job,
Landscape
Portrait
Duplex
This shows that the job will be printed One side or Two side.
Color mode
Here we can select the color for our job:
Grayscale
Color
Staple
We can choose how we want to staple the selected document. We have the following options:
None
Top Left
Top Right
Bottom Left
Bottom Right
Select the Save button to save the changes you made.
On selecting next, the job will be submitted and the below screen is displayed

Here’s a video demonstration of how we can upload a job from the portal, select it from ScanEz application and proceed towards payment with successful job submission. Here I am using the Sirsi Log In option. Print Release(PPL) | Job-Submission-and-Payment
Sirsi
📘 Instructions
On the login page, fill in the BARCODE and PIN and select next.
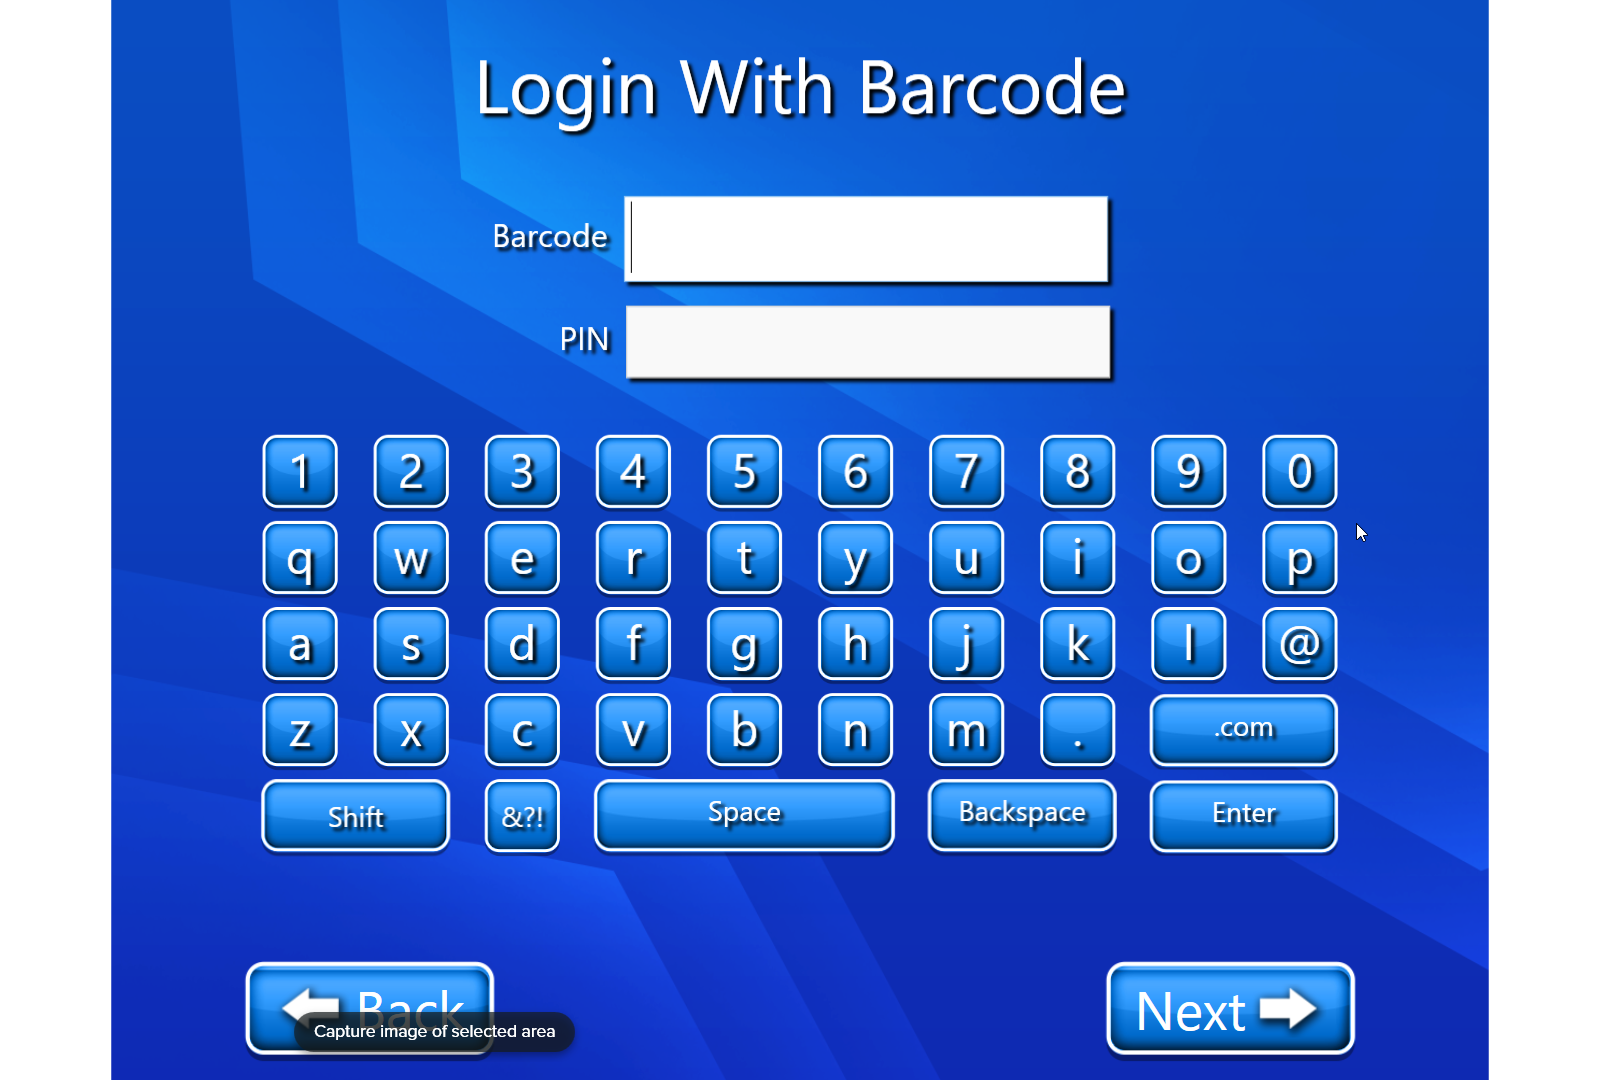
On the below Page, we can modify and apply settings for all jobs using various options

Color mode
Here we can select the color for all jobs:
Grayscale
Color
Paper Size
We have the following paper sizes:
Letter
Legal
Ledger
Tabloid
A4
A3
A2
A1
A0
Standard
Letter Small
Executive
Statement
Duplex
This shows that the job(s) will be printed One side or Two side.
Orientation
Here we can select the orientation for our print jobs,
Landscape
Portrait
Print/Re-Print
We can check list of jobs which we have to print in Print and the jobs that are already printed in Re-Print.
Delete
We can delete a particular selected job(s) using the delete button.
Refresh
We can select the Refresh button to refresh the job(s).
Edit
We can also select a particular job and apply the changes on just the selected job. After selecting the edit button, we will be directed to the below screen

Here we can modify the following settings to only the selected job:
Paper Size
We have the following paper sizes:
Letter
Legal
Ledger
Tabloid
A4
A3
A2
A1
A0
Standard
Letter Small
Executive
Statement
Number of copies
Here we can add or remove the number of copies for the selected document.
Page From
By selecting this option, we can select From which page we want to print the selected document.
Page To
By selecting this option, we can select till which page we want to print the selected document.
Orientation
Here we can select the orientation for our print job,
Landscape
Portrait
Duplex
This shows that the job will be printed One side or Two side.
Color mode
Here we can select the color for our job:
Grayscale
Color
Staple
We can choose how we want to staple the selected document. We have the following options:
None
Top Left
Top Right
Bottom Left
Bottom Right
Select the Save button to save the changes you made.
On selecting next, the job will be submitted and the below screen is displayed

Here’s a video demonstration of how we can upload a job from the portal, select it from ScanEz application and proceed towards payment with successful job submission. Here I am using the Sirsi Log In option. Print Release(PPL) | Job-Submission-and-Payment
Polaris
📘 Instructions
On the login page, fill in the BARCODE and PIN and select next.
.png?inst-v=0e59a41b-3956-4360-9f24-969a2e02f064)
On the below Page, we can modify and apply settings for all jobs using various options

Color mode
Here we can select the color for all jobs:
Grayscale
Color
Paper Size
We have the following paper sizes:
Letter
Legal
Ledger
Tabloid
A4
A3
A2
A1
A0
Standard
Letter Small
Executive
Statement
Duplex
This shows that the job(s) will be printed One side or Two side.
Orientation
Here we can select the orientation for our print jobs,
Landscape
Portrait
Print/Re-Print
We can check list of jobs which we have to print in Print and the jobs that are already printed in Re-Print.
Delete
We can delete a particular selected job(s) using the delete button.
Refresh
We can select the Refresh button to refresh the job(s).
Edit
We can also select a particular job and apply the changes on just the selected job. After selecting the edit button, we will be directed to the below screen

Here we can modify the following settings to only the selected job:
Paper Size
We have the following paper sizes:
Letter
Legal
Ledger
Tabloid
A4
A3
A2
A1
A0
Standard
Letter Small
Executive
Statement
Number of copies
Here we can add or remove the number of copies for the selected document.
Page From
By selecting this option, we can select From which page we want to print the selected document.
Page To
By selecting this option, we can select till which page we want to print the selected document.
Orientation
Here we can select the orientation for our print job,
Landscape
Portrait
Duplex
This shows that the job will be printed One side or Two side.
Color mode
Here we can select the color for our job:
Grayscale
Color
Staple
We can choose how we want to staple the selected document. We have the following options:
None
Top Left
Top Right
Bottom Left
Bottom Right
Select the Save button to save the changes you made.
On selecting next, the job will be submitted and the below screen is displayed

Here’s a video demonstration of how we can upload a job from the portal, select it from ScanEz application and proceed towards payment with successful job submission. Here I am using the Sirsi Log In option. Print Release(PPL) | Job-Submission-and-Payment
G Suite Identity Provider
📘 Instructions
A native browser will open when we select G Suite. On the Sign in page, fill in the credentials and select next.
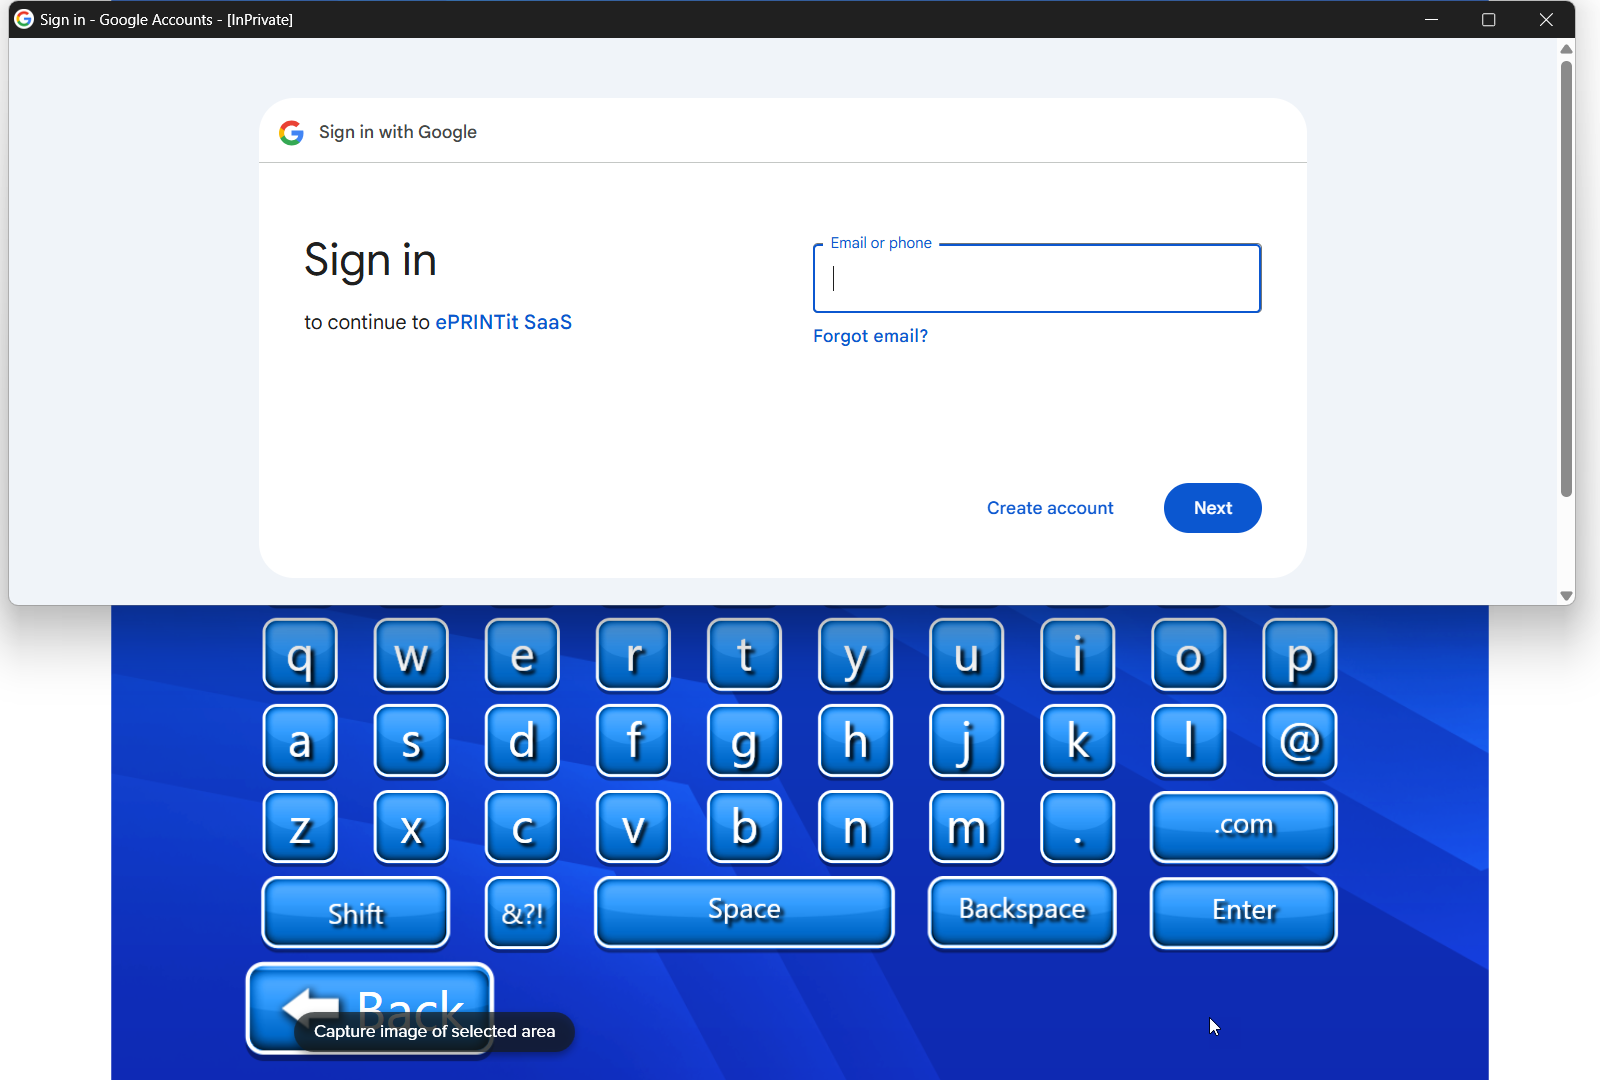
On the below Page, we can modify and apply settings for all jobs using various options

Color mode
Here we can select the color for all jobs:
Grayscale
Color
Paper Size
We have the following paper sizes:
Letter
Legal
Ledger
Tabloid
A4
A3
A2
A1
A0
Standard
Letter Small
Executive
Statement
Duplex
This shows that the job(s) will be printed One side or Two side.
Orientation
Here we can select the orientation for our print jobs,
Landscape
Portrait
Print/Re-Print
We can check list of jobs which we have to print in Print and the jobs that are already printed in Re-Print.
Delete
We can delete a particular selected job(s) using the delete button.
Refresh
We can select the Refresh button to refresh the job(s).
Edit
We can also select a particular job and apply the changes on just the selected job. After selecting the edit button, we will be directed to the below screen

Here we can modify the following settings to only the selected job:
Paper Size
We have the following paper sizes:
Letter
Legal
Ledger
Tabloid
A4
A3
A2
A1
A0
Standard
Letter Small
Executive
Statement
Number of copies
Here we can add or remove the number of copies for the selected document.
Page From
By selecting this option, we can select From which page we want to print the selected document.
Page To
By selecting this option, we can select till which page we want to print the selected document.
Orientation
Here we can select the orientation for our print job,
Landscape
Portrait
Duplex
This shows that the job will be printed One side or Two side.
Color mode
Here we can select the color for our job:
Grayscale
Color
Staple
We can choose how we want to staple the selected document. We have the following options:
None
Top Left
Top Right
Bottom Left
Bottom Right
Select the Save button to save the changes you made.
On selecting next, the job will be submitted and the below screen is displayed

Here’s a video demonstration of how we can upload a job from the portal, select it from ScanEz application and proceed towards payment with successful job submission. Here I am using the Sirsi Log In option. Print Release(PPL) | Job-Submission-and-Payment
Azure AD Identity Provider
📘 Instructions
A native browser will open when we select Azure AD. On the Sign in page, fill in the credentials and select next.
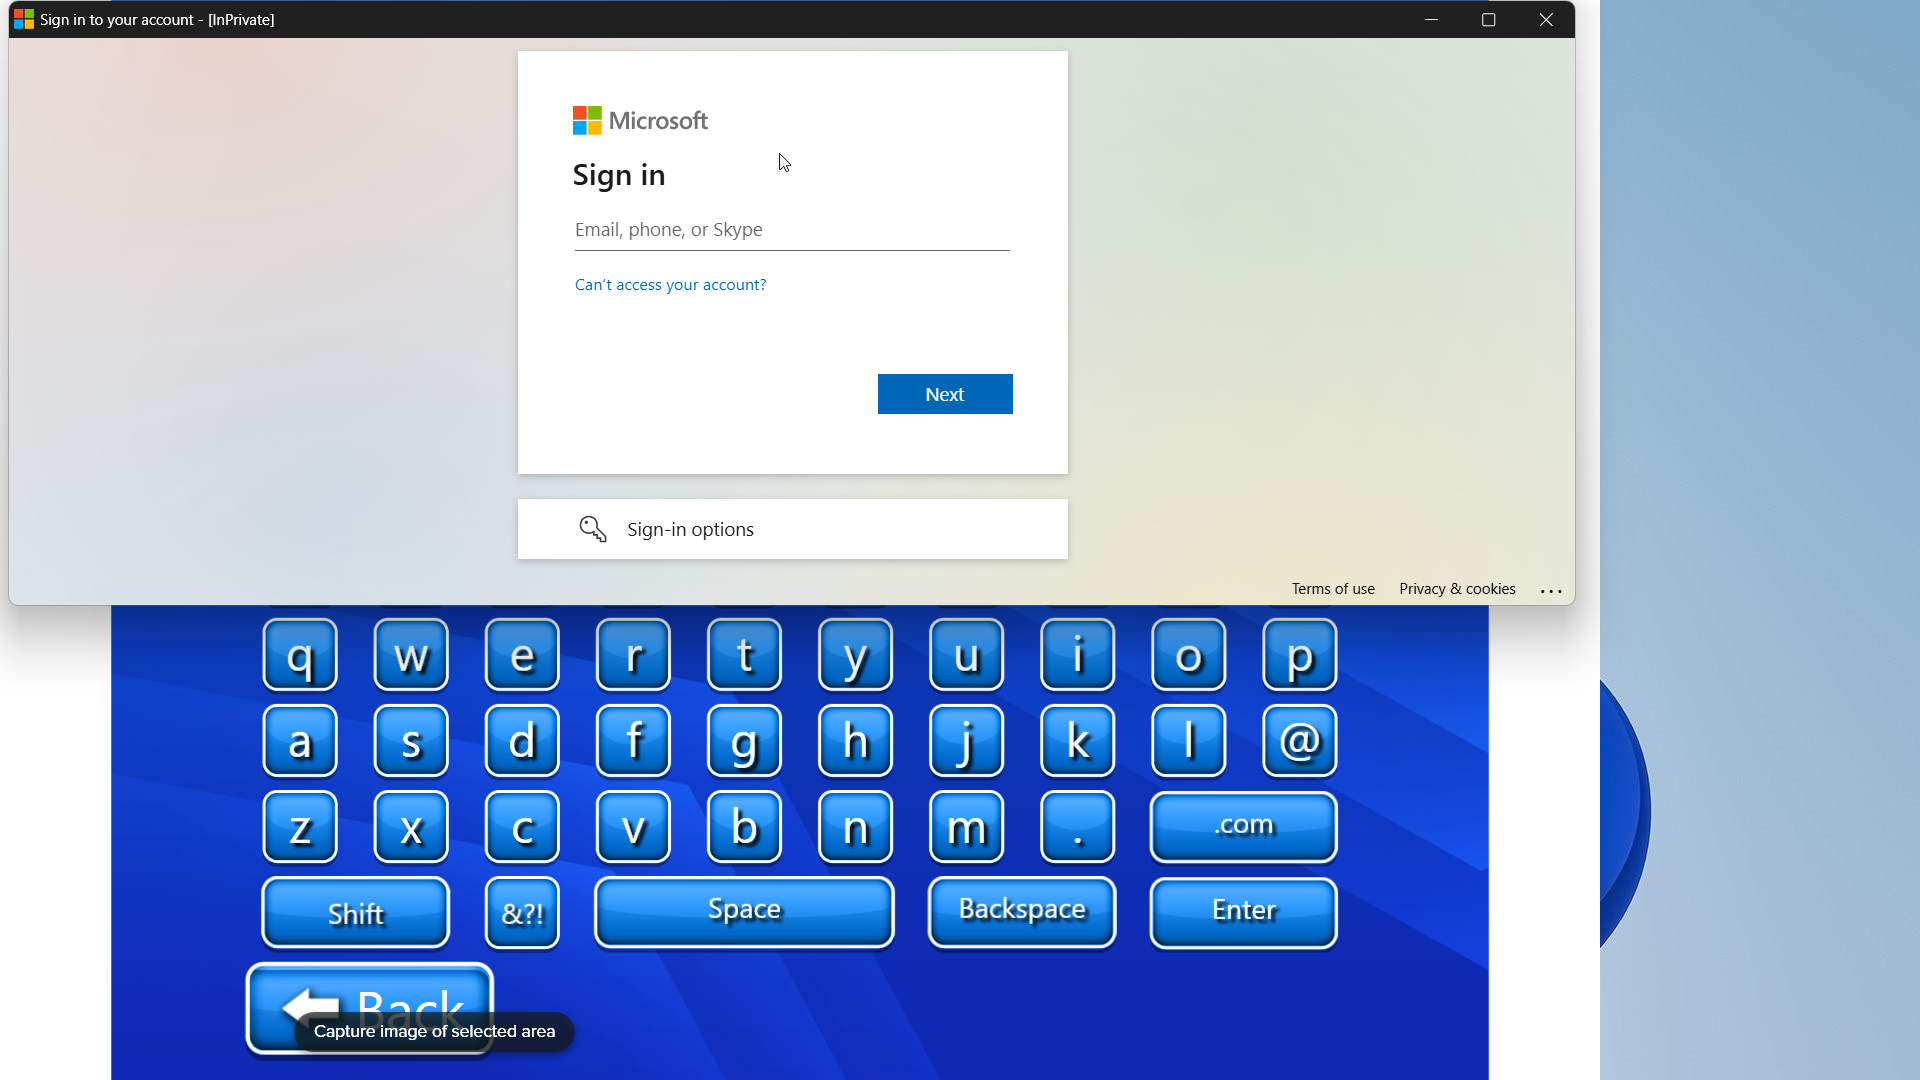
On the below Page, we can modify and apply settings for all jobs using various options

Color mode
Here we can select the color for all jobs:
Grayscale
Color
Paper Size
We have the following paper sizes:
Letter
Legal
Ledger
Tabloid
A4
A3
A2
A1
A0
Standard
Letter Small
Executive
Statement
Duplex
This shows that the job(s) will be printed One side or Two side.
Orientation
Here we can select the orientation for our print jobs,
Landscape
Portrait
Print/Re-Print
We can check list of jobs which we have to print in Print and the jobs that are already printed in Re-Print.
Delete
We can delete a particular selected job(s) using the delete button.
Refresh
We can select the Refresh button to refresh the job(s).
Edit
We can also select a particular job and apply the changes on just the selected job. After selecting the edit button, we will be directed to the below screen

Here we can modify the following settings to only the selected job:
Paper Size
We have the following paper sizes:
Letter
Legal
Ledger
Tabloid
A4
A3
A2
A1
A0
Standard
Letter Small
Executive
Statement
Number of copies
Here we can add or remove the number of copies for the selected document.
Page From
By selecting this option, we can select From which page we want to print the selected document.
Page To
By selecting this option, we can select till which page we want to print the selected document.
Orientation
Here we can select the orientation for our print job,
Landscape
Portrait
Duplex
This shows that the job will be printed One side or Two side.
Color mode
Here we can select the color for our job:
Grayscale
Color
Staple
We can choose how we want to staple the selected document. We have the following options:
None
Top Left
Top Right
Bottom Left
Bottom Right
Select the Save button to save the changes you made.
On selecting next, the job will be submitted and the below screen is displayed

Here’s a video demonstration of how we can upload a job from the portal, select it from ScanEz application and proceed towards payment with successful job submission. Here I am using the Sirsi Log In option. Print Release(PPL) | Job-Submission-and-Payment
OIDC
📘 Instructions
A native browser will open when we select OIDC. On the login page, sign in with your credentials and select continue.
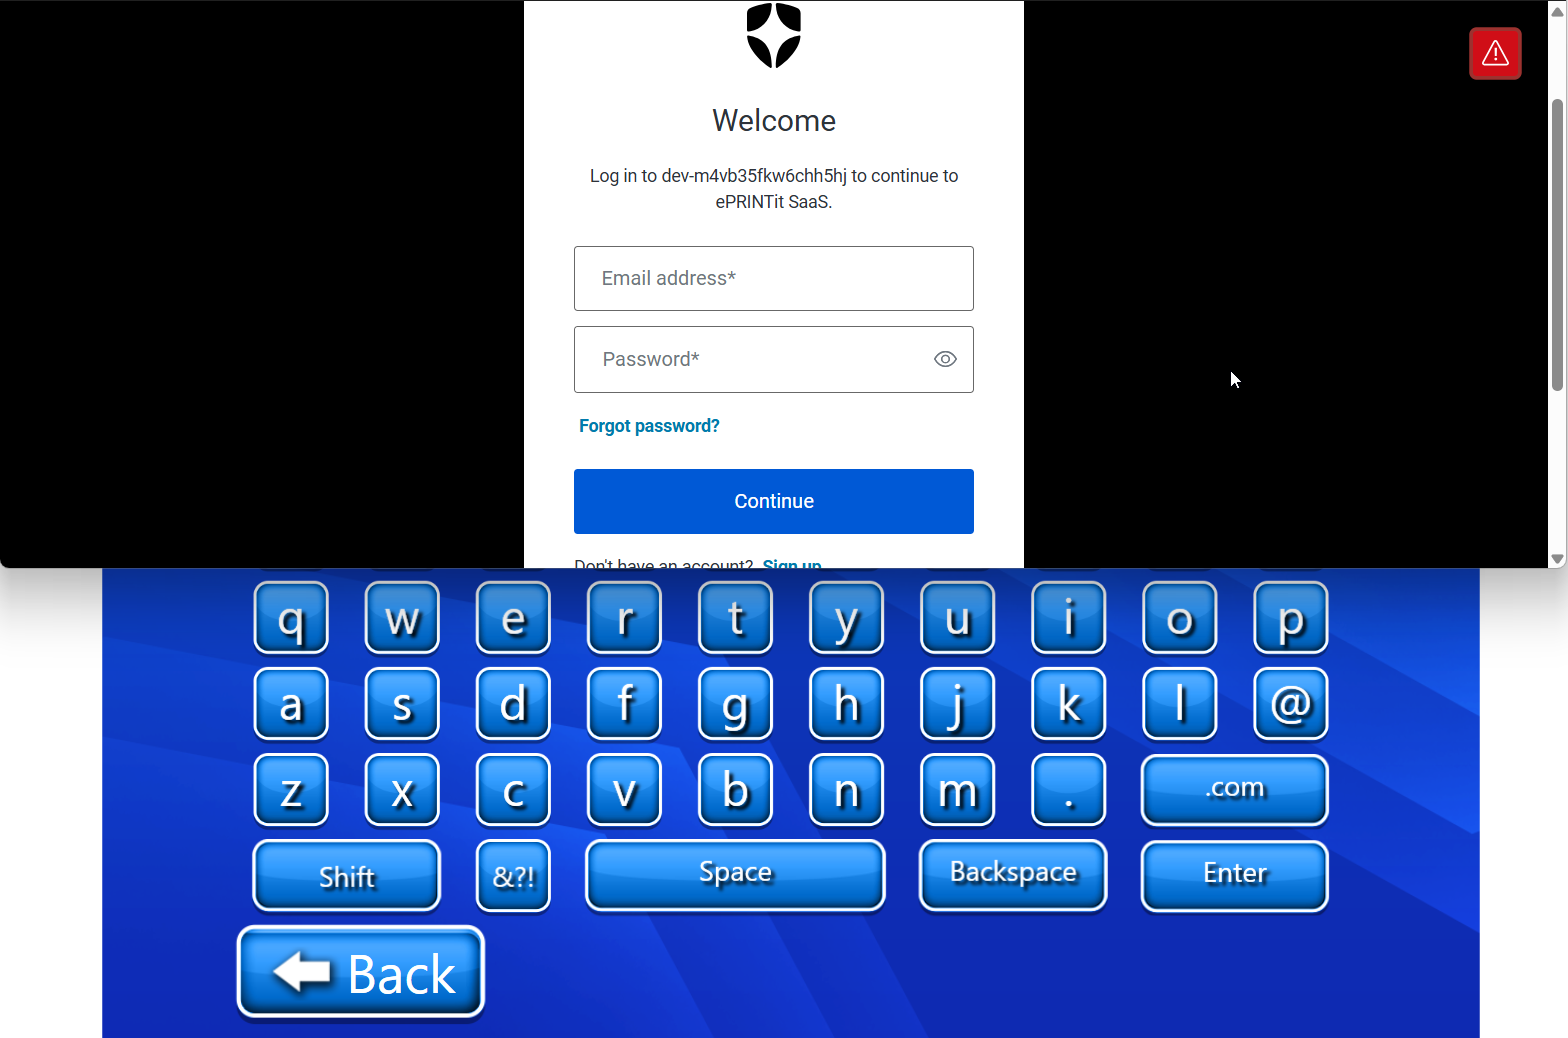
On the below Page, we can modify and apply settings for all jobs using various options

Color mode
Here we can select the color for all jobs:
Grayscale
Color
Paper Size
We have the following paper sizes:
Letter
Legal
Ledger
Tabloid
A4
A3
A2
A1
A0
Standard
Letter Small
Executive
Statement
Duplex
This shows that the job(s) will be printed One side or Two side.
Orientation
Here we can select the orientation for our print jobs,
Landscape
Portrait
Print/Re-Print
We can check list of jobs which we have to print in Print and the jobs that are already printed in Re-Print.
Delete
We can delete a particular selected job(s) using the delete button.
Refresh
We can select the Refresh button to refresh the job(s).
Edit
We can also select a particular job and apply the changes on just the selected job. After selecting the edit button, we will be directed to the below screen

Here we can modify the following settings to only the selected job:
Paper Size
We have the following paper sizes:
Letter
Legal
Ledger
Tabloid
A4
A3
A2
A1
A0
Standard
Letter Small
Executive
Statement
Number of copies
Here we can add or remove the number of copies for the selected document.
Page From
By selecting this option, we can select From which page we want to print the selected document.
Page To
By selecting this option, we can select till which page we want to print the selected document.
Orientation
Here we can select the orientation for our print job,
Landscape
Portrait
Duplex
This shows that the job will be printed One side or Two side.
Color mode
Here we can select the color for our job:
Grayscale
Color
Staple
We can choose how we want to staple the selected document. We have the following options:
None
Top Left
Top Right
Bottom Left
Bottom Right
Select the Save button to save the changes you made.
On selecting next, the job will be submitted and the below screen is displayed

Here’s a video demonstration of how we can upload a job from the portal, select it from ScanEz application and proceed towards payment with successful job submission. Here I am using the Sirsi Log In option. Print Release(PPL) | Job-Submission-and-Payment
SAML
📘 Instructions
A native browser with OKTA login will open when we select SAML. On the Sign in page, fill in your credentials and select Sign in. Complete the authentication using Okta Verify application.
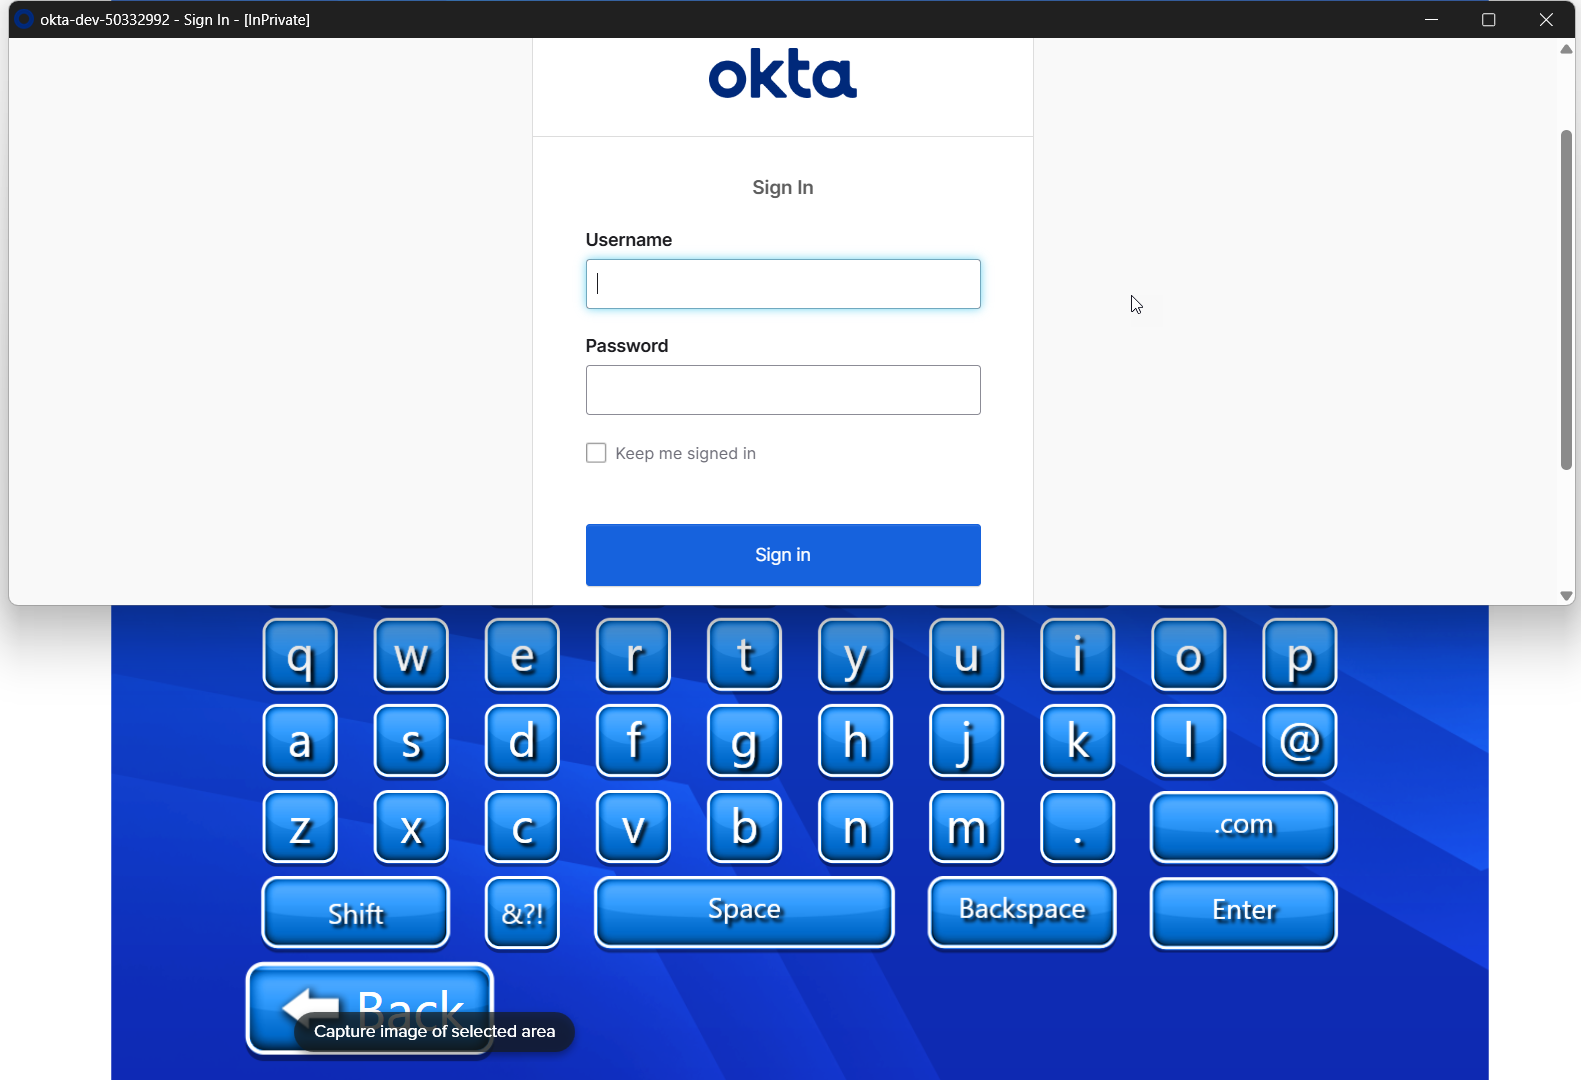
On the below Page, we can select and modify settings for all jobs using various options

Color mode
Here we can select the color for all jobs:
Grayscale
Color
Paper Size
We have the following paper sizes:
Letter
Legal
Ledger
Tabloid
A4
A3
A2
A1
A0
Standard
Letter Small
Executive
Statement
Duplex
This shows that the job(s) will be printed One side or Two side.
Orientation
Here we can select the orientation for our print jobs,
Landscape
Portrait
Print/Re-Print
We can check list of jobs which we have to print in Print and the jobs that are already printed in Re-Print.
Delete
We can delete a particular selected job(s) using the delete button.
Refresh
We can select the Refresh button to refresh the job(s).
Edit
We can also select a particular job and apply the changes on just the selected job. After selecting the edit button, we will be directed to the below screen

Here we can modify the following settings to only the selected job:
Paper Size
We have the following paper sizes:
Letter
Legal
Ledger
Tabloid
A4
A3
A2
A1
A0
Standard
Letter Small
Executive
Statement
Number of copies
Here we can add or remove the number of copies for the selected document.
Page From
By selecting this option, we can select From which page we want to print the selected document.
Page To
By selecting this option, we can select till which page we want to print the selected document.
Orientation
Here we can select the orientation for our print job,
Landscape
Portrait
Duplex
This shows that the job will be printed One side or Two side.
Color mode
Here we can select the color for our job:
Grayscale
Color
Staple
We can choose how we want to staple the selected document. We have the following options:
None
Top Left
Top Right
Bottom Left
Bottom Right
Select the Save button to save the changes you made.
On selecting next, the job will be submitted and the below screen is displayed

Job Submission and Payment
Here’s a video demonstration of how we can upload a job from the portal, select it from ScanEz application and proceed towards payment with successful job submission. Here I am using the Sirsi Log In option.
